New Ideas In Fairings, Suspensions, Preservatives And Touring
New Ideas In Fairings Suspensions Preservatives And Touring
VETTER'S WINDJAMMER SS
Although complicating the profile of one’s motorbike with a fairing isn’t the aesthetic no-no it once was, there are still a number of reservations in the minds of many would-be owners. There were in ours, at any rate.
For example: How much does a good fairing cost? How much hassle is it to mount? How does it look? How well is it made? How much storage does it offer? Most of all, how well does it work?
The logical guinea pig for these inquiries was the Honda GL1000, a long hauler that appears so often with a fairing that it looks almost naked without one. The logical fairing seemed to be Vetter’s Windjammer SS, since it’s an industry pioneer and sales pacesetter. Besides that, we liked its looks.
Our Windjammer was a deluxe model, with horns, Bosch quartz halogen headlamp, extra tall windshield with vents, striping to match the blue and gold stripes of the GL1000, even an electric cigarette lighter.
Overall finish on the fairing was outstanding. The gloss was high, there wasn’t a hint of orange peel anywhere, and the striping perfectly matched that of the bike. The windshield material, which is acrylic, was flawless.
Installation instructions are straightforward, although we did encounter a Catch 22 involving a reference to supplementary instructions pertaining specifically to the Gold Wing. This meant a little backtracking to cobble up some turn signal wiring that we’d made somewhat shorter than we should have, but no major problems. The lesson is plain: Read the instructions—all of them—all the way through before you begin loosening any screws.
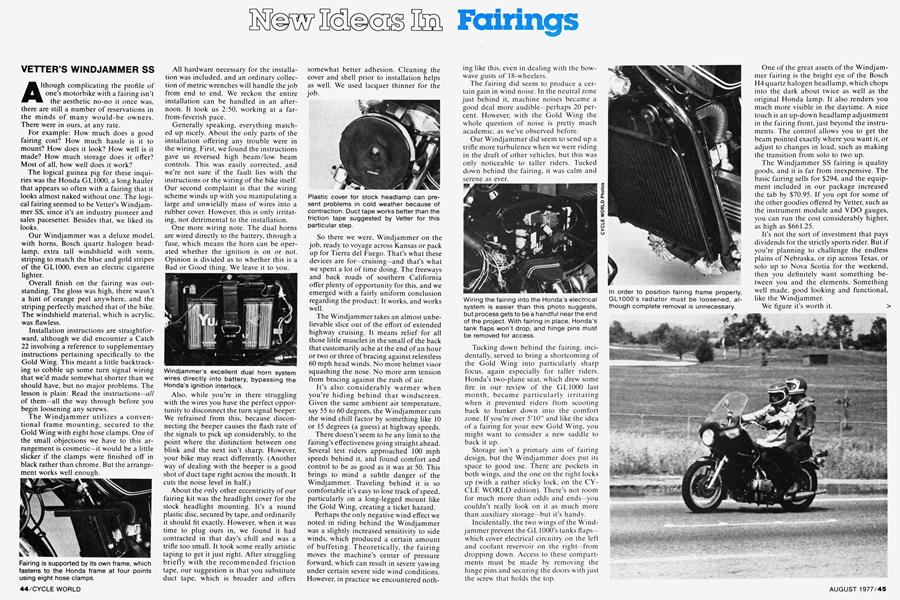
The Windjammer utilizes a conventional frame mounting, secured to the Gold Wing with eight hose clamps. One of the small objections we have to this arrangement is cosmetic—it would be a little slicker if the clamps were finished off in black rather than chrome. But the arrangement works well enough.
All hardware necessary for the installation was included, and an ordinary collection of metric wrenches will handle the job from end to end. We reckon the entire installation can be handled in an afternoon. It took us 2:50, working at a farfrom-feverish pace.
Generally speaking, everything matched up nicely. About the only parts of the installation offering any trouble were in the wiring. First, we found the instructions gave us reversed high beam/low beam controls. This was easily corrected, and we’re not sure if the fault lies with the instructions or the wiring of the bike itself. Our second complaint is that the wiring scheme winds up with you manipulating a large and unwieldly mass of wires into a rubber cover. However, this is only irritating, not detrimental to the installation.
One more wiring note. The dual horns are wired directly to the battery, through a fuse, which means the horn can be operated whether the ignition is on or not. Opinion is divided as to whether this is a Bad or Good thing. We leave it to you.
Also, while you’re in there struggling with the wires you have the perfect opportunity to disconnect the turn signal beeper. We refrained from this, because disconnecting the beeper causes the flash rate of the signals to pick up considerably, to the point where the distinction between one blink and the next isn’t sharp. However, your bike may react differently. (Another way of dealing with the beeper is a good shot of duct tape right across the mouth. It cuts the noise level in half.)
About the only other eccentricity of our fairing kit was the headlight cover for the stock headlight mounting. It’s a round plastic disc, secured by tape, and ordinarily it should fit exactly. However, when it was time to plug ours in, we found it had contracted in that day’s chill and was a trifle too small. It took some really artistic taping to get it just right. After struggling briefly with the recommended friction tape, our suggestion is that you substitute duct tape, which is broader and offers somewhat better adhesion. Cleaning the cover and shell prior to installation helps as well. We used lacquer thinner for the job.
So there we were, Windjammer on the job, ready to voyage across Kansas or pack up for Tierra del Fuego. That’s what these devices are for—cruising—and that’s what we spent a lot of time doing. The freeways and back roads of southern California offer plenty of opportunity for this, and we emerged with a fairly uniform conclusion regarding the product: It works, and works well.
The Windjammer takes an almost unbelievable slice out of the effort of extended highway cruising. It means relief for all those little muscles in the small of the back that customarily ache at the end of an hour or two or three of bracing against relentless 60 mph head winds. No more helmet visor squashing the nose. No more arm tension from bracing against the rush of air.
It’s also considerably warmer when you’re hiding behind that windscreen. Given the same ambient air temperature, say 55 to 60 degrees, the Windjammer cuts the wind chill factor by something like 10 or 15 degrees (a guess) at highway speeds.
There doesn’t seem to be any limit to the fairing’s effectiveness going straight ahead. Several test riders approached 100 mph speeds behind it, and found comfort and control to be as good as it was at 50. This brings to mind a subtle danger of the Windjammer. Traveling behind it is so comfortable it’s easy to lose track of speed, particularly on a long-legged mount like the Gold Wing, creating a ticket hazard.
Perhaps the only negative wind effect we noted in riding behind the Windjammer was a slightly increased sensitivity to side winds, which produced a certain amount of buffeting. Theoretically, the fairing moves the machine’s center of pressure forward, which can result in severe yawing under certain severe side wind conditions. However, in practice we encountered nothing like this, even in dealing with the bowwave gusts of 18-wheelers.
The fairing did seem to produce a certain gain in wind noise. In the neutral zone just behind it, machine noises became a good deal more audible—perhaps 20 percent. However, with the Gold Wing the whole question of noise is pretty much academic, as we’ve observed before.
Our Windjammer did seem to send up a trifle more turbulence when we were riding in the draft of other vehicles, but this was only noticeable to taller riders. Tucked down behind the fairing, it was calm and serene as ever.
Tucking down behind the fairing, incidentally, served to bring a shortcoming of the Gold Wing into particularly sharp focus, again especially for taller riders. Honda’s two-plane seat, which drew some fire in our review of the G L1000 last month, became particularly irritating when it prevented riders from scooting back to hunker down into the comfort zone. If you’re over 5'10" and like the idea of a fairing for your new Gold Wing, you might want to consider a new saddle to back it up.
Storage isn’t a primary aim of fairing design, but the Windjammer does put its space to good use. There are pockets in both wings, and the one on the right locks up (with a rather sticky lock, on the CYCLE WORLD edition). There’s not room for much more than odds and ends—you couldn’t really look on it as much more than auxiliary storage—but it’s handy.
Incidentally, the two wings of the Windjammer prevent the GLIOOO’s tanks flaps— which cover electrical circuitry on the left and coolant reservoir on the right—from dropping down. Access to these compartments must be made by removing the hinge pins and securing the doors with just the screw that holds the top.
One of the great assets of the Windjammer fairing is the bright eye of the Bosch H4 quartz halogen headlamp, which chops into the dark about twice as well as the original Honda lamp. It also renders you much more visible in the daytime. A nice touch is an up-down headlamp adjustment in the fairing front, just beyond the instruments. The control allows you to get the beam pointed exactly where you want it, or adjust to changes in load, such as making the transition from solo to two up.
The Windjammer SS fairing is quality goods, and it is far from inexpensive. The basic fairing sells for $294, and the equipment included in our package increased the tab by $70.95. If you opt for some of the other goodies offered by Vetter, such as the instrument module and VDO gauges, you can run the cost considerably higher, as high as $661.25.
It’s not the sort of investment that pays dividends for the strictly sports rider. But if you’re planning to challenge the endless plains of Nebraska, or zip across Texas, or solo up to Nova Scotia for the weekend, then you definitely want something between you and the elements. Something well made, good looking and functional, like the Windjammer.
We figure it’s worth it.
S&W SHOCKS FOR KAWASAKI KZ650
One example doesn’t make a good scientific demonstration but it does make a good example. CYCLE WORLD’s long-term Kawasaki KZ650 is one of the better roadsters, a powerful sports bike with superior handling. As a long-term machine the 650 gets used a lot, often by riders in the company but who are not part of the magazine’s testing staff.
One of these borrowers is a veteran touring sports rider dating back to the days when Britannia Ruled the Roads. One weekend he took off with the 650 and a friend whose bike is a big English Twin. They returned in a state of shock.
The KZ650 out-handled the purebred bike. Not just more speed and power, they expected that. But in the corners, head to head, the KZ had the edge. It would accept more lean, more bump and more power. The two swapped bikes and did some more experimentation with the same result. The KZ650 always was good, but now it was better than the mark against which handling used to be measured.
The astonished borrower had to know: What had we done?
Fitted a pair of S&W shocks and springs.
The idea came shortly after Kawasaki took a trio of KZ650s to Daytona and collected a flock of speed records. The record machines were basically stock, but they did have some suspension changes. Kawasaki had the work done by S&W, which is an indication of that firm’s reputation. Seemed sensible to follow the factory’s lead.
S&W was happy to help. For the Daytona banking, a motorcycle needs more stiffness than would be acceptable on a flat surface, or for a road-legal bike in daily use. Rather than go the full race route, S&W’s engineers recommended their H525-3 shock, a gas/oil unit with medium damping and a free length of 13 in. so ride height wouldn’t change. Springs are progressive, rated at 95/125 in./lb.
Installation was simple once the installers accepted the need to remove the mufflers so the bolts on the swing arm brackets would pull clear. We were prepared to do some trimming, but none was required. Unbolt the bolt, bolt on the new.
S&W’s medium rating seems fairly accurate. The original factory shock had light damping when new and lost some of that after a few thousand miles. Stock spring rate was 86 in./lb., and the KZ650 had a soft ride when ridden solo and needed at least two clicks pre-load for twoup touring.
The damping curve of the S&W shock is fairly soft on light impacts, so a ride on the highway is as comfortable as before. The new springs have a higher intial rate, but while this should in theory give a bit more bounce, none of the test riders noticed any difference at low speeds.
The difference does show on a surprise bump, where the damping and springs both work to absorb the blow. It’s nearly impossible now to bottom the rear suspension unless you vault a curb or something, which we haven’t done. Touring is done with the springs set at minimum pre-load, one person or two.
The payoff comes with fast curves. The additional firmness and damping keep the wheel in constant contact with the road, even over the ripples which sometimes develop on turns subject to summer heat. The KZ can now be flopped from one side to the other with no wobbler and the back of the chassis doesn’t come up so quickly under full braking.
Shock absorbers: H525-3; $65.84 pr. Springs: SP129525-10; $21.68 pr.
S&W Engineered Products 2617 W. Woodland, Anaheim, Calif 92801
S&W AIR SHOCKS WILL BANISH THE BOTTOMING BLUES
One of the few recurrent complaints we encounter from Honda GL1000 riders falls into the general area of suspension.
The front offers too much initial friction, making it an indifferent ally against the unending assaults of expansion joints, small bumps and uneven road surfaces, the implacable foes of the long distance rider.
At the rear, the problem is one of spring rates. With its limited suspension travel (3.4 in.), the Gold Wing’s compromise rear springs seek to gamble a soft freeway ride against the possibility of occasionally bottoming the suspension. Judging by our mail and staff experience with the Wing, we’d have to say this isn’t the sort of gamble any professional would stake his rent on.
We tackled the front end first, installing fork springs with a slightly softer primary rate than the original equipment. The S&W springs rate at 35/65, compared to the stock 47/66. To prevent bottoming and front-end dive under braking, the secondary rate of the S&W springs comes into play sooner than on stock units.
Results were indifferent but not unexpected. The softer initial rate produced a very slight improvement in the Gold Wing’s front-end stiffness, but the basic problem is inherent in the fork design, not the spring rates. (See this month’s “Service” column for details.)
The rear end problem seemed custommade for the pair of S&W standard air shocks we’ve been itching to bolt up. With its basic weakness magnified by the great stacks of trappings, gear and people it is regularly required to tote, the Gold Wing really needs some sort of variable support at the stern, with more flexibility than is normally offered in an adjustable shock/ dual-rate spring setup.
The S&Ws are as easy as conventional shock absorbers to install. The job takes a little longer, because there’s a bit of pneumatic plumbing to route and a valve to locate, but the opportunity to do a little engineering of your own is worth the 15 minutes or so the extra steps require. Even so, the job shouldn’t take you more than about 45 minutes, and you won’t need any special tools, other than a drill, to handle the job.
The S&W plan entails drilling a number of holes, one of 5/16-in. for the pressure valve, and several of '/4-in. for mounting the retainer clips provided by S&W for routing the tubing from shocks to valve. Drilling into the motorcycle’s frame, of course, is out. S&W suggests mounting the valve under the seat, at the handle bars, or on the license plate bracket.
We disliked the idea of doing any drilling, and came up with a tube routing and valve mount position that avoided putting any new holes in the Gold Wing. And even though we liked the idea of mounting the valve in some out-of-sight location, such as under the seat, we were limited by the G L1000 seat, which bolts down, making access to the valve about as handy as shoes that fasten with glue.
However, after a bit of scouting we found a nice spot on the right side of the bike between the gas tank and frame. The tee valve snugged in very nicely, positioned by the nylon hex nuts that secure the tubing. The whole thing required only a couple of cable ties to hold it in place. We also recommend the cable ties for tube routing purposes, to avoid the drilling required by the S&W nylon retainer clips.
continued on page 69
continued from page 47
The arrangement looks very sanitary, and hides behind the right side cover, which will reduce the temptation of the idle curious to let the air out of your suspension.
This last could be a particularly irritating problem if you’re far from a service station, and it’s a nuisance even at the best of times since getting the right amount of air into the system is tricky at best. S&W maintains that an ordinary tire gauge is adequate for charging the system to just the right psi level. However, in practice it takes a quick, sure hand, since it takes such a tiny volume of air to pressurize the shocks. Hold the gauge against the valve core an instant too long and the rear end of the bike sags down in total defeat. (Be sure you have it on the center stand for this procedure, incidentally, or it could easily topple over, which with a Gold Wing means calling AAA.)
A sophisticated pressure gauge with a good, tight bleeder valve will solve this problem, although items such as this are expensive and unhandy to carry around.
However, if pressurizing the S&Ws is tricky, it also serves the manufacturer as a sort of psychological plus. The idea of these shocks is that you can tune them to suit your needs exactly, and it’s reasonable to assume that owners will want to fiddle with them past all need, like a guy with a new color TV. That was the effect within casa CYCLE WORLD, and we think it likely to be general. Obviously 32 psi isn’t going to do the job when you want 33—or maybe we should make it 34, for that set of fast sweepers just south of Laguna Beach.
The big question: Do they work? Yes. Although various staff' members are still experimenting with personal formulas, no one has bottomed the rear suspension since the S&W installation. S&W recommends 30 to 40 lb. of preload to start, and this seemed to do the job for most riders, great and small. However, too much pressure makes S&W's cure for soft springs worse than the disease. At 50 psi, small bumps sock the rider solidly. In fact. 50 was a trifle stiff even for two riders.
With an upper limit of 90 psi. this means that even a full-dress Wing—complete with two passengers, fairing, panniers and assorted baggage—will never exceed the limits of its suspension.
The S&W air shocks sell for $95.90 a pair, the fork springs for $19.95. They are far from being the least expensive shocks around, but for this job the S&Ws—or a comparable product—seem to be what’s required.
MEGUIAR CYCLE CARE
This is an evaluation by implication and indirect evidence.
Meguiar is a respected name in automotive waxes, polishes and cleaners for plexiglass. The company is expanding into the motorcycle field, so one day one of its people came to visit our office and asked if we’d like to try the new line of motorcycle cleaner, wax and vinyl dressing. We said we would and the representative left a set of bottles of the stuff.
The bottles went off to have their pictures taken. Afterward, nobody seemed to know where the stuff had got to. Awkward, but we telephoned Meguiar and explained that the product had apparently been so attractive that somebody passing by had picked up the stuff and run.
The company sent another batch. This time the bottles stayed around the shop long enough for the Editor to dress out his own bike—it never looked better—for pictures. Then the Meguiar material disappeared again.
So. Meguiar is now selling three types of preservative: a cleaner and wax for painted surfaces, metal, and chrome plate. It’s supposed to clean and protect in one swipe, to remove bugs, tar and grease. Then comes a polish for magnesium and aluminum, claimed to remove oxidation with minimum effort. The vinyl dressing is for vinyl and rubber parts like tires, seats, grips, etc., and is supposed to restore color and protect against cracking and fading.
Our first-hand experience is, as explained, limited. All three products appear to do the intended jobs. The elves who come in at night and do our work are taking their pay in Meguiar products, which would indicate that people who have experienced Meguiar preservatives come back for more. That’s about as convincing an endorsement as a product can get.
Meguiar products are being sold through the major parts and discount chains, priced at $2.95 for the cleaner/wax, $3.25 for the polish and $3.20 for the vinyl dressing.
Don’t let the bottles out of your sight.
MAG-MAP
Road or trail maps are pretty much required when you’re riding in new country. Maps are easy to find and (except for some of us) maps are easy to interpret. Their usual drawback is just that reading a map while riding is tricky, not to say dangerous.
Here’s the solution. The Mag-Map is a clear plastic envelope. There’s a zipper on the side and four strips of magnetized metal on the bottom surface. You tuck your folded map inside, zip the thing closed and place the envelope on the fuel tank, always assuming your bike has a metal tank.
You then have a map in front of you, held in place and easy to see. Handy thing to have. We’ve not actually used ours at more than legal speeds, but it stayed in place at 55 mph and the manufacturer says it’s been tested to 100 mph.
Obviously it will hold any map you can fold into the holder, (approx. 5x9 in.) and can be swapped from tank to tank. Only maintenance recommended is gently pulling the holder loose and cleaning the tank surface every other month. Only flaw we’ve found is that the shape of the holder doesn’t match the shape of the average highway map when folded in the usual way, which means you must refold all the maps now living beneath your seat or in your saddlebags.
Mag-Map is distributed by Wheelsport, P.O. Box 4608, Portland, Ore. 97208. The firm says Mag-Map is stocked by motorcycle stores and if the store doesn’t have them, they can get them if asked. Retail price is $3.95.