Tuning Forks
TUNING FORKS
How to Get the Most from Leading-Axle and Straight-Leg Forks
Len Vucci
When primitive man became fatigued from dragging heavy objects over rough terrain, he invented the wheel.
When motocross man became fatigued from riding heavy objects over rough terrain, he invented the long-travel fork, the air-suspension fork, and (re-invented, actually) the leading axle fork.
The newest and best in front suspension technology will never bring a revolution (pun intended) equal to that caused by the wheel. But these design refinements have gained acceptance by virtually all offroaders and many pavement riders as well.
Once all these marvels arrived, problems arose. The new forks are much better than the older versions, especially in the area of tuning. Now that the works racers and privateers and Sunday cowtrailers can adjust forks to suit the conditions of the day, all the above people are faced with either doing the tuning or letting most of the potential improvement go to waste.
The flexibility of the new-generation forks, of whatever type, warrants a serious look at general fork tuning practice.
STRAIGHT VS OFFSET
Just as there are design differences between various straight-leg forks, an analysis of several offset-axle forks will show marked internal differences. But such details are not at issue here, and they are best set aside for the moment. Instead, let’s compare a hypothetical straight-leg fork to an offset-axle fork having an otherwise comparable design.
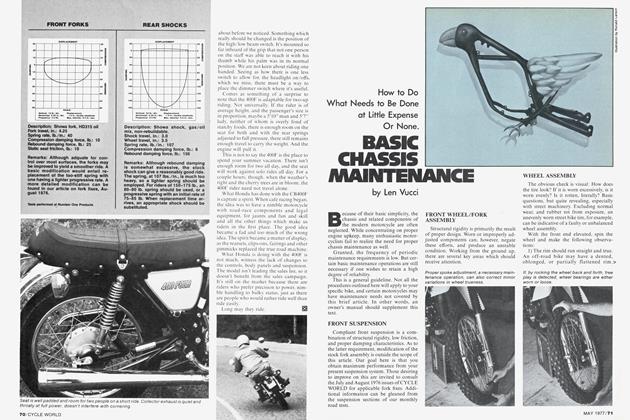
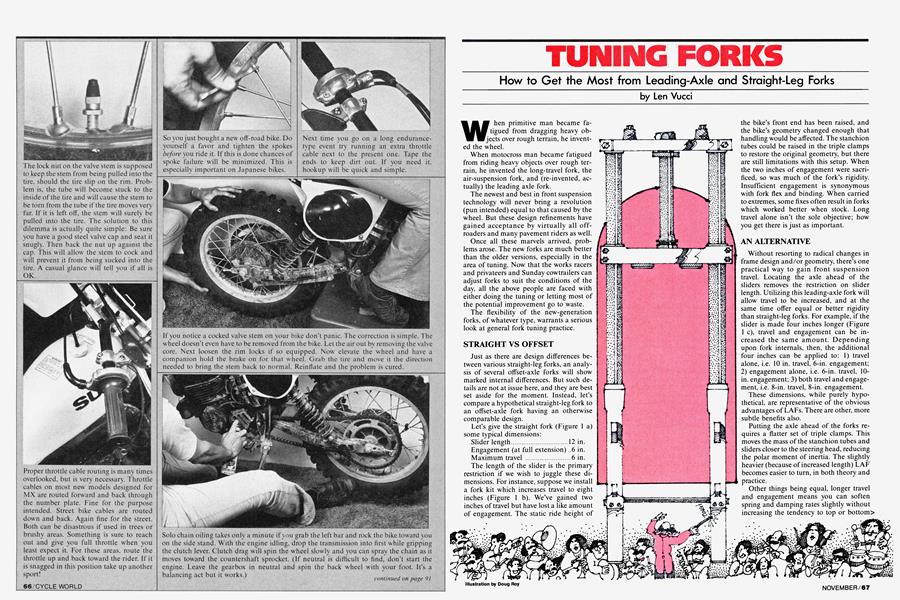
Let’s give the straight fork (Figure 1 a) some typical dimensions:
The length of the slider is the primary restriction if we wish to juggle these dimensions. For instance, suppose we install a fork kit which increases travel to eight inches (Figure 1 b). We’ve gained two inches of travel but have lost a like amount of engagement. The static ride height of
the bike’s front end has been raised, and the bike’s geometry changed enough that handling would be affected. The stanchion tubes could be raised in the triple clamps to restore the original geometry, but there are still limitations with this setup. When the two inches of engagement were sacrificed, so was much of the fork’s rigidity. Insufficient engagement is synonymous with fork flex and binding. When carried to extremes, some fixes often result in forks which worked better when stock. Long travel alone isn’t the sole objective; how you get there is just as important.
AN ALTERNATIVE
Without resorting to radical changes in frame design and/or geometry, there’s one practical way to gain front suspension travel. Locating the axle ahead of the sliders removes the restriction on slider length. Utilizing this leading-axle fork will allow travel to be increased, and at the same time offer equal or better rigidity than straight-leg forks. For example, if the slider is made four inches longer (Figure 1 c), travel and engagement can be increased the same amount. Depending upon fork internals, then, the additional four inches can be applied to: 1) travel alone, i.e. 10 in. travel, 6-in. engagement;
2) engagement alone, i.e. 6-in. travel, 10in. engagement; 3) both travel and engagement, i.e. 8-in. travel, 8-in. engagement.
These dimensions, while purely hypothetical, are representative of the obvious advantages of LAFs. There are other, more subtle benefits also.
Putting the axle ahead of the forks requires a flatter set of triple clamps. This moves the mass of the stanchion tubes and sliders closer to the steering head, reducing the polar moment of inertia. The slightly heavier (because of increased length) LAF becomes easier to turn, in both theory and practice.
Other things being equal, longer travel and engagement means you can soften spring and damping rates slightly without increasing the tendency to top or bottom> the suspension. Of course, there will always be those iron men who will bottom or break anything you put on their bikes. But they, even more than most, benefit from longer travel suspension.
The increased volume of longer tubes and sliders enables LAFs to be rider-tuned to a much greater degree. Improperly adjusted LAFs, however, manifest their problems even more so. Straight or offset, any fork will respond to the treatment to be described here.
THE VARIABLES
Contrary to popular belief, the internals of straight and offset forks differ little, if at all. Both types of forks are operationally identical.
Springing is either mechanical (coils), pneumatic (compressed air or nitrogen), or a combination of both.
Damping is accomplished by forcing a medium (oil) through a system of valves and orifices, converting mechanical energy to heat energy which is then dissipated.
Eliminating various friction losses because of seals and the like, there are three basic variables with which you will be concerned: oil viscosity, oil volume, and air pressure. These variables interact to produce overall fork action, but can be individually controlled to tailor fork performance to suit virtually any application or personal preference.
THE KEY TO SUCCESS
“Familiarity breeds contempt.” If ever an aphorism does not apply to the workings of the modern motorcycle, this is it. The only way (other than by sheer luck) you can set up your bike properly is to first know it. You must develop a rapport with your machine, making it an extension of yourself. Once you are totally familiar with the bike’s handling characteristics, you can apply this simple tuning methodology.
If you don’t know your motorcycle, the end result will be a product of guesswork and nothing more.
In general, the manufacturers’ recommendations on oil viscosity, volume and air pressure should be used as an initial starting point. If someone with experience tuning the model you own has some hardwon advice, fine. Either way, there’s one stipulation: Know exactly the air or gas pressure, the oil volume, and oil viscosity. Be sure both legs are set up identically. You must have a reference point upon which future changes can be based.
START HERE
We’ll use the Suzuki RM250’s Kayaba forks as an example in setting up this reference point. The actual figures will differ for other forks, but the procedure will be identical.
As cited in the Suzuki owners’ manual, there are two methods which can be used to give the proper oil volume. The first involves removing the fork legs, draining the oil, and refilling with a certain quantity of oil. While this method is certainly valid, it is not recommended for several reasons:
1 ) You can’t be sure you’ve removed all the oil (or even an equal amount from each leg) without totally disassembling and cleaning the forks. 2) Varying the oil volume would necessitate use of some sort of graduated container, increasing the likelihood of error. 3) Changing oil viscosity would require the hassle of step 1, and then some. Imagine field-stripping your forks between motos! 4) It is needless work.
That method disposed of, let’s try the other. First, remove the fork drain plugs and pump out the existing oil (unless it’s fresh, and you are sure of its viscosity). Stroke the forks vigorously, allow 10 minutes or so for oil to gravitate dowmward, then pump again. Repeat once or twice. Most of the original oil will have been evacuated. Replace the drain plugs, then prop the bike with the front wheel elevated.
Remove the fork caps—mark one to avoid switching them—and springs, and fill each leg with the manufacturer’s recommended amount of oil. Work the front wheel up and down until the fork oil is bubble-free, indicating all the air has been purged from the slider.
Remove the prop from under the bike and, with both w heels on the ground, allow the forks to compress completely. You will be able to see the oil level in each fork tube easily, as it should be roughly six inches or so from the top. The oil levels should be identical when measured from the top of the stanchion tubes. If not, remove enough oil from the excessively full tube to equalize the levels.
By following this procedure you will have a basic reference point from which you can work. For the RM250C’s forks, this corresponded to 9.2 oz. of oil per leg, or a measured level of 139mm. The oil quantity/level will differ for other fork types, but the important point is that a reference is established. As a general guideline, if you cannot locate the proper oil quantity recommendations, set the levels at 125-150mm.
Once the basic levels are set, reassemble the forks, making sure the left and right caps are replaced in their original positions. If they’re swapped, you’ll either have to rotate the stanchion tubes or switch the caps back to gain access to the air valves.
The final baseline step is pressurization of the forks. Because of the small air volume, a hand pump works just as well as a tank, but you will also need a good quality bleed-down gauge. To avoid false readings, prop the bike so the forks are fully extended and the front wheel is off the ground. The weight of the bike’s front end would otherwise cause a higher-thanactual reading.
Standard setting for the RM250 is 20 psi. We felt 15 psi was a more realistic starting point, so that’s where we set it. Regardless of your initial setting, keep the pressure in the fork legs as equal as possible.
Before field-tuning the forks, write down your baseline settings—oil viscosity, oil level, and air pressure—for reference.
TUNING APPROACHES
Tuning your forks is simply a matter of finding the combination which you feel works best. It will vary slightly, depending upon terrain, but for most will be consistent with individual riding styles.
There are two basic approaches to fork setups. If you’re thoroughly familiar with its mechanical operation, you’ll know where the fork is right, where it’s wrong, and how to correct for its deficiencies. That kind of familiarity comes only with time and experience.
A more practical approach is the systematic trial and error method. From the basic reference settings, changes are made and handling reactions noted. If enough combinations are tried and recorded, you will have a series of setups which will be indicative of the characteristics of your forks. To change the fork action, you merely check your records and set the fork up accordingly.
FIELD TUNING
Ride the bike with the basic fork setting. How does it act? Generally too stiff? Too soft? OK for the first half of travel, but hard as rock from then on? Does it bottom? Does it top?
You should be able to answer these questions to your own satisfaction. When you feel you can, you’re ready to experiment with varying the fork settings.
AIR PRESSURE
Changing the air pressure has essentially the same effect as varying the rate of the fork springs. Less pressure gives a softer rate, and a softer ride. More pressure raises the rate, and gives a firmer ride.
Changing the air pressure affects the forks throughout their whole stroke. If you are bottoming the forks prematurely, boost the pressure slightly. If the increased pressure causes the forks to top out, this is not the solution.
Likewise, if the forks are topping, and by reducing the air pressure you just make them bottom out, a pressure change alone is not the answer. >
OIL LEVEL
A change in oil level can be used to tailor the progressive nature of the coil/air spring combination.
With the minimum amount of oil, the effective spring rate will increase slightly as the forks are compressed. With more oil, this increase happens sooner and reaches a higher value.
The overall ride will not be affected by changing oil level. What will be affected is the stiffness of the forks when they are compressed.
A few words of caution about oil level are in order. Insufficient oil will cause a loss of damping as the forks extend. A quick check is to view the oil level with the springs removed and the wheel fully extended. There should be a half-inch or more oil covering the damper rods.
Too much oil, on the other hand, will not affect damping. Instead, it will increase the effective spring rate of the forks to the point where travel will be substantially reduced. If the forks feel as though they’re bottoming, yet don't seem to have full travel, check for excessive oil volume.
OIL VISCOSITY
A change of oil viscosity will affect the damping rates of the forks throughout the whole range of travel. The effects of damping rates and spring rates are often hard to differentiate, but there is a basic key. A change in oil viscosity, hence a change in damping rates, will affect the overall action of the forks.
If fork action is vague or soft, and/or prone to both topping and bottoming, try heavier fork oil. If the forks are generally harsh and stiff, try using lighter oil. Your forearms should feel the difference.
THREE IN ONE
Each of these three variables can be easily understood by itself, but interaction can make sorting out causes and effects difficult.
For each of the general symptoms there are one or more potential cures. Make only one change at a time, noting its effects, to avoid compounding the handling problem. While a single step might suffice, you may have to make two or more successive changes to arrive at the desired state of tune. Again, the key word is systematic.
THE LAST LAF
Motorcycle suspension has come a long way in the past decade but like other technological advances, the improvements must be utilized properly before their true worth can be realized. We've presented merely the basics here. With experience and experimentation, the owners of straight-leg and FAF-equipped motorcycles can truly derive the most from their mounts. [§]