Triler Wiring Made Simple
TRILER WIRING MADE SIMPLE
The Easy Way and the Right Way Are One and the Same
Len Vucci
Seems most of us, at one time or another, have undergone a neartraumatic experience when attempting to wire the light on a trailer, evidenced by the use of vile and explosive language, and followed by fits of extreme depression. The symptoms may be recurrent, and are often triggered by an apparition of flashing red lights in one's rear-view mirror.
Relief can be had by simple excision of the offending tow. Unfortunately, this procedure should be restricted to periods of inclement weather, and is temporary at best. The real cure lies in education, and its application thereafter.
BASIC PROCEDURES WIRE FINDING
Perhaps the most difficult trailer wiring task is locating the proper wires on your tow rig. Common sense dictates you simply look to the areas directly behind the taillights. In most cases this is the appropriate method, and the wires will usually be seen after loosening panel or cover. Sometimes the wires can be found by looking under the rear of the vehicle, as with some pickups and other trucks. In any case, you’re on your own until you find your wires, then we’ll show you what to do with them.
WIRE IDENTIFICATION, VEHICLE
We’ll start with the left taillight. Most cars will have a single light assembly on each side which may contain several bulbs. Turn on both the lights and the left turn signal. You should see at least one bulb which performs both functions. (If your car is equipped with sequential turn signals, you can use any bulb, although the #2 bulb will probably look best.)
Using one of the test devices listed in the photos, ground one lead to the car’s chassis (bumper, sheet metal, bolts, etc.). Pick one of the selected bulb’s wires, and insert a common pin through the center of the wire. Connect the other lead of the test device to the pin.
If you get a steady indication (voltage reading, lit test lamp, buzz, or whatever), you have probably found the taillight lead. Turn everything else off, then turn the car’s lights on and off. If your tester responds likewise, mark the wire and you’re onethird of the way there.
Flip the left turn signal back on, and by the pin-stick-and-test method, locate that wire and mark it.
Move over to the right taillight, and, in the same manner, locate the right turn signal lead.
CONNECTOR WIRING, VEHICLE
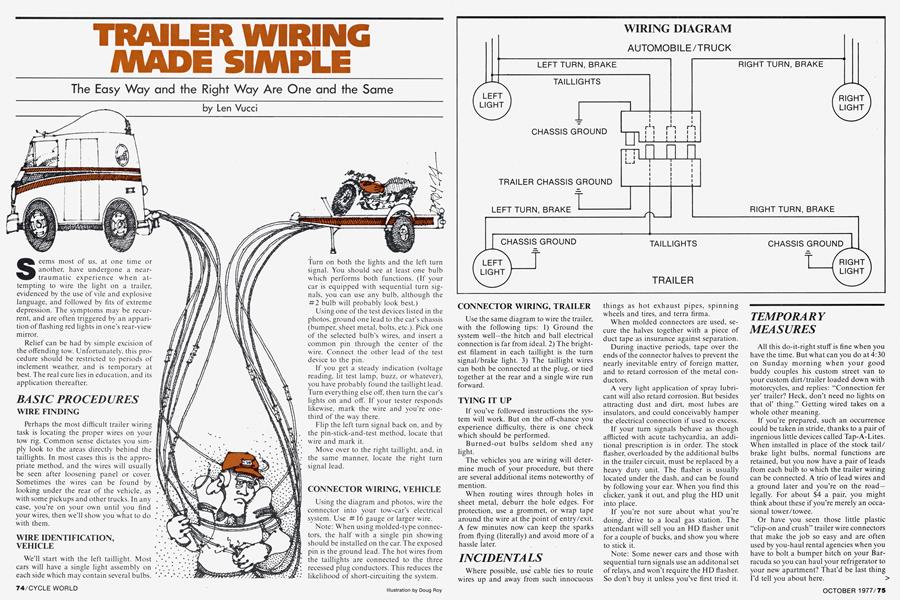
Using the diagram and photos, wire the connector into your tow-car’s electrical system. Use # 16 gauge or larger wire.
Note: When using molded-type connectors, the half with a single pin showing should be installed on the car. The exposed pin is the ground lead. The hot wires from the taillights are connected to the three recessed plug conductors. This reduces the likelihood of short-circuiting the system.
CONNECTOR WIRING, TRAILER
Use the same diagram to wire the trailer, with the following tips: 1) Ground the system well—the hitch and ball electrical connection is far from ideal. 2) The brightest filament in each taillight is the turn signal/brake light. 3) The taillight wires can both be connected at the plug, or tied together at the rear and a single wire run forward.
TYING IT UP
If you’ve followed instructions the system will work. But on the off-chance you experience difficulty, there is one check which should be performed.
Burned-out bulbs seldom shed any light.
The vehicles you are wiring will determine much of your procedure, but there are several additional items noteworthy of mention.
When routing wires through holes in sheet metal, deburr the hole edges. For protection, use a grommet, or wrap tape around the wire at the point of entry/exit. A few minutes now can keep the sparks from flying (literally) and avoid more of a hassle later.
INCIDENTALS
Where possible, use cable ties to route wires up and away from such innocuous things as hot exhaust pipes, spinning wheels and tires, and terra firma.
When molded connectors are used, secure the halves together with a piece of duct tape as insurance against separation.
During inactive periods, tape over the ends of the connector halves to prevent the nearly inevitable entry of foreign matter, and to retard corrosion of the metal conductors.
A very light application of spray lubricant will also retard corrosion. But besides attracting dust and dirt, most lubes are insulators, and could conceivably hamper the electrical connection if used to excess.
If your turn signals behave as though afflicted with acute tachycardia, an additional prescription is in order. The stock flasher, overloaded by the additional bulbs in the trailer circuit, must be replaced by a heavy duty unit. The flasher is usually located under the dash, and can be found by following your ear. When you find this clicker, yank it out, and plug the HD unit into place.
If you’re not sure about what you’re doing, drive to a local gas station. The attendant will sell you an HD flasher unit for a couple of bucks, and show you where to stick it.
Note: Some newer cars and those with sequential turn signals use an additonal set of relays, and won’t require the HD flasher. So don’t buy it unless you’ve first tried it.
TEMPORARY MEASURES
All this do-it-right stuff is fine when you have the time. But what can you do at 4:30 on Sunday morning when your good buddy couples his custom street van to your custom dirt/trailer loaded down with motorcycles, and replies: “Connection fer yer’ trailer? Heck, don’t need no lights on that ol’ thing.” Getting wired takes on a whole other meaning.
If you’re prepared, such an occurrence could be taken in stride, thanks to a pair of ingenious little devices called Tap-A-Lites. When installed in place of the stock tail/ brake light bulbs, normal functions are retained, but you now have a pair of leads from each bulb to which the trailer wiring can be connected. A trio of lead wires and a ground later and you’re on the road— legally. For about $4 a pair, you might think about these if you’re merely an occasional tower/towee.
Or have you seen those little plastic “clip-on and crush” trailer wire connectors that make the job so easy and are often used by you-haul rental agencies when you have to bolt a bumper hitch on your Barracuda so you can haul your refrigerator to your new apartment? That’d be last thing I’d tell you about here. >
PROPER WIRE CONNECTIONS
There are two basic types of wire connections commonly used in trailer wiring. The easiest involves splicing the ends of two wires together. The other, best described as a “T-splice,” is required when you must connect two wires, but have only one end. The methods differ slightly, depending upon whether tape or shrink tubing is used, as the photo illustrates.
^ey points to remember: 1) Physically connect the wires before soldering to ensure a strong joint. Simply laying one wire on *°P other is not enough. 2) A
clean, hot joint is a good joint, but don’t fry the insulation. 3) If you are using shrink tubing, don t forget to slide it on before soldering—if the reason is not immediately apparent, it surely will become so.
SOLDER AND IRONS
Tin/lead solder with a resin core is easiest to work with, although unfluxed solder and resin paste are alternatives. Never use acid-core or acid-based flux. Besides corroding wires, this acid does unkind things to paint and metal work.
Pencil-type soldering irons do a neat job, and are preferred by the author. Guns are in some ways handier, but produce sufficient heat that wire insulation and nearby components are damaged unless an in-and-out-quickly technique is used. A large iron, for the purposes of this article, is to be used only when there is nothing else available, and is, therefore, not normally recommended.
TEST DEVICES
Once you have located the brake wires for the taillight assembly, you must isolate the proper leads. A voltmeter can be used, as can a test lamp with clip leads. If you’re working alone, a Mallory Sonalert, Honda turn signal buzzer, or other audible device is handy.
INSULATORS
Common electrical tape is common for a very good reason: It works well.
Gaining in popularity, especially with ex-aerospace engineers and technicians, is shrinkable tubing. When heated with a match, cigarette lighter, heat gun, or the sun through a magnifying glass, this tubing shrinks tightly around wire joints. When used properly, shrink tubing is superior to tape, as it does not get gooey with age, won’t creep, and can withstand higher temperatures.
In lieu of either of the above, duct or masking tape should be used only when that’s all that is available.
When using connectors with screw-type terminals, a coating of silicone rubber will prevent corrosion, and also provide a mechanically stronger bond which is less prone to damage from vibration or shock.
TOOLS
In dire cases, an experienced person can wire a trailer using a knife (or his teeth) and a roll of tape. If circumstances permit, using proper tools will make the job easier.
A wire stripper is handy, especially the one-handed automatic type. Combination stripper-crimpers also work well, and perform both tasks admirably. The scissorstype stripper, preferred by some, becomes a wire butcher when used by the inexperienced or careless.
In addition to a stripper, most will find common, everyday, work-on-yer-bike tools sufficient.
CONNECTORS
There is no universally accepted standard connector, so several popular types are shown here.
The best is the spring-loaded trap-door unit, one side of which is mounted solidly to the towing vehicle. Plug-fumbling is virtually eliminated with this type, and the solid mounting relieves much of the stress contributing to wire and connector failure. Besides, it’ll keep the wires from dragging on the ground, no unimportant matter, gj