New Ideas In Ignitions, Speedomerets And Shocks
New Ideas In Ignitions,Speedomerets And Shocks
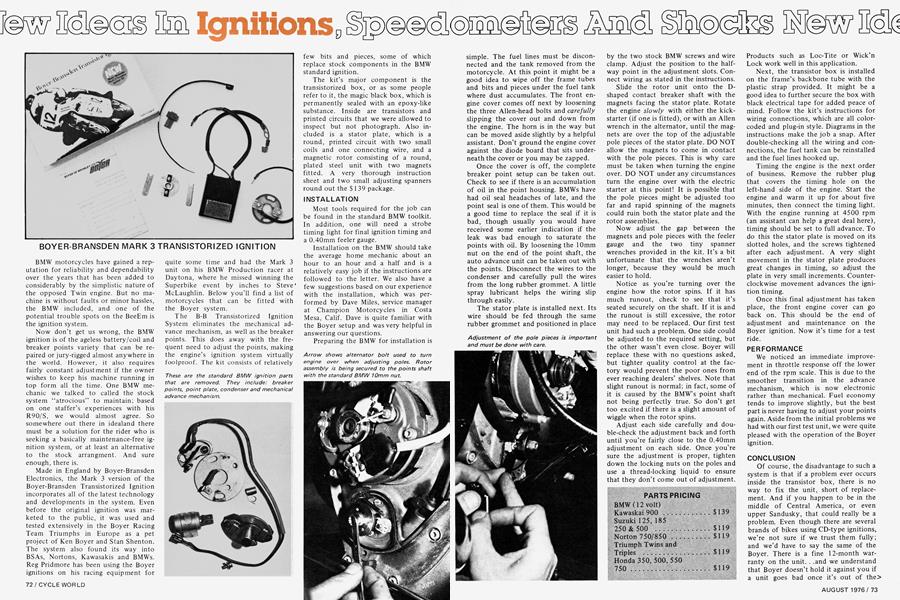
BOYER-BRANSDEN MARK 3 TRANSISTORIZED IGNITION
BMW motorcycles have gained a reputation for reliability and dependability over the years that has been added to considerably by the simplistic nature of the opposed Twin engine. But no machine is without faults or minor hassles, the BMW included, and one of the potential trouble spots on the BeeEm is the ignition system.
Now don’t get us wrong, the BMW ignition is of the ageless battery/coil and breaker points variety that can be repaired or jury-rigged almost anywhere in the world. However, it also requires fairly constant adjustment if the owner wishes to keep his machine running in top form all the time. One BMW mechanic we talked to called the stock system “atrocious” to maintain; based on one staffer’s experiences with his R90/S, we would almost agree. So somewhere out there in idealand there must be a solution for the rider who is seeking a basically maintenance-free ignition system, or at least an alternative to the stock arrangment. And sure enough, there is.
Made in England by Boyer-Bransden Electronics, the Mark 3 version of the Boyer-Bransden Transistorized Ignition incorporates all of the latest technology and developments in the system. Even before the original ignition was marketed to the public, it was used and tested extensively in the Boyer Racing Team Triumphs in Europe as a pet project of Ken Boyer and Stan Shenton. The system also found its way into BSAs, Nortons, Kawasakis and BMWs. Reg Pridmore has been using the Boyer ignitions on his racing equipment for quite some time and had the Mark 3 unit on his BMW Production racer at Daytona, where he missed winning the Superbike event by inches to Steve* McLaughlin. Below you’ll find a list of motorcycles that can be fitted with the Boyer system.
The B-B Transistorized Ignition System eliminates the mechanical advance mechanism, as well as the breaker points. This does away with the frequent need to adjust the points, making the engine’s ignition system virtually foolproof. The kit consists of relatively few bits and pieces, some of which replace stock components in the BMW standard ignition.
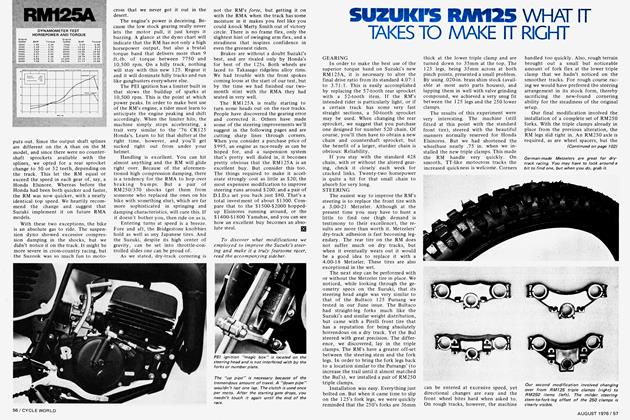
The kit’s major component is the transistorized box, or as some people refer to it, the magic black box, which is permanently sealed with an epoxy-like substance. Inside are transistors and printed circuits that we were allowed to inspect but not photograph. Also included is a stator plate, which is a round, printed circuit with two small coils and one connecting wire, and a magnetic rotor consisting of a round, plated steel unit with two magnets fitted. A very thorough instruction sheet and two small adjusting spanners round out the $139 package.
INSTALLATION
Most tools required for the job can be found in the standard BMW toolkit. In addition, one will need a strobe timing light for final ignition timing and a 0.40mm feeler gauge.
Installation on the BMW should take the average home mechanic about an hour to an hour and a half and is a relatively easy job if the instructions are followed to the letter. We also have a few suggestions based on our experience with the installation, which was performed by Dave Miles, service manager at Champion Motorcycles in Costa Mesa, Calif. Dave is quite familiar with the Boyer setup and was very helpful in answering our questions.
Preparing the BMW for installation is simple. The fuel lines must be disconnected and the tank removed from the motorcycle. At this point it might be a good idea to wipe off the frame tubes and bits and pieces under the fuel tank where dust accumulates. The front engine cover comes off next by loosening the three Allen-head bolts and carefully slipping the cover out and down from the engine. The horn is in the way but can be moved aside slightly by a helpful assistant. Don’t ground the engine cover against the diode board that sits underneath the cover or you may be zapped.
Once the cover is off, the complete breaker point setup can be taken out. Check to see if there is an accumulation of oil in the point housing. BMWs have had oil seal headaches of late, and the point seal is one of them. This would be a good time to replace the seal if it is bad, though usually you would have received some earlier indication if the leak was bad enough to saturate the points with oil. By loosening the 10mm nut on the end of the point shaft, the auto advance unit can be taken out with the points. Disconnect the wires to the condenser and carefully pull the wires from the long rubber grommet. A little spray lubricant helps the wiring slip through easily.
The stator plate is installed next. Its wire should be fed through the same rubber grommet and positioned in place by the two stock BMW screws and wire clamp. Adjust the position to the halfway point in the adjustment slots. Connect wiring as stated in the instructions.
Slide the rotor unit onto the Dshaped contact breaker shaft with the magnets facing the stator plate. Rotate the engine slowly with either the kickstarter (if one is fitted), or with an Allen wrench in the alternator, until the magnets are over the top of the adjustable pole pieces of the stator plate. DO NOT allow the magnets to come in contact with the pole pieces. This is why care must be taken when turning the engine over. DO NOT under any circumstances turn the engine over with the electric starter at this point! It is possible that the pole pieces might be adjusted too far and rapid spinning of the magnets could ruin both the stator plate and the rotor assemblies.
Now adjust the gap between the magnets and pole pieces with the feeler gauge and the two tiny spanner wrenches provided in the kit. It’s a bit unfortunate that the wrenches aren’t longer, because they would be much easier to hold.
Notice as you’re turning over the engine how the rotor spins. If it has much runout, check to see that it’s seated securely on the shaft. If it is and the runout is still excessive, the rotor may need to be replaced. Our first test unit had such a problem. One side could be adjusted to the required setting, but the other wasn’t even close. Boyer will replace these with no questions asked, but tighter quality control at the factory would prevent the poor ones from ever reaching dealers’ shelves. Note that slight runout is normal; in fact, some of it is caused by the BMW’s point shaft not being perfectly true. So don’t get too excited if there is a slight amount of wiggle when the rotor spins.
Adjust each side carefully and double-check the adjustment back and forth until you’re fairly close to the 0.40mm adjustment on each side. Once you’re sure the adjustment is proper, tighten down the locking nuts on the poles and use a thread-locking liquid to ensure that they don’t come out of adjustment. Products such as Loc-Tite or Wick’n Lock work well in this application.
PARTS PRICING
BMW (12 volt) Kawaskai 900 ............ $ 139
Suzuki 125, 185 250 & 500 .............. $119
Norton 750/850 .......... $119
Triumph Twins and Triples ................. $119
Honda 350, 500,550 750 .................... $119
Next, the transistor box is installed on the frame’s backbone tube with the plastic strap provided. It might be a good idea to further secure the box with black electrical tape for added peace of mind. Follow the kit’s instructions for wiring connections, which are all colorcoded and plug-in style. Diagrams in the instructions make the job a snap. After double-checking all the wiring and connections, the fuel tank can be reinstalled and the fuel lines hooked up.
Timing the engine is the next order of business. Remove the rubber plug that covers the timing hole on the left-hand side of the engine. Start the engine and warm it up for about five minutes, then connect the timing light. With the engine running at 4500 rpm (an assistant can help a great deal here), timing should be set to full advance. To do this the stator plate is moved on its slotted holes, and the screws tightened after each adjustment. A very slight movement in the stator plate produces great changes in timing, so adjust the plate in very small increments. Counterclockwise movement advances the ignition timing.
Once this final adjustment has taken place, the front engine cover can go back on. This should be the end of adjustment and maintenance on the Boyer ignition. Now it’s time for a test ride.
PERFORMANCE
We noticed an immediate improvement in throttle response off the lower end of the rpm scale. This is due to the smoother transition in the advance mechanism, which is now electronic rather than mechanical. Fuel economy tends to improve slightly, but the best part is never having to adjust your points again. Aside from the initial problems we had with our first test unit, we were quite pleased with the operation of the Boyer ignition.
CONCLUSION
Of course, the disadvantage to such a system is that if a problem ever occurs inside the transistor box, there is no way to fix the unit, short of replacement. And if you happen to be in the middle of Central America, or even upper Sandusky, that could really be a problem. Even though there are several brands of bikes using CD-type ignitions, we’re not sure if we trust them fully; and we’d have to say the same of the Boyer. There is a fine 12-month warranty on the unit. . .and we understand that Boyer doesn’t hold it against you if a unit goes bad once it’s out of the> warranty period. And there is no question that our BMW performed better after the Boyer ignition was installed.
The Boyer-Bransden ignition is available from, among others, the following suppliers:
Boyer International P.O. Box 24 Tustin, CA 92680 (714) 997-2833 RPM
5718 Hollister Ave. Goleta, CA 93017 Champion Motorcycles 1980 Harbor Blvd.
Costa Mesa, CA 92627 (714) 642-231 1
WEBCO/VDO SPEEDOMETER KIT
Back before the long-travel suspension revolution, a lot of people rode dual-purpose machines in enduros. They didn’t handle all that well, but they did come with a speedometer, a necessary item for determining one’s location on the course.
As enduros increased in popularity, a lot of entrants riding dual-purpose machines decided to get serious. Unfortunately, getting serious required the purchase of a faster, lighter motorcycle— and a motorcycle that, more often than not, did not come with a speedometer.
To eliminate this problem, Webco has put together a VDO speedometer kit, primarily designed for use on Yamaha motocross models and playbikes like the TT500. We say primarily, because with a little ingenuity and a different axle spacer, the Webco kit adapts nicely to other brands of machines.
Keep in mind that this kit is designed for machines without an original equipment speedometer drive unit attached to the hub. If your bike already has an OEM speedo drive, Webco will sell you an appropriate speedometer separately. When ordering the speedometer separately, it is best to consult their catalog.
INSTALLATION
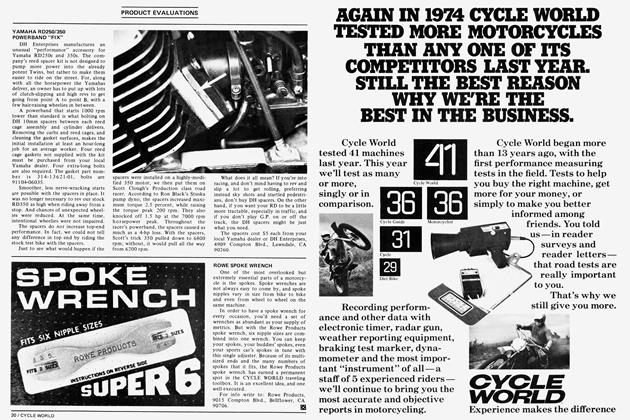
Installation of the Yamaha kit is relatively simple. First, remove the front wheel. On the side of the hub opposite the brake drum, there is a spacer and an accompanying dirt shield for the wheel bearing. These are not used. In their place go the VDO speedometer drive and spacer provided in the kit.
Before the front wheel is reinstalled with the new spacer and speedo drive, a small hole must be drilled in the hub, between spokes, for the revolving member of the speedo drive. The hole should be drilled near the edge of the hub and should be just large enough to allow the revolving member to pass through. Once the hole is drilled, place the speedo drive and spacer on the axle and shove the axle through the front wheel assembly. This will locate the speedo drive. Next, bend the revolving member so that it passes through the hole. Then bend it over on the opposite side of the hub so that it won’t become dislodged. With this accomplished, reinstall the wheel.
Thread the cable into the speedo drive so that it exits to the rear of the front forks. A cable guide is not provided in the kit so care must be taken when routing the cable to keep it out of the front wheel.
Complete speedometer kit, part number 480 ................... $69.95
Replacement cable, part number 480-01 .................... $7.95
Replacement drive unit, part number 480-02 .................... $6.95
Normally, the speedometer mounting bracket is held in place by the forward handlebar clamp bolts. If your bike is not fitted with a headlight, this position works fine. If a headlight is fitted, there will be insufficient clearance between the rear of the light and the speedometer cable.
First we tried securing the speedo bracket with the rear handlebar clamp bolts. This positioned the speedo correctly in relation to the headlight, but the handlebar clamps themselves interfered with the speedo bracket. As a solution, we replaced the rear handlebar clamp bolts with studs. A nut on each stud secures the handlebars and doubles as a spacer for the speedo bracket. Two self-locking nuts hold the speedo bracket in place.
Insert the rubber grommets into the speedo bracket (oil them and they’ll slide right in), bolt the speedo in place, attach the speedo cable, and the installation is complete.
MODIFICATIONS FOR RELIABILITY
The VDO speedometer is reliable if the following procedures are carried out. First, unthread the lightbulb holder from the bottom of the instrument. Use silicone seal around the bulb bracket to keep out water and dirt. Loc-Tite the threads and reinstall the holder. Next, take a jewelers screwdriver and remove the locking screw that secures the reset knob located in the lower right corner of the instrument face. Loc-Tite this and reinstall. Do not overtighten the screw because it is brass. Slide a piece of rubber tubing over the reset knob so that when you grab the knob in an enduro there will be enough flexibility to keep you from breaking the knob off. (If you fail to do these two things, the reset knob will either fall off or be broken immediately). Finally, substitute self-locking nuts for the speedometer retaining nuts supplied.
CONCLUSION
With the modifications we’ve suggested, reliability has been excellent. At 2000 miles, the revolving member broke, requiring replacement of the speedo drive unit. Cost of this replacement is moderate. Our speedometer was calibrated for a 3.00-21 in. front tire; with that tire in place, accuracy is acceptable. The unit is not waterproof and does fog up when water gets inside. The Webco/VDO speedometer kit is available from dealers or by writing: Webco Inc. Box 429 Venice, CA 90291
BOGE MULHOLLAND GAS/OIL MX AND SUPERSPORT STREET SHOCKS
Boge Mulholland shocks have come a long way in the last couple of years. Oil capacity has increased. Better seals are used. The new units are completely rebuildable. And finally, both compression and rebound damping are adjustable to suit individual motorcycles and/ or styles of riding.
Because of this last feature, we decided to test the latest Boge motocross and street shocks on the dyno and on various machines.
THE GAS/OIL MX
Boge’s orange dirt shock is designed for all types of off-road riding, motocross included, and is designated the LTG. The reason it works well in practically all applications is that both compression and rebound damping are adjustable. Here’s how you arrive at precisely the right combination for your riding style and your machine.
First of all, consult the Boge Mulholland catalog and look up your machine by brand and model number. The catalog will tell you what length you should purchase and the compression and rebound damping rates suggested for your bike. There is also a column for spring rate that we found to be quite accurate. With this information in hand, you can make an intelligent shock/spring purchase that will bolt right onto your machine.
The next step is to go riding. If you’re of average weight and ability and ride at sane speeds, you’ll no doubt come to the same conclusion we did: the LTG provides a reasonably soft ride and offers good control until it gets very hot, from which point on the ride becomes harsher, with a subsequent reduction in control.
(Continued on page 92)
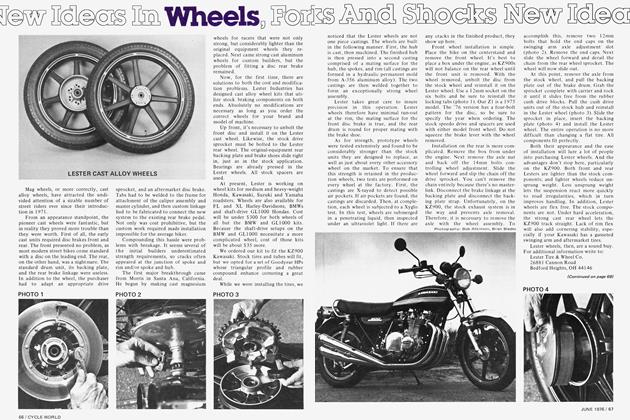
DescriptiOfl Boge Muiholland rebuildable gas/oil MX shock, 14.25-in, length, set up for MR250 Honda Shock travel, in.: 4.25 Spring rate, lb./in.: 110 lb. (for
MR250; for other rates see text) Compression damping force, lb.: 28 (at 300 degrees, 36) Rebound damping force, lb.: 120: (at 300 degrees, 82)
Continued from page 75
The reason for the harsher ride and reduction in control is an expansion of the benetron gas in the bladder. The higher the temperature, the more the gas expands. This in turn raises the compression damping rate and at the same time reduces the rebound damping rate (see accompanying dyno charts). The higher compression damping rate increases the harshness of the ride. Reduction in the rebound rate causes the rear of the bike to pitch upward, especially when large rocks or square ledges are encountered.
Don’t let this worry you too much, however. All shocks suffer from high temperature and the Boges’ ailment isn’t as serious as most. It is certainly better to have a reduction in control and a slightly harsher ride than no control at all, as is the case with the majority of shocks. Temperatures on the dyno, incidentally, got as high as 300 degrees . . .and the seals did not fail.
Back to that initial ride. If the rear of the bike pitches upward when you hit something hard, there isn’t enough rebound damping. If the rear suspension pounds down over a series of whoopde-doos, rebound damping is too high.
It can be altered by changing rods. Three rods of differing damping rates are available: soft, medium and hard. If you need more rebound damping, go from soft to medium or medium to hard. If you want to decrease damping, go the other way.
Compression damping is a little easier to dial in. If the bike bottoms frequently (assuming you have the right spring for your weight), compression damping should be increased. If the bike rides too rough, compression damping should be lessened. Compression damping is controlled by a foot valve. Again, there are three choices: soft, medium and hard. If you want more compression damping, go from soft to medium or medium to hard. If you want to lessen damping, go the other way.
Both compression and rebound kits are available from dealers who handle the shocks. Cost is moderate and installation is simple. Detailed instructions come with the optional valves and rods, so we won’t go into that here.
For our seat of the pants portion of the test, we chose units appropriate for> an MR250 Honda. Both spring rate and damping rates were correct as delivered. Slightly more preload was necessary for heavier riders; this was accomplished by adding washers (supplied with the shock) on top of the spring rather than rotating a cam-type adjuster. Ride was as plush as stock, but control was considerably better, even when the units got hot. We experienced no failures of any kind.
THE SUPERSPORT STREET VERSION
Take an LTG dirt shock, remove the external cooler, take out the gas bladder, add a cam adjuster for spring preload, paint it black, alter the compression and rebound damping rates, and you have a close approximation of a Supersport shock.
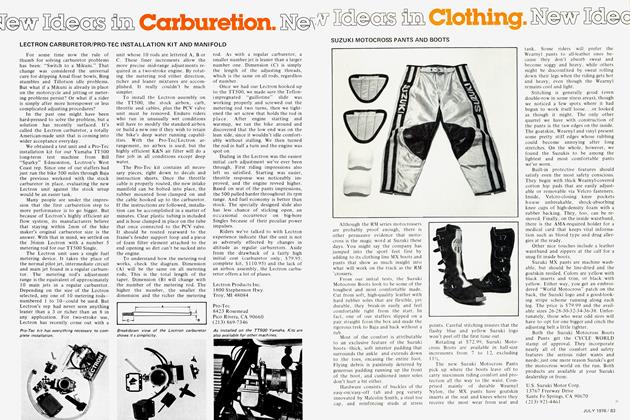
All Supersport shocks come with a soft compression valve and a medium rebound rod. We found this to be a good choice for most machines that require a 100to 120-lb. spring. The 35 lb. of compression damping offers a ride on the firm side of plush. The 150-lb. rebound rate forces a slow wheel return which is good for optimum handling on the street (see accompanying dyno chart). In most cases, the 35-lb. CD rate allows use of a slightly softer spring than is fitted stock.
As with the LTG, choice of the proper length shock and spring is spelled out quite clearly in the Boge catalog. The catalog will also suggest damping modifications, if appropriate. For example, an RD350 Yamaha requires installation of a soft rebound rod to lower rebound damping. Rebound of 150 lb. would be too much for the recommended 80-lb. spring. Three compression valves and three rebound rods are available. The choices, again, are soft, medium and hard.
(Continued on page 94)
REBUILDABLE STREET SHOCKS
Description: Boge Muiholland rebu lid able Supersport street shock with soft compression valve and. medium rebound shaft Shock travel, in.: 3.0 Spring rate, lbJin.: see text Compression damping force, lb.: 35 Rebound damping force, :th.: 150
Continued from page 93
We evaluated two pairs of Supersport shocks. The first pair was installed on a Zl. Damping was not altered (soft compression, medium rebound) and 110-lb. springs were fitted. Spring rate was 10 lb. lighter than stock, but ended up an excellent choice. Plushness of ride remained about the same as stock, but control in turns and overall stability improved considerably.
The second pair was installed on an RD350 Yamaha. We altered the rebound damping as mentioned above. The 80-lb. spring is 40 lb. lighter than the OEM spring, and Boge Mulholland is right to recommend the change. Ride ended up much softer than stock, especially on rough surface streets. Handling on smooth streets at legal speeds remained the same as stock. On rough roads or when pushing to the limit in corners, handling improved with the Boges in place.
PARTS PRICING
Boge LTG MX ........ $89.95 (pair)
Boge Supersport ....... $59.95 (pair)
Springs for the LTG $ 19.95 to $27.95
Springs for the Supersport ................ $13.95 to $16.95
Compression valves for the LTG ..................... $4.65 (pair)
Rebound rods for the LTG .................... $19.50 (pair)
Compression valves for the Supersport .......................... $4.65
Rebound rods for the Supersport .................... $ 15.95 (pair)
SHOCK LENGTHS AND SPRING WEIGHTS
LTG: 13 in., 13-1/2 in., 14-1/4 in., 15-1/8 in.
LTG Springs: 72 lb., 80 lb., 78/106 progressive, 86/116 progressive, 101 lb., 112 lb., 94/138 progressive, 121 lb., 97/154 progressive, 1 30 lb. Supersport: 11-3/4 in., 12-1/4 in., 13 in., 13-1/2 in.
Supersport Springs: 60 lb., 78 lb., 60/90 progressive, 80/100 progressive, 90 lb., 90/120 progressive, 100 lb., 110 lb., 120 lb., 135 lb., 150 lb.
Boge Mulholland shocks are available from:
Interpart Corporation 100 Oregon St.
El Segundo, CA 90245
(213) 538-9820