The Service Dept
THE SERVICE DEPT
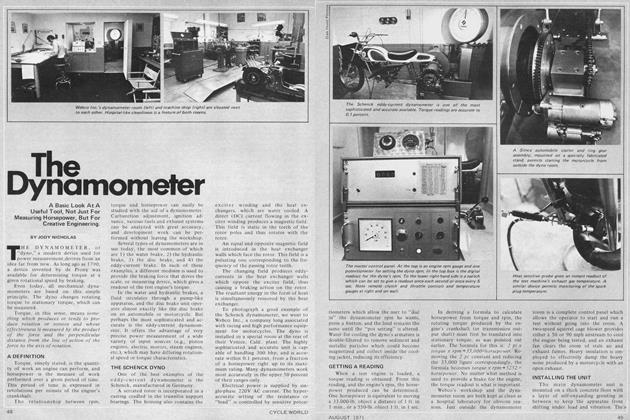
JODY NICHOLAS
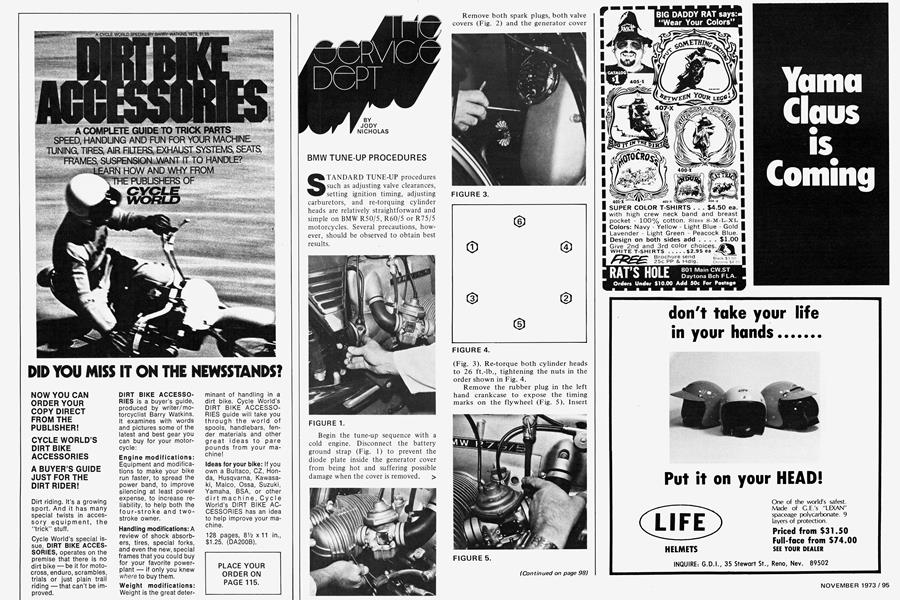
BMW TUNE-UP PROCEDURES
STANDARD TUNE-UP procedures such as adjusting valve clearances, setting ignition timing, adjusting carburetors, and re-torquing cylinder heads are relatively straightforward and simple on BMW R50/5, R60/5 or R75/5 motorcycles. Several precautions, however, should be observed to obtain best results.
Begin the tune-up sequence with a cold engine. Disconnect the battery ground strap (Fig. 1) to prevent the diode plate inside the generator cover from being hot and suffering possible damage when the cover is removed.
Remove both spark plugs, both valve covers (Fig. 2) and the generator cover The carburetor adjustment procedure
(Fig. 3). Re-torque both cylinder heads to 26 ft.-lb., tightening the nuts in the order shown in Fig. 4.
Remove the rubber plug in the left hand crankcase to expose the timing marks on the flywheel (Fig. 5). Insert
(Continued on page 98)
Continued from page 95
the 6mm alien wrench supplied in the tool kit into the generator nut (Fig. 6) and turn the engine over until the “OT” mark appears in the inspection hole. At this point, one cylinder’s valves will be on overlap (both valves open at the same time) while the other cylinder will be at TDC. Adjust the valves, using the feeler gauges supplied with the tool kit. The valves are correctly adjusted when the pushrods are just free to rotate with the feeler gauge in place (Fig. 7). After
one side has been adjusted, rotate the engine with the alien wrench until the “OT” mark appears in the inspection hole again and the other cylinder’s valves may be adjusted. Then adjust the ignition point cam to 0.014 to 0.016 in. and lightly grease the felt with point cam grease.
Because dynamic ignition timing is recommended, only this method will be outlined. For this, you need a timing light. Connect the battery ground strap and the timing light, replace the valve covers and spark plugs and start the engine. With the engine at idle (600-800 rpm) the “S” mark should appear in the center of the inspection hole. If the “S” is above center, the spark is too far advanced; if below, it is too far retarded. To correct this adjustment, loosen the screws securing the point plate (Fig. 8) and turn the plate slightly in the direction of rotation to retard the timing and vice versa.
(Continued on page 100)
Continued from page 98
The ignition advance curve begins at 800 rpm, and continues to 3000 rpm, at which point the "F" mark should appear in the inspection hole. Flowever, if the "S" mark is correct, the "F" mark will be also.
A way to simplify both ignition timing and carburetor adjustment is to obtain two spokes and nipples and screw the nipple on the spoke a couple of turns, then cement it in place. The nipple end can then be placed on top of the spark plug and the additional two inches of spoke can stick onto the spark plug cover, leaving enough room to attach the timing light, and to permit a screwdriver to be used to short out one cylinder when checking the carburetor adjustment.
To adjust the carburetors on the R50/5 and R60/5, warm the engine up to normal operating temperature. The idle speed should be near 800 rpm and run even. If not, make certain that there is 0.02 to 0.04-in. free play in the throttle cables, adjustable at the carburetor tops. Short out one spark plug with a screwdriver (Fig. 7), note the engine rpm, and do the same with the other side. Adjust the throttle stop
screws (Fig. 9, 2) to obtain the same rpm reading on each carburetor, then adjust the pilot air screws (Fig. 9, 1) to obtain the highest rpm.
Next, rev the engine slightly (to about 2000 rpm) short out one spark plug, note the engine rpm, and do the same with the other spark plug. Adjust the cables to give the same rpm when the spark plug is shorted on each cylinder.
is basically the same for the R75/5. First, adjust the starting enrichment cables to have a free play of 0.02-0.04 in. Back off both carburetors’ cable adjustment screws so that the butterfly lever is not suspended on the throttle cable. Set the idle mixture screw (Fig. 10) and the butterfly stop screw (Fig. 11) to the basic settings. Turn the idle mixture screw in fully and back it out one full turn. Adjust the butterfly stop screw inward until it just contacts the stop of the butterfly lever; then turn the screw inward one turn.
Adjust each idle mixture regulating screw (with a warm engine) carefully in either direction until the engine '“sound” is smoothest, and the highest rpm is attained.
Continue adjusting these screws alternately on the right and left hand carburetors. Gradually back off each butterfly stop screw and after each adjustment try to obtain the highest possible idling speed by turning the idle mixture regulating screw. Repeat this procedure until the cylinder stops running after a few strokes while shorting out the spark plug on the other cylinder. The best idling speed for this engine is also 600-800 rpm.
To adjust the throttle transition from idle to part load range, increase the throttle opening slightly and check whether each cylinder runs at the same speed by shorting out the spark plugs. If necessary, adjust the throttle cable of the slower cylinder to have less free play. Remember to retighten all cables.
Once the carburetors have been adjusted, the engine will be up to normal operating temperature and the engine oil may be changed. 0