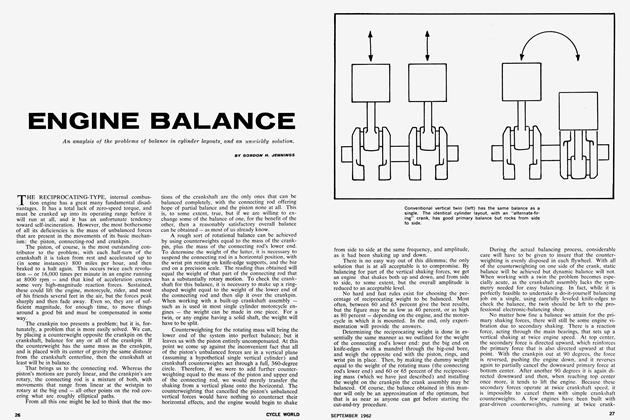
Power Transmission Methods Part Two
POWER TRANSMISSION METHODS Part Two
GORDON H. JENNINGS
IN PART ONE of this two-part series about the machinery that performs the all-important function of carrying the power from the engine to the driven wheel, we covered the transmission. That item is, as everyone knows, only one stage in the overall system and it is, moreover, relatively unimportant to the experiment-inclined rider, as he can do little beyond keeping it in good repair. The final drive, usually consisting of a chain and pair of sprockets, is of more direct interest, because this can be altered with very little investment in time or money, and alterations of this sort can change a motorcycle’s entire character. And, even when the drive system is left as-purchased, it is still something that deserves some attention, if nothing more than an occasional inspection, because a failure in this area will make a pedestrian out of a rider quicker than almost anything. In short, it is well worth the time of any rider, racing or touring, to learn the fundamentals of ratio selection, and those of simple maintenance.
Most motorcyclists have wondered, usually while repairing or replacing a chain, why manufacturers have not gotten around to eliminating this seemingly archaic form of power transmission. Certainly, the all-enclosed shaft and bevel-gear arrangement is cleaner, quieter and more reliable. Gear-and-shaft drives have long since displaced everything else in the automotive field, and on the face of it there is no reason why we should have to bother with those messy, flailing chains. There are reasons, obviously; three of them to be exact: simplicity, economy and, rather surprisingly, efficiency.
Taking first the matter of simplicity, it takes no very great amount of imagination to see that a chain drive is a less involved mechanism than one using shafts and gears. And, what is less obvious, is that the use of shaftdrive carries with it penalties that extend beyond the simple matter of bridging the gap between the back of the transmission and the rear wheel. If shaft drive is used, it will be necessary to either provide two pairs of bevel gears, one to make the right-angle turn coming out of the transmission, the other to turn the drive 90-degrees again to get it into the rear axle; or to mount the engine with the crankshaft in-line with the frame, and then use transfer gears to take the drive far enough to the side so that the drive shaft can pass along beside the rear wheel. In both instances, we find ourselves with a great many gears whirling away and those gears are expensive. Thus, the chain drive gets good marks for simplicity and, consequently, the low manufacturing cost that ultimately appears as an economy for the motorcycle purchaser.
Now we get to the question of efficiency. Everyone knows that all power transmitting devices pass the power along slightly diminished — some of it being absorbed in the operation of the device in question. We have heard all manner of wild guesses as to the extent of this power loss — some as high as twenty to thirty percent. In point of fact, only a very bad drive system would lose that much, and if it did, some form of cooling would be necessary before it could transmit a motorcycle’s twenty to fifty horsepower. Taking an extreme example: if we had a thirty percent power loss on a fifty horsepower output, some fifteen horsepower would be disappearing. And, if you will harken back to your high school physics, you will recall that power does not just disappear; it can only be changed into some other form. In the case of transmission losses, it is converted into heat, and our fifteen horsepower loss would become 636 btu per minute — enough heat to literally melt a motorcycle transmission, indeed, the entire motorcycle, after a very short time.
In practice, transmission losses are much lower than what we have been discussing. On the average, probably no more than five percent overall is lost — even taking into account such things as oil-churning losses. Still, as has often been said, every little bit helps, and here again the chain drive has an advantage. A chain drive, in good repair, is virtually loss-free (about one percent for each chain and pair of sprockets) whereas gear drives lose about two percent at each point of mesh.
Apart from the efficiency aspect, chain drives are marvels of practicality, being willing to accept abuse, neglect, and a lot of misalignment without much complaint. Also, they can easily be modified to absorb more than the originally intended loading and, as we have said, permit rapid and inexpensive ratio changes.
Given a little care, chain and sprockets will last a lot longer than is usually the case. New chains “bed-in” after a short time, and it is essential that they be watched closely during this period and adjusted when it is required. Slack is gauged by moving the chain up and down midway between sprockets. Primary chains should have about V^-inch of slack, on the average, and the final drive chain about %-inch. The exact amount of slack will always be specified in your owner’s manual, and it is wise to take note of this bit of information. Incidentally, when adjusting the rear chain on bikes with swing-arm suspension, make sure that the adjustment is made with the suspension held at the point giving maximum chain tightness. People commonly adjust the chain with the suspension unloaded and the swing-arm angled down, which brings the driving and driven sprockets closer together than they are when the suspension is loaded and the arm is horizontal. In extreme instances, the slack disappears when the arm goes past “center.”
With the correct tension, it is also necessary to insure that the chain is properly lubricated; the links wear very fast when dry. Most primary drives are in an oil bath and pose no particular problem, it being necessary only to top up with oil periodically in many cases. When the clutch is of the wet-plate type, there is a tendency for the oil in the primary case to become sludgy, and if your motorcycle has this type of clutch, follow the maker’s recommendations with regard to oil changes.
Rear chains, which in most instances are running out in the open and are subjected to a constant barrage of water and road grit, present more of a problem. Come what may, the rear chain will not last as long as the one on the primary drive, but we can extend its service life by careful maintenance — which usually means keeping the chain lubricated. On many motorcycles, the rear chain is oiled by either mist from the crankcase breather, or by a drip-feed drawing its oil from the primary case. When this provision has been made, the task of keeping the chain in a healthy state is reduced to little more than an occasional cleaning, to remove abrasive grit from the links. On bikes having no rear chain oiler, we are faced with three alternatives: first, we can do as almost everyone does and just squirt oil in the general direction of the chain whenever the notion strikes us; second, we can fit the bike with a lubricator; and third, we can, at regular intervals, “cook” the chain in a grease made for that purpose. This last measure is a good idea no matter what other steps may have been taken to oil the chain. Chain grease can be purchased at most motorcycle shops, and the proper procedure consists of cleaning the chain carefully in solvent and then soaking it in a pan of chaingrease that has been heated until it is liquid enough to penetrate into the links. The chain should be stirred about as it cooks to get the lubricant worked well into the links and then the whole mess allowed to cool. Then, the chain can be dredged out, wiped clean, and put into service. A couple of words of caution: if the chain is not thoroughly cleaned before soaking, the operation is largely useless; and do be sure that a regular chain grease is used — not just any grease will take the heating without detrimental changes in properties.
Those particularly keen on maintaining their bikes at the near-perfect level may want to make an oiler for their pride-andjoy. All that is required for this is a small (about a 1-pint capacity will do) oil reservoir, an adjustable feed valve (something suitable can be ferreted-out in most hardware stores) and a line down to the chain. At the point where the oil is actually being fed onto the chain, the feed-line should branch into two neoprene tips that will direct the oil to the edges of the links, where it is needed.
There is a definite point at which chain wear is excessive and the time for replacement has come. Lay the chain under inspection on a table next to a ruler, holding the free end of the chain firmly at one end of the ruler. Then, at the other end, one foot away, give it the old pushpull test. If there is more than 14-inch of wear in the links over the 1-foot span, replace the chain. To continue on with a worn chain is a false economy. In the first place, a chain that worn has worked right through the case hardening, and is into soft metal which really wears fast and puts one in constant danger of a breakage out on the road. Secondly, excessively worn chains are likely to damage the sprockets. Slack in the chain’s links allows the rollers to climb higher up on the sprocket teeth, and tends to bend these teeth. Worn, or simply abused sprockets are characterized by the curledover, or hooked appearance of their teeth.
Yet another form of chain and sprocket wear is caused by sprocket misalignment, which can be linear or angular. If the sprockets are not true on their shafts, or if they are offset, or if the shafts are not parallel, then the chain links will be pulled hard against the sides of the sprocket teeth. This causes a wearing of the sprocket, and of the chain, which is being asked to bend to the side — a condition for which they are not normally designed. Sometimes, misalignment can be so bad that chain after chain will quickly wear, go slack, and then be thrown off. This should be a much more rare condition than it is, as alignment can be checked very quickly and easily, simply by placing a straight-edge along the faces of the sprockets. To make certain that the sprockets are true on the shafts, they should be rotated and checked at several positions. The perfectionist may also want to check the sprockets for concentricity, by fixing a pointer at the edges of the teeth and rotating the sprocket.
In fitting chains, it will be worth while to buy the special tools needed for the job. Makeshift tools can do a lot of damage and such Neanderthal methods usually make the task much more difficult than it need be. After all, the full set of chain tools consists simply of a rivet extractor and special pliers (you really don’t need the latter) and you will, in a couple of years of serious motorcycling, definitely use the tools enough to justify the purchase. Oh yes! Just in case there is someone out there who doesn’t already know, we would like to mention that the little spring clip on a “master-link” must be installed with the open end away from the direction of chain travel; otherwise, it can snag on something and flip right off.
Modifications of chain drives are easily made, and there is no reason for any problems, insofar as the drive itself is concerned, if the chain is properly aligned and not asked to carry too much power. The first condition is easily met, unless the parties in question happen to be exceptionally sloppy workmen. The second, overload problems, are seldom encountered, simply because a chain drive is so strong, but this aspect is worth some discussion anyway. Initially, let us make quite clear the fact that, assuming there has been no error in alignment, it is most unlikely that an engine can be modified enough to increase the power output to such an extent that a chain breakage will occur. Even a small chain has a pull-capacity of about 1-ton, and the Vi-inch pitch chains used on most of the medium-displacement motorcycles have a 2-ton ultimate capacity. However, if too-rapid wear is to be avoided, one should not plan to use more than 10-percent of the ultimate capacity.
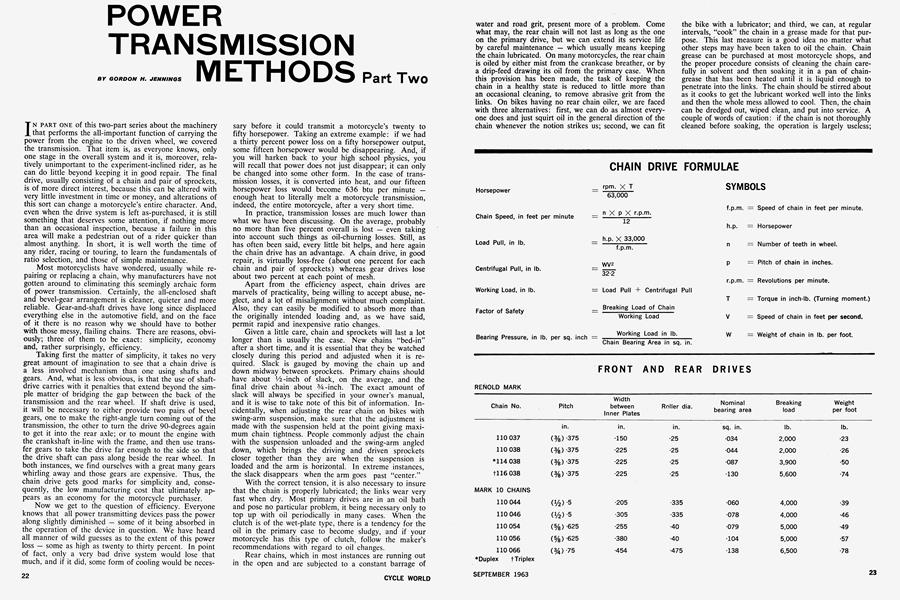
And how does one determine the working load? By adding together the pull exerted by the engine and the pull created by centrifugal force as the links swing around the sprockets. This is, obviously, more easily said than done, but there are methods. All of the required formulae are to be found below, with a table that lists commonly used chain, their bearing areas, breaking load, weight per foot, etc. All of this courtesy Renold Chains Ltd. At this point we will abandon the reader to puzzle over the formulae, with nothing to do but that Most Dreaded of work: thinking.
One thing that should be understood in connection with chaip drives is that nothing is more destructive than small sprockets. A sprocket does not pull the chain around smoothly, in a circular path, because it is, in effect, a polygon. Thus, there is a cyclic speed variation, and while this effect is negligible with sprockets of more than 19 teeth, it creates problems when there are fewer. Also, chain loads are carried on those sprocket teeth, divided evenly between the teeth in mesh, and that makes a good case for having a lot of teeth, and wrapping the chain around the sprocket enough to engage a maximum number of the teeth available. And, as we increase the sprocket’s pitch diameter, the actual'pull-load on the chain, for any given amount of engine power, is reduced. Thus, there is every reason for using largediameter sprockets whenever possible, no matter what overall drive ratio is desired.
Overall gearing is extremely important, as we have said many times, but let us make quite clear that there is no such thing as “perfect” gearing — at least, not so long as we must work with a 4 or 5speed transmission. A ratio that is good for acceleration is bad for top speed, and vice versa, and about the best we can hope -for is an effective compromise. Most motorcycles are sold with “compromise” gearing and, for all around riding, there is not much point in experimenting with different sprockets. However, nearly all riders have preferences that do not coincide with the manufacturer’s average. The tourist will usually prefer a low ratio, which will permit high cruising speeds with the engine turning at a relatively low speed. The “cow-trail” enthusiast, on the other hand, is more likely to want a lot of pulling power even at some sacrifice in cruising and top speeds.
To aid in the selection of a ratio for your individual requirements, we have prepared a chart that shows top speed plotted against horsepower. This was done by actually putting a dot on the chart for every motorcycle on which we had valid data. After getting all of the dots in place, we discovered that they formed a curving band, speed increasing with power. Naturally, up above the 100 mph range, further increases in power do not produce the same increases in speed as are true in the lower speed ranges, and that is what causes the band to trail off. Also, we found that bikes geared for fast cruising tended to be toward the upper edge of the speed range band and those geared for acceleration and pulling power were all down around the bottom of the band.
And what does all of this mean? Simply that if you have a motorcycle with, for instance, 30 bhp, its top speed should be (with average gearing) about 96 mph; but that a bike intended to be a charger at low speeds might only do 90 mph and one geared for speed, pure and simple, should get up to about 103 mph. You can take the power rating of your own motorcycle and read off the probable top speed. Of course, it will be necessary to take into account the bike’s gearing.
Here, we come to the problem of calculating revolutions per minute against miles per hour. And, again, the reader will have to Think. This is a problem that is worked backward, so to speak. Take the distance, in inches, between the rear wheel’s axle centerline and the ground (which we technical-types call the “rollingradius,” if you care) and multiply by 2. Then, multiply again by 3.14, which is the constant, “Pi.” Having done this, you will have the distance the tire will roll in one revolution. Then, take this figure and divide by 12, to convert it from inches to feet, and divide again into 5280, the number of feet in a mile. At this point, you will have the number of revolutions the tire will turn in one mile. It is not necessary to bother with decimal points; a round figure is close enough. Now, take the tire revs/mile figure and multiply by the bike’s overall gear ratio (we will get to the “hows” of that in a moment) to get the number of engine revolutions per mile (in top gear).
For example: a tire having a rolling radius of 12.5-inches would turn about 807 revs/mile (12.5 X 2 = 25; 25 X 3.14 = 78.5; 78.5 -f12 = 6.54; 5280 + 6.54 = 807).
Now then, if the overall gear ratio is 4.5:1, then the engine will turn 3630 revs/ mile and if the bike is traveling at the rate of one mile per minute, or 60 miles per hour, then it follows that the engine will be turning 3630 rpm. To get other rpm/ mph figures, you can use a graph, as we do, put a dot on the grid at the 60 mph/ 3630 rpm coordinate, and then extend a line from zero mph and rpm up through this point — extending it up as far as you wish the speed/rpm reading to go. Otherwise, you can divide the rpm figure, in this instance 3630, into the 60 mph figure, to get the number of miles per hour per 1000 rpm and use that as a basis for further calculations. Best of all: do the whole thing on a slide-rule, which makes it possible to do the whole problem in a snap and gives readings all up and down the speed range scale.
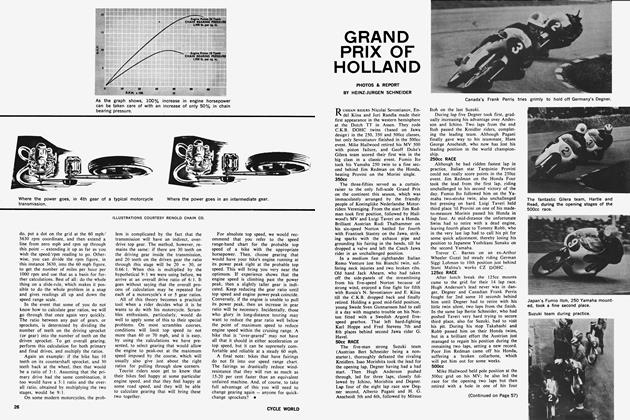
In the event that some of you do not know how to calculate gear ratios, we will go through that once again very quickly. The ratio between any pair of gears, or sprockets, is determined by dividing the number of teeth on the driving sprocket (or gear) into the number of teeth on the driven sprocket. To get overall gearing, perform this calculation for both primary and final drives, and multiply the ratios.
Again an example: if the bike has 10 teeth on its countershaft sprocket, and 30 teeth back at the wheel, then that would be a ratio of 3:1. Assuming that the primary drive had the same combination, it too would have a 3:1 ratio and the overall ratio, obtained by multiplying the two stages, would be 9:1.
On some modern motorcycles, the problem is complicated by the fact that the transmission will have an indirect, overdrive top gear. The method, however, remains the same: if there are 30 teeth on the driving gear inside the transmission, and 20 teeth on the driven gear the ratio through this stage will be 20 -r 30, or 0.66:1. When this is multiplied by the hypothetical 9:1 we were using before, we arrive at an overall drive ratio of 6:1. It goes without saying that the overall process of calculation may be repeated for each of a motorcycle’s 4 or 5 gear ratios.
All of this theory becomes a practical tool when a rider decides what it is he wants to do with his motorcycle. Scrambles enthusiasts, particularly, would do well to apply some of this to their special problems. On most scrambles courses, conditions will limit top speed to not more than 60 or 70 mph, and it is easy, by using the calculations we have presented, to select gearing that would allow the engine to peak-out at the maximum speed imposed by the course, which will usually also give just about the right ratios for pulling through slow corners.
Tourist riders soon get to know that their bikes feel happy at some particular engine speed, and that they feel happy at some road speed, and they will be able to calculate gearing that will bring these two together.
For absolute top speed, we would recommend that you refer to the speed range-band chart for the probable top speed of a bike with the appropriate horsepower. Then, choose gearing that would have your bike’s engine running at its power peak right at the probable top speed. This will bring you very near the optimum. If experience shows that the engine speed is climbing past the power peak, then a slightly taller gear is indicated. Keep reducing the gear ratio until top speed and engine power peak coincide. Conversely, if the engine is unable to pull its power peak, then an increase in gear ratio will be necessary. Incidentally, those who glory in long-distance touring may want to reduce the gear ratio well below the point of maximum speed to reduce engine speed within the cruising range. A bike that is “over-geared” may not have all that it should in either acceleration or top speed, but it can be supremely comfortable and reliable at a steady 60 mph.
A final note: bikes that have fairings do not fit into our speed range chart. The fairings so drastically reduce windresistance that they will run as much as 15-20 per cent faster than an equivalent unfaired machine. And, of course, to take full advantage of this you will need to change gearing again — anyone for quickchange sprockets? •