Service
SERVICE
PAUL DEAN
Slip-slidin' away
QReading the November Service column, I found special interest in your “Breaking the Mold” comments about the dangers of mold release on new tires. Like the guy who wrote that letter, Mark Teragawa, I too have a 2001 Suzuki SV650, and I recently had it fitted with a new rear Dunlop Sportmax Q2. On the very first corner after the tire change, I took a spill. I had just shifted into second gear, still keeping in mind that new tires are slippery, and when I initiated a left turn, the SV started to low-side. I tried to correct, but instead I high-sided.
I would like to know if the mold release was to blame. The tire had 38 psi in it, whereas Dunlop’s recommended pressure is 36, and the accident took place on an overcast, 50-degree day.
No obvious dirt, liquid or other debris was found at the crash site. Could the slightly higher tire pressure or the cooler weather have been the culprit?
John Schnettler Saint Cloud, Minnesota
A Whatever might have caused your crash, it wasn’t tire pressure; that extra 2 psi would not be sufficient to make a bike misbehave that way. And neither was it mold release; Dunlop does not use mold release or any other similar agent when manufacturing motorcycle tires. It instead uses a type of mold with an ultra-smooth, chrome-like finish that prevents the rubber from sticking to the interior when the tire is removed. That’s why new Dunlop tires have a shinier tread surface than most others.
But that doesn’t mean you can spoon on new Dunlops and immediately go all Ben Spies. The tread surface still needs a little scuffing to provide the best grip, and a new tire requires at least one decent heat cycle to even begin performing the way it was intended. A tire is a rather complex structure of alternate layers of fabric and rubber, and after it is popped out of the mold, it has not yet undergone any of the flexing cycles that put heat in the structure and effectively “break it in.” So, at first, a new tire tends to be a little stiff and not quite as reactive as it will be
once it has been flexed many thousands of times over the first few dozen miles. This is why racers use tire warmers; in lieu of the flexing provided by many reasonably fast laps, the warmers artificially break in new tires and get them up to operating temperature.
You were not riding your SV at race speeds when you fell, but a combination of several factors is probably what put you on the ground. First, the new rear tire still had a slightly slick tread surface, even without mold release; second, the new tire was not broken in, so it could not yet perform as intended; third, the new tire behaved a little differently than the old one that had just been removed, making it more difficult for you to anticipate its behavior; and fourth, on a cloudy, 50-degree day, the temperature of the road surface likely was lower, preventing the tire from generating any meaningful heat in such a short distance.
End result: You fall down, go boom. We’re all just thankful that you didn’t get hurt.
No wrong answer
QI bought a ’94 Honda VFR750F with 3000 miles on the clock for S500. The bike looks almost brandnew, but the original owner left the fuel tank half-full and the petcock in the On position about 10 years ago. (The petcock is very hard to access.) When I removed the carburetors to clean them, noticed gunk, varnish and rusty-looking fuel deposits on the valves. I can only assume that crud made its way inside the cylinders, as well. I put the bike on its centerstand, shifted it into sixth gear and rotated the rear tire, and the engine turned freely. Before I invest the time and effort to rebuild the carbs and start the engine, what should I do about the deposits on the valves? Or am I screwed? I hope I can save this great bike! Bob Kelly
Boulder, Colorado
A This is a simple choice, really.
There are two ways to know if the deposits that formed over time have harmed the engine: either disassemble the top end and inspect for damage or start the engine and run it. Top-end rebuilds on a VFR are neither cheap nor easy, even if they only involve removing the heads and reinstalling them. So, if you take that route, you will have a sizable investment in time and, if a mechanic does the work, expense. And in the end, you may find nothing wrong, meaning that it all was for naught.
If you instead run the engine long enough to assess its condition, it may prove to be just fine, saving you the time and money you would have spent on a top-end job. And if running it reveals that there indeed is some top-end damage, well, you’ll be no worse off than you would have been if you had chosen Door Number One.
So, my advice is to pour a little carburetor cleaner in the gas tank (I assume you will already have cleaned the carbs themselves) to help dissolve the deposits on the valves, fire ’er up and see what happens. You really have nothing to lose.
Sump-thing to consider
QI have a question about the two different kinds of lubrication systems used by motorcycles. Some are dry-sump types, like on HarleyDavidsons and older British bikes, but a number of current motorcycles also use them. Most engines on modern
ToolTime
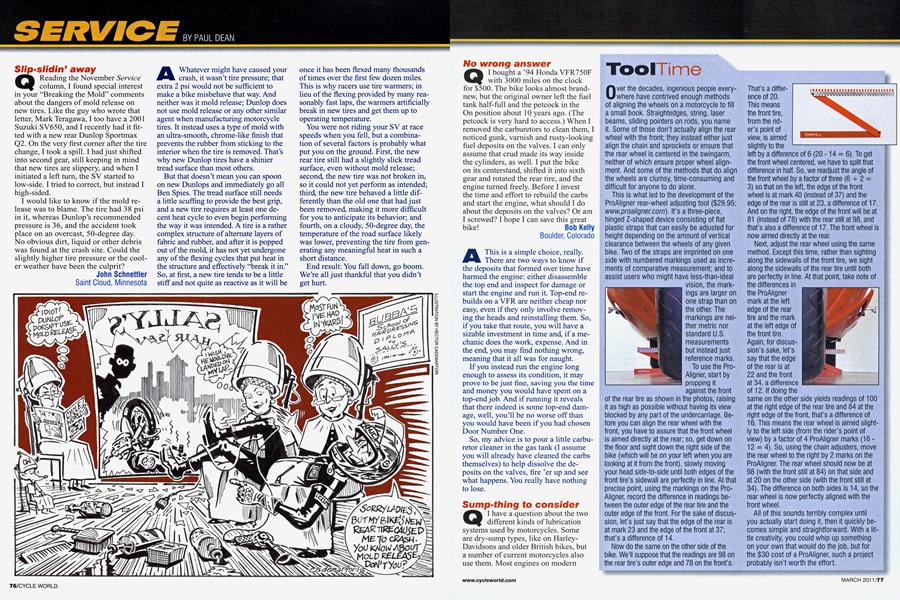
O verthe decades, ingenious people every where have contrived enough methods of aligning the wheels on a motorcycle to fill a small book. Straightedges, string, laser beams, sliding pointers on rods, you name it. Some of those don't actually align the rear wheel with the front; they instead either just align the chain and sprockets or ensure that the rear wheel is centered in the swingarm, neither of which ensure proper wheel align ment. And some of the methods that do align the wheels are clumsy, time-consuming and diffietilt for anyone to do alone
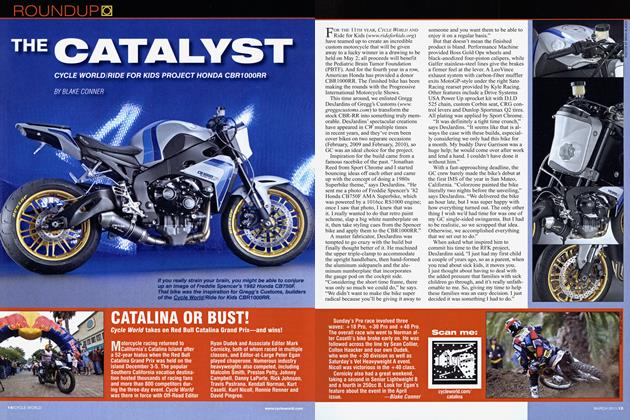
This is what led to the development of the ProAligner rear-wheel adjusting tool ($29.95; www.proaligner.com). It’s a three-piece, hinged Z-shaped device consisting of flat plastic straps that can easily be adjusted for height depending on the amount of vertical clearance between the wheels of any given bike. Two of the straps are imprinted on one side with numbered markings used as increments of comparative measurement; and to assist users who might have less-than-ideal
vision, the markings are larger on one strap than on the other. The markings are neither metric nor standard U.S. measurements but instead just reference marks.
To use the ProAligner, start by propping it against the front
of the rear tire as shown in the photos, raising it as high as possible without having its view blocked by any part of the undercarriage. Before you can align the rear wheel with the front, you have to assure that the front wheel is aimed directly at the rear; so, get down on the floor and sight down the right side of the bike (which will be on your left when you are looking at it from the front), slowly moving your head side-to-side until both edges of the front tire’s sidewall are perfectly in line. At that precise point, using the markings on the ProAligner, record the difference in readings between the outer edge of the rear tire and the outer edge of the front. For the sake of discussion, let’s just say that the edge of the rear is at mark 23 and the edge of the front at 37; that’s a difference of 14.
Now do the same on the other side of the bike. We’ll suppose that the readings are 98 on the rear tire’s outer edge and 78 on the front’s.
That’s a difference of 20.
This means the front tire, from the rider’s point of view, is aimed slightly to the
left by a difference of 6 (20 -14 = 6). To get the front wheel centered, we have to split that difference in half. So, we readjust the angle of the front wheel by a factor of three (6^-2 =
3) so that on the left, the edge of the front wheel is at mark 40 (instead of 37) and the edge of the rear is still at 23, a difference of 17. And on the right, the edge of the front will be at 81 (instead of 78) with the rear still at 98, and that’s also a difference of 17. The front wheel is now aimed directly at the rear.
Next, adjust the rear wheel using the same method. Except this time, rather than sighting along the sidewalls of the front tire, we sight along the sidewalls of the rear tire until both are perfectly in line. At that point, take note of
the differences in the ProAligner mark at the left edge of the rear tire and the mark at the left edge of the front tire.
Again, for discussion’s sake, let’s say that the edge of the rear is at 22 and the front at 34, a difference of 12. If doing the
same on the other side yields readings of 100 at the right edge of the rear tire and 84 at the right edge of the front, that’s a difference of 16. This means the rear wheel is aimed slightly to the left side (from the rider’s point of view) by a factor of 4 ProAligner marks (16 -12 = 4). So, using the chain adjusters, move the rear wheel to the right by 2 marks on the ProAligner. The rear wheel should now be at 98 (with the front still at 84) on that side and at 20 on the other side (with the front still at 34). The difference on both sides is 14, so the rear wheel is now perfectly aligned with the front wheel.
All of this sounds terribly complex until you actually start doing it, then it quickly becomes simple and straightforward. With a little creativity, you could whip up something on your own that would do the job, but for the $30 cost of a ProAligner, such a project probably isn’t worth the effort. high-performance bikes, though, have wet-sump lubrication systems. Are there advantages and disadvantages to both types or do manufacturers just have preferences based on their engineering history or previous engine designs?
Jeff Swanson Palo Alto, California
A Yes, both types of oiling systems do have advantages and disadvantages. A wet-sump system (which stores the engine oil in the crankcase) is self-contained, generally less expensive to manufacture (fewer components) and requires just one oil pump, which also is usually located in the crankcase. Plus, wet-sump systems tend to allow easier oil changes (only one drain point) and simpler oil-level checking procedures (especially with sight-glass windows).
Dry sump’s two biggest advantages are that it allows an engine to be shorter, since the crankcase can be essentially “shrink-wrapped” around the arc of the crankshaft throws; the engine can therefore sit lower in the chassis, helping to drop the overall center of gravity. Dry-sump systems also reduce the oil’s operating temperature. The mere fact that oil is pumped out of the device that is making it hot (the engine) and into a separate reservoir before being cycled back into the engine gives the oil a brief time to lose some heat, even without the aid of an oil cooler. A dry-sump system’s oil tank and feed lines get very hot when the engine is running, and that heat is being extracted from the oil as it circulates through them.
Another advantage of dry-sump designs is that they significantly reduce “windage.” That’s the frictional power loss that occurs as the oil makes nonlubricating contact with moving parts inside the engine. In most wet-sump systems, the worst loss occurs as the oil splashes against the counterweights of the crank; the faster the cranks spins, the greater the loss. But with the tiny crankcases of a dry-sump system and the small amount of oil in it at any given time, the windage loss is far less.
In vehicles that are subject to highg-load acceleration and turning forces, a wet-sump system’s internal reservoir usually must have strategically placed baffling to prevent oil from being thrust away from the pump’s pickup location. Not so much a problem with dry sumps, though, because the oil outlet in the reservoir always can be located at a low point where the oil will not be thrust away from the pickup by inertial forces. On the minus side, a dry-sump system requires two oil pumps—one to extract the oil from the reservoir and circulate it under pressure throughout the engine, another to “scavenge” the oil from the crankcase sump and return it to the reservoir. Plus, since the sump volume is very small, the design of the crankcase breather system is much more critical than on a wet-sump engine. And finally, a dry-sump arrangement offers a greater opportunity for leaks, since it contains more components and external fittings.
Best UsedBikes
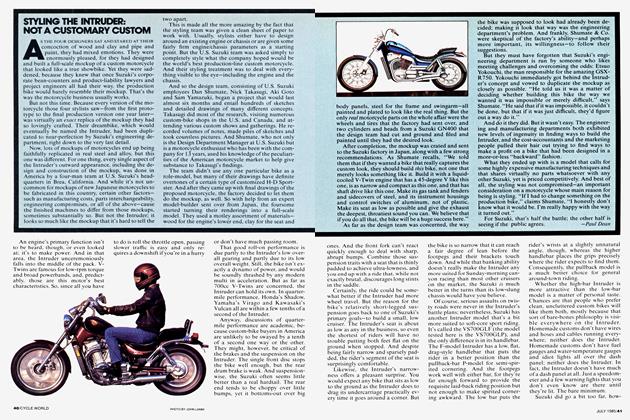
Suzuki GSX-R750
Best Superbike, 2000 Ten Best Awards
MSRP new: $9399 (2000)
Blue Book retail value: $3390 Basic specs: A fully faired, fuel-injected, ultra-light repli-racer powered by a 750cc inline-Four engine.
Why it won: We had little choice. Although the GSX-R750 has been around since 1986 (1985 outside of the U.S.), the 2000 model was—and still is—one of the greatest sportbikes of all time. Its handling is neartelepathic, seeming to lead the bike precisely where you want it to go at the very moment you even think about it. Between 10,000 and 14,000 rpm—the meatiest part of its surprisingly broad powerband—the engine cuts loose a piercing shriek that raises the hair on the back of your neck while yanking you forward at a rate that’s almost disorienting. From the impeccable feedback it provides to the unbridled confidence it inspires to the sheer
excitement it delivers, the 2000 GSX-R750 is the personification of sportbike performance.
If you’re lucky enough to find one still in good shape, you’re in for an unforgettable ride.
From the 2000 Ten Best story:
“Near-170-mph top speed puts it among the 900cc elite. Its 398-pound dry weight makes it lighter than any 600cc sportbike on the market. Need awesome chassis feedback at the limit? Got it. Flickability and lean angles that’ll leave you dizzy? In spades. A 124-horsepower, 14,000-rpm wail equaled in frenzy only by the joyful screams inside your helmet? Waahhh! It’s all here.”
Useful resources: GSX-Rs of all years and sizes are mechanical legends in their own time, so it’s not hard to find volumes of information about them. And, once again, the Internet is the quickest and easiest source of anyand everything GSX-R. As with many popular motorcycles, there is virtually endless information about these Suzukis on the Internet, including forums dedicated exclusively to GSX-Rs. You’ll also find a cornucopia of other related “stuff,” such as Gixxer 750 road tests from the present all the way back to the original ’86, tons of tech information, all manner of owner feedback, more hop-up and racing equipment than you could count, along with GSX-Rs for sale, related photos, T-shirts, posters and a whole lot more.
So, to answer your last question, manufacturers decide between wetand dry-sump oiling systems based partly on their history but also on the requirements for any given motorcycle.
A real stand-up guy
QWhat makes a motorcycle “stand up” when the front brakes are applied while leaned over in a turn? I read online that it is simply due to a change in the center of gravity. The same source then said that it would not occur on a bike like my 2002 BMW, but it most surely does. Donan Klooz
Mobile, Alabama
A A bike’s center of gravity is involved, but not because it “changes”; when the front brake is applied while turning, the eg remains in the same place as always. Instead, what’s at work here is the principle of inertia as described in Newton’s first law of motion. It states that a body in motion at a constant velocity will remain in motion in a straight line unless acted upon by an outside force. The reason you need to lean a motorcycle over to make it turn in the first place is that, according to Sir Isaac, inertia really wants it to continue going straight ahead. As a result, you have to lean it into a turn far enough that the force of gravity trying to pull it over onto its side is equal to the force trying to keep it going straight, with both forces acting at the bike’s center of gravity.
When you apply the front brakes while turning, however, you introduce yet another force. This one tries to slow a motorcycle that not only wants to remain in motion at a “constant velocity” but is already maintaining a critical balance between falling inward and standing up; braking, however, upsets that balance. Like inertia, the force of braking always wants to act in a straight line, whether a bike is turning or not.
So, if the front brakes are applied when the bike is leaned over, that force, acting at the eg, causes the bike to “trip” over its front contact patch and want to stand up. The only relief is either to regain the aforementioned balance by either releasing the brake or leaning the bike over even farther.
HomeBrews
I’m a long-time Cycle World reader and subscriber, and I wanted to tell you about a DIY alternative to your Tool Time article in the December, 2010, issue regarding Pig Mat oil-absorbent pads. I’m glad that Mark Hoyer is happy with the performance of that product, and I don’t want to detract from his satisfaction. But for these same purposes over the past 10 years, I’ve used a product that can be found in the pet aisles at Walmart: Puppy Dog Training Pads. They’re usually in packages of 24 and have absorbent material on the topside of each 23" x 24" mat, with a plastic-like layer on the underside that keeps liquid from seeping through. They work great under my BMW K1200LT when I invariably make a mess while changing fluids. Again, no knock on Pig Mats; I’m just suggesting an easy alternative that works so well. Dick Largen
Boerne, Texas
A Even though Hoyer doesn’t have a
dog, he does maintain a small fleet of older British bikes and cars, so a 24-pack of those Dog Training Pads should last him about, oh, maybe a week. Or less.
Seriously, we’re very grateful for the useful tip. We—and the greeters at Walmart—thank you very much.
TechTips
I’ve seen or tried quite a few different and creative methods for installing handgrips, including the use of gasket cement, hair spray, super glue, friction tape and, of course, grip adhesive. While some of these materials will hold the grips securely if
applied properly, sliding a grip fully into place over a sticky surface isn’t always easy, and removing it later on can be a little messy and time-consuming.
That’s why I prefer to use contact cleaner for that task. I first clean the handlebar surface
or twistgrip housing with the cleaner, then spray about two seconds’ worth into the grip. If the grip is closed at one end, I put my thumb over the open end and shake it to ensure that the entire inner surface gets coated with the cleaner. If the grip is open at both ends, I shake it while holding it closed between both of my palms. I then dump out the excess and immediately
slide the grip into place while its interior is still wet. The contact cleaner attacks the grip’s rubber material enough to render it slippery at first, making installation a snap; but the rubber becomes ever more sticky as it dries and quickly forms a good,
solid bond with the handlebar or twistgrip housing. If the need later arises to remove the grip, you just slice it lengthwise with a sharp knife and peel it away, leaving no glue or other messy residue to clean up.
On dirtbikes (and even my personal streetbikes), I apply a couple of loops of tightly drawn safety wire around both the outer and inner circumference of each grip (and one in the middle on dirtbikes); some grips even are molded with grooves just for this purpose. The safety wire is inflexible, so it squeezes the rubber to create a seal that prevents water from getting under the grip and loosening it.
Some bikes have a greater tendency than others to stand up when braking while turning. Bikes with a high center of gravity often are the worst offenders, but other factors can play a role, as well. Steering geometry can have a considerable effect on this characteristic, as can front-tire width, tire carcass design and even the bike’s wheelbase. Because trail braking is usually done most often and aggressively on racetracks and backroads, designers of racebikes and sportbikes strive to minimize this trait on motorcycles designed for those purposes.
To rev or not to rev
QI have a question about gear
selection. I own a 2004 Honda VFR800, and no matter what some moto-journalists have said about its
VTEC valve system, I just love this bike. I ride primarily on twisty backroads in third and fourth gear most of the time at speeds of 45-70 mph. That puts the revs up at 6000-to-8000-rpm levels on an engine that redlines at 12,000. I talked to several dealers about this, and they insisted that I need to ride in sixth gear at speeds over 55 mph. Is riding at higher rpm hard on the valvetrain or other parts of my bike? In sixth gear at those speeds, the engine just does not have the torque I like for exiting corners. Wilbur Hickman Submitted via www.cycleworld.com
AI don’t like leaping to conclusions, but the dealers who gave you that so-called “advice” either are woefully misinformed or completely misunderstood your inquiry, because what they told you is utter nonsense. First of all, 6000 to 8000 is not even close to “high rpm” on an engine that can safely reach 12,000. You could, in fact, ride all day in the 10,000-to12,000-rpm range without fear of damaging the engine. VFR engines have proven exceptionally reliable, including the VTEC versions, and large numbers ofVFRs just like yours have easily survived countless track days and riding schools. Those were conditions in which most of the riding was conducted in the upper one-third of the rpm range.
Recall Roster
NHTSA Recall NO.10V496000 Manufacturer: BMW of North America Model: 2007-10 F650GS Number of units involved: 1835 Problem: On certain of these motorcycles manufactured between November, 2006, and January, 2010, washers on the front brake disc may have prevented the proper torquing of the disc’s fasteners. Over time, one or more of the fasteners could become loose, allowing the disc also to loosen. This could negatively affect proper braking performance, possibly increasing the risk of a crash.
Remedy: Dealers will inspect and repair the motorcycles free of charge. Owners not receiving this remedy can call BMW at 866/525-7417.
Even more compelling evidence is the fact that in May of 1986 at a five-mile tire-test track in Laredo, Texas, a bonestock first-generation VFR750F set a world 24-hour speed record of more than 143 mph. Doing so required the bike to run flat-out and wide-open for 24 straight hours except for very quick pit stops about once every hour for refueling and rider changes. Immediately after that event had concluded, Honda permitted me to ride the record-setting bike home from Laredo and tear down its engine to inspect for wear and damage. Not only did I find no damage whatsoever, the amount of wear was so minimal that practically every measurement I took was still within the factory manual’s prescribed assembly tolerances, never mind the allowable wear limits. The engine had not been hurt one bit by a full day of running at or near peak power rpm, and your bike’s engine is a further evolution of that one.
Bottom line? Forget what those dealers told you and ride your VFR the way you want to ride it—and the way it was intended to be ridden. It won’t mind in the least. □
Got a mechanical or technical problem with your beloved ride? Can’t seem to find workable solutions in your area? Or are you eager to learn about a certain aspect of motorcycle design and technology? Maybe we can help. If you think we can, either: 1) Mail a written inquiry, along with your full name, address and phone number, to Cycle World Service, 1499 Monrovia Ave., Newport Beach, CA 92663; 2) fax it to Paul Dean at 949/631-0651 ; 3) e-mail it to CW1Dean@aol.com; or 4) log onto www. cycleworld.com, click on the “Contact Us” button, select “CW Service” and enter your question. Don’t write a 10-page essay, but if you’re looking for help in solving a problem, do include enough information to permit a reasonable diagnosis. And please understand that due to the enormous volume of inquiries we receive, we cannot guarantee a reply to every question.