Tool Time
Tool Time
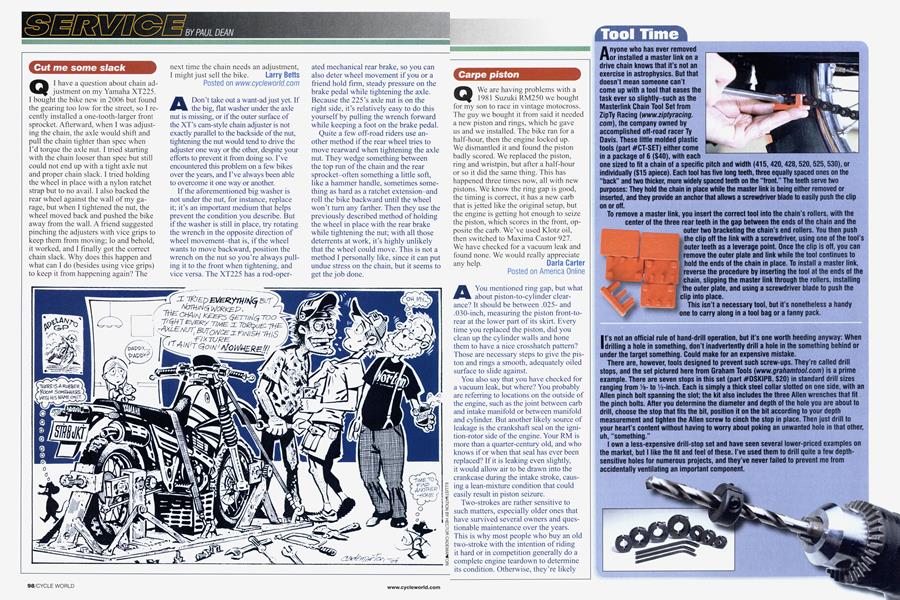
Anyone who has ever removed or installed a master link on a drive chain knows that it’s not an exercise in astrophysics. But that doesn’t mean someone can’t come up with a tool that eases the task ever so slightly—such as the Masterlink Chain Tool Set from ZipTy Racing (www.ziptyracing.com), the company owned by accomplished off-road racer Ty Davis. These little molded plastic tools (part #CT-SET) either come in a package of 6 ($40), with each one sized to fit a chain of a specific pitch and width (415,420,428,520,525,530), or individually ($15 apiece). Each tool has five long teeth, three equally spaced ones on the “back” and two thicker, more widely spaced teeth on the “front.” The teeth serve two purposes: They hold the chain in place while the master link is being either removed or inserted, and they provide an anchor that allows a screwdriver blade to easily push the clip on or off.
To remove a master link, you insert the correct tool into the chain’s rollers, with the center of the three rear teeth in the gap between the ends of the chain and the outer two bracketing the chain’s end rollers. You then push the clip off the link with a screwdriver, using one of the tool’s outer teeth as a leverage point. Once the clip is off, you can remove the outer plate and link while the tool continues to hold the ends of the chain in place. To install a master link, 4'-. reverse the procedure by inserting the tool at the ends of the chain, slipping the master link through the rollers, installing the outer plate, and using a screwdriver blade to push the clip into place.
This isn’t a necessary tool, but it’s nonetheless a handy one to carry along in a tool bag or a fanny pack.
It’s not an official rule of hand-drill operation, but it’s one worth heeding anyway: When drilling a hole in something, don’t inadvertently drill a hole in the something behind or under the target something. Could make for an expensive mistake.
There are, however, tools designed to prevent such screw-ups. They’re called drill stops, and the set pictured here from Graham Tools (www.grahamtool.com) is a prime example. There are seven stops in this set (part #DSKIPB, $20) in standard drill sizes ranging from 1/sto Vis-inch. Each is simply a thick steel collar slotted on one side, with an Allen pinch bolt spanning the slot; the kit also includes the three Allen wrenches that fit the pinch bolts. After you determine the diameter and depth of the hole you are about to drill, choose the stop that fits the bit, position it on the bit according to your depth measurement and tighten the Allen screw to cinch the stop in place. Then just drill to your heart’s content without having to worry about poking an unwanted hole in that other, uh, “something.”
I own a less-expensive drill-stop set and have seen several lower-priced examples on the market, but I like the fit and feel of these. I’ve used them to drill quite a few depthsensitive holes for numerous projects, and they’ve never failed to prevent me from accidentally ventilating an important component.