Lessons From the Six-Hour
Lessons from the Six-Hour
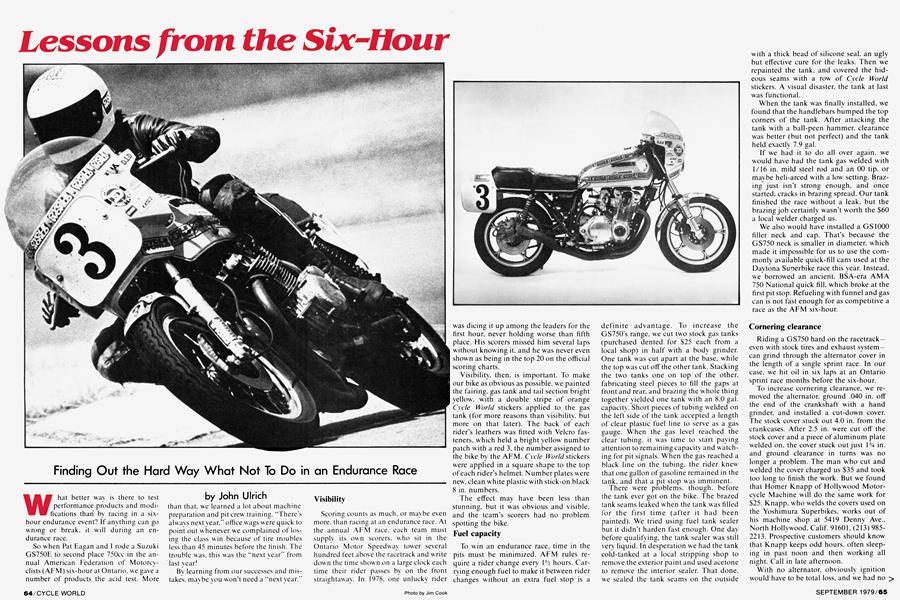
Finding Out the Hard Way What Not To Do in an Endurance Race
John Ulrich
What better way is there to test performance products and modifications than by racing in a six-hour endurance event? If anything can go wrong or break, it will during an endurance race.
So when Pat Eagan and I rode a Suzuki GS750E to second place 750cc in the annual American Federation of Motorcyclists (AFM) six-hour at Ontario, we gave a number of products the acid test. More than that, we learned a lot about machine preparation and pit crew training. “There's always next year," office wags were quick to point out whenever we complained of losing the class win because of tire troubles less than 45 minutes before the finish. The trouble was, this was the “next year" from last year!
By learning from our successes and mistakes. maybe you won’t need a “next year."
Visibility
Scoring counts as much, or maybe even more, than racing at an endurance race. At the annual AFM race, each team must supply its own scorers, who sit in the Ontario Motor Speedway tower several hundred feet above the racetrack and write down the time shown on a large clock each time their rider passes by on the front straightaway. In 1978. one unlucky rider was dicing it up among the leaders for the first hour, never holding worse than fifth place. His scorers missed him several laps w ithout knowing it. and he was never even shown as being in the top 20 on the official scoring charts.
Visibility, then, is important. To make our bike as obvious as possible, we painted the fairing, gas tank and tail section bright yellow, with a double stripe of orange Cycle World stickers applied to the gas tank (for more reasons than visibility, but more on that later). The back of each rider’s leathers was fitted with Velcro fasteners, which held a bright yellow' number patch with a red 3, the number assigned to the bike by the AFM. Cycle World stickers were applied in a square shape to the top of each rider's helmet. Number plates were new', clean white plastic w ith stick-on black 8 in. numbers.
The effect may have been less than stunning, but it was obvious and visible, and the team’s scorers had no problem spotting the bike.
Fuel capacity
To win an endurance race, time in the pits must be minimized. AFM rules require a rider change every Wi hours. Carrying enough fuel to make it between rider changes without an extra fuel stop is a definite advantage. To increase the GS750’s range, we cut two stock gas tanks (purchased dented for $25 each from a local shop) in half with a body grinder. One tank was cut apart at the base, while the top was cut off the other tank. Stacking the two tanks one on top of the other, fabricating steel pieces to fill the gaps at front and rear, and brazing the whole thing together yielded one tank with an 8.0 gal. capacity. Short pieces of tubing welded on the left side of the tank accepted a length of clear plastic fuel line to serve as a gas gauge. When the gas level reached the clear tubing, it was time to start paying attention to remaining capacity and watching for pit signals. When the gas reached a black line on the tubing, the rider knew that one gallon of gasoline remained in the tank, and that a pit stop was imminent.
There were problems, though, before the tank ever got on the bike. The brazed tank seams leaked when the tank was filled for the first time (after it had been painted). We tried using fuel tank sealer but it didn’t harden fast enough. One day before qualifying, the tank sealer was still very liquid. In desperation we had the tank cold-tanked at a local stripping shop to remove the exterior paint and used acetone to remove the interior sealer. That done, we sealed the tank seams on the outside with a thick bead of silicone seal, an ugly but effective cure for the leaks. Then we repainted the tank, and covered the hideous seams with a row of Cycle World stickers. A visual disaster, the tank at last was functional.
When the tank was finally installed, we found that the handlebars bumped the top corners of the tank. After attacking the tank with a ball-peen hammer, clearance was better (but not perfect) and the tank held exactly 7.9 gal.
If we had it to do all over again, we would have had the tank gas welded with 1/16 in. mild steel rod and an 00 tip, or maybe heli-arced with a low' setting. Brazing just isn’t strong enough, and once started, cracks in brazing spread. Our tank finished the race without a leak, but the brazing job certainly wasn’t worth the $60 a local welder charged us.
We also would have installed a GS1000 filler neck and cap. That’s because the GS750 neck is smaller in diameter, which made it impossible for us to use the commonly available quick-fill cans used at the Daytona Sunerbike race this year. Instead, we borrowed an ancient, BSA-era AMA 750 National quick fill, which broke at the first pit stop. Refueling with funnel and gas can is not fast enough for as competitive a race as the AFM six-hour.
Cornering clearance
Riding a GS750 hard on the racetrackeven with stock tires and exhaust systemcan grind through the alternator cover in the length of a single sprint race. In our case, we hit oil in six laps at an Ontario sprint race months before the six-hour.
To increase cornering clearance, we removed the alternator, ground .040 in. off the end of the crankshaft with a hand grinder, and installed a cut-down cover. The stock cover stuck out 4.0 in. from the crankcases. After 2.5 in. were cut off the stock cover and a piece of aluminum plate welded on, the cover stuck out just VA in. and ground clearance in turns was no longer a problem. The man who cut and welded the cover charged us $35 and took too long to finish the work. But we found that Homer Knapp of Hollywood Motorcycle Machine will do the same work for $25. Knapp, who welds the covers used on the Yoshimura Superbikes, works out of his machine shop at 5419 Denny Ave., North Hollywood, Calif. 91601, (213) 9852213. Prospective customers should know that Knapp keeps odd hours, often sleeping in past noon and then working all night. Call in late afternoon.
With no alternator, obviously ignition would have to be total loss, and we had no > way to predict whether or not one battery would go the entire six hours. So we fitted three batteries with quick-disconnect gang connectors, and soldered a mating connector into the wiring harness. The quickdisconnect, 16-gauge wires couldn’t handle the load imposed by the electric starter, the starter was removed and a plug installed in the alternator cover. All the bike’s lights had already been removed as unnecessary.
The battery was replaced twice during the race, but because we hadn’t discussed an appropriate signal for the rider to alert the pit crew that a change was needed (as evidenced by missing at top end as the battery was drained), we lost several minutes each time. In theory, one man should have flipped up the seat and pulled out the battery while another installed the replacement. Two changes were needed because a member of the pit crew inadvertently left the two spare batteries sitting on bare concrete for several hours before the race, and the batteries lost some charge.
The ignition itself was stock Suzuki points. We didn’t want to take any chances on a “black box” failure with an electronic ignition. The stock parts worked flawlessly.
The stock footpegs were replaced with a pair of Honda 305 Super Hawk mounts and pegs which repositioned the pegs an inch higher and an inch farther back than stock. To match, the shift lever was moved up one notch on the splined shift shaft and the brake lever shortened 3 in. by cutting out a piece and rewelding. With the pegs relocated, the bike could be leaned over farther without the rider’s feet dragging. The shorter brake lever also reduced leverage on the touchy rear disc brake, making wheel control easier, thus avoiding lock-up and making braking more predictable.
Wheels and Tires
The standard GS750E has cast wheels with a WM2 front rim width and WM3 rear rim width. We knew that in the past, open-class bikes had finished the six-hour on wide Michelin and Goodyear slicks, and since the 750 would have less power than an AMA Superbike, we figured that slicks would easily last the distance while giving superior traction. So we had Meryl’s Pro Wheel lace a DID WM5-18 aluminum alloy rim to a stock GS750 (standard model) rear hub and a DID WM3-18 aluminum alloy rim to a standard front hub, both wheels using Meryl’s new 7gauge spokes. The plan was to use a set of experimental Metzeler slicks front and rear. The tires had been used with great success in European endurance races, we were told, but were not available in a 19 in. size. By the time we learned that the front tire simply wouldn’t work—it hopped off the ground in corners and set up a front end oscillation with the stock forks—it was too late to find a set of Goodyear slicks for sale. All were sold, and supplies of 19 in. front slicks had been tight for weeks anyway. We hurriedly mounted a 19-in. Michelin PZ2 M45 on the front wheel off' Eagan’s 845cc GS750 Superbike (with WM3-19 Borriani shouldered alloy rim) but found that it washed out in hard corners, bouncing the wheel off the ground. Another quick switch to a 3.50/ 4.50-19 Dunlop KR83 solved the front end problem.
But the 150/70-18 Metzeler slick became greasy on the right side 10 laps into the six-hour, slipping and sliding and even requiring that the rider upshift out of turns to keep from getting sideways. After five hours the bike was sliding on the banking at steady throttle. Trying not to crash was a serious worry in every righthand turn, and righthanders dominate at OMS. At 5 hours, 15 minutes the KR83 went flat in Turn 11. (Later inspection revealed that the 3.25-19 tube installed in the tire was too small to fit the carcass and had chaffed through). Three laps after the front wheel change was completed, the rear slick had worn through three layers of its four ply carcass from spinning and sliding, and the rear wheel was changed. One more lap would have surely resulted in a flat with possibly disastrous results. The race was finished on the stock Suzuki wheels and IRC tires. Wear from the final 12 laps of the race indicates that the IRC tires would not have lasted six hours at the lap times then being turned.
Brakes
The stock front brake pads were replaced with Ferodo compound 2447 pads, while Ferodo DS-11 compound pads were used in the rear.
The 2447 compound for front brakes replaces the older 2434 Ferodo compound,> which would glaze and carbonize if not carefully broken in, and which wouldn’t work on plasma-sprayed aluminum discs. The 2434 pads stopped great but were soft and wore out quickly.
The new 2447 compound has a wear rate four to five times greater than the older compound, according to Bob Pepper of Performance Research Organization (PRO), the Ferodo importers for this country. While the new' pads last longer and have a very stable and constant coefficient of friction at temperatures ranging from room temperature to past 1000°. they have slightly less friction than the earlier pads— on a scale of relative friction, the difference between the two compounds is 2 percent. The new' compound has an advantage, though, in that it works well w ith cast iron, plasma-coated aluminum and stainless steel discs.
The rear disc pads made of DS-1 1 compound are formulated to have a coefficient of friction 50 percent less than the front pads but more resistance to high temperatures. The result is very predictable action, making braking hard to the apex of a turn possible without a problem with wheel control.
While the latest Ferodo pads are not as sensitive to careful break-in as the previous compounds, the company still recommends following detailed break-in procedures packaged with each set of pads. Briefly, the instructions state that the brakes should be used lightlv until 80 percent of the pad surface is visibly contacting the disc, with the brakes used progressively harder and harder until the brake parts are very hot. Once the parts have cooled from the initial break-in session. they are then ready for sustained hard use.
Compared to stock, Ferodo front pads have more power and rear pads are less prone to lockup, but they squeal loudly in medium-lever-pressure street use.
The Ferodo company is a giant multinational manufacturer of friction materials. from Formula One and OEM car brakes to elevator clutches. The firm is involved in motorcycle brakes—a tiny portion of their business—thanks to the efforts of a few motorcycle enthusiasts working for the company, notably England’s Stuart King. The 2447 front pads are made in the firm's Australian plant, while the OS-1 1 pads come from the English factory.
The company has found that motorcycle racers—particularly the best American motorcycle racers—put brake pad materials through the most severe use of any application. The company makes specially coated pads for F750 and 250cc road racers which need no break-in. thus allowing the rider to change pads before the race and still banzai into Turn One. but those pads aren't available for street-based bikes.
From PRO. P.O. Box 445. Grafton, Mass. 01519. (617) 839-6342 or from Tom Havner’s Racer Supply, 6959 Van Nuvs Blvd.. Van Nuvs. Calif.. (213) 781-6386. Priced at $22.95 for each set of two compound 2447 front pads. $25.95 for a set of two compound DS-1 1 rear pads.
Engine modifications
The engine was left basically stock in the interests of reliability, with a few exceptions. The valve clearances were set at .004 in. instead of the stock recommended .002 to ensure that the clearances wouldn’t tighten up as the engine heated up. The automatic cam chain tensioner was modified to adjust manually by Kazuo Yoshima of Ontario Moto Tech Corp. (6850 Vineland Ave. #18. North Hollywood, Calif. 91605, $40) because the stock tensioner backs out and does not adequately control the cam chain (and thus, cam timing) at racing rpm. The redline for the race was normally 9000, with 10,000 used while making up time late in the race after the wheel changes.
ND W29Ept (platinum tip) racing plugs were used because platinum tips are supposed to last longer. The plugs didn’t give us any trouble, but were expensive, costing $12.50 each at a local shop.
A two-year-old standard Derale oil cooler which had survived two previous six-hours was mounted, and Bel-Ray 40w Racing Oil was used in the engine.
Yoshimura exhaust and Mikuni smoothbore carbs
“I thought you said that bike was stock except for carbs and pipe,” said one astonished competitor after our six-hour Suzuki won its qualifying heat.
It was. But adding a Yoshimura handbent exhaust system and 29mm Mikuni carburetors drastically improved the performance of the bike, adding to top speed and acceleration.
After the six-hour, we took the bike to the dragstrip, where it turned a best of 12.19 sec. at 108.95 with the stock gearing (which we ran in the race). The best the machine had done in the quarter-mile with stock pipes and carbs and standard gearing was 12.72 at 103.80 mph.
Curious as to how much effect the 29mm carburetors had, we installed the stock 26mm Mikunis with the hand-bent racing pipe in place. After the carbs had been properly jetted, the best the bike would turn was 12.88 at 104.40.
Fujio Yoshimura says that the unmuffled racing pipe was designed to be used with the larger carburetors. The stock carburetors simply cannot flow enough air to work with the racing exhaust system. Because the stock carbs are not smoothbores, turbulence reduces effective diameter even more than the 26mm nominal rating.
Using the racing pipe and smoothbore carbs with 117.5 main jets, the GS750 averaged 18 mpg during the six-hour race, which kept the machine running for the maximum allowed interval of IV2 hours between pit stops and rider changes— about 40 laps or 128 mi., with 7 gal. used.
To fit the racing exhaust system, Mike Velasco and Dave Langford of Yoshimura Speed Center cut off the right passenger peg frame loop and welded on a mount for the tailsection. Another tailsection mount bolted to the centerstand mounts underneath the frame. The hand-bent pipes met in a collector, which slipped into the tail section. The head pipes were secured by the stock bolts into the cylinder head. The system weighed 12 lb., compared to 33 lb. for the stock Suzuki system.
After mounting, the pipe could not touch the ground while the bike was still on two wheels, so cornering clearance was unhindered by the system.
The hand-bent racing pipe costs $275, with an additional $60 for frame cutting and mount fabrication. A mandrel-bent Yoshimura street exhaust system with racing tailsection sells for $160 in black and $180 in chrome, again with an additional $60 charged for frame modification and mount fabrication.
The 29mm Mikuni smoothbores sell for $333.
From Yoshimura Speed Center, 1958 Placentia, Costa Mesa, Calif. 92626, (714) 642-7094.
Barnett clutch kit
All the power in the world isn’t any good if it doesn’t get to the rear wheel, and a common weak link in power transmission is the clutch. The stock Suzuki clutch is fine for street use and pretty good for racing, but has its limits, limits likely to appear during a six-hour race.
In the 1977 AFM six-hour, two staff members rode an 845cc GS750 to fourth in the open class, with the clutch slipping after four hours. To avoid any such problems with the stock-displacement GS750E raced this year, we used a Barnett Tool and Engineering Extra Plate Clutch Kit #TM2EP1, which includes nine fiber drive plates (stock has eight), an extra copperplated steel driven plate (for a total of eight steel plates versus the stock seven) and a set of #MT-23 clutch springs. The seven stock steel driven plates were replaced with additional copper-plated Barnett plates.
The friction material used on the drive plates is made by Raybestos to Barnett specifications and contains a combination of asbestos, graphite, metal and polyglass particles. The material is suitable for use in wet or dry clutches (the GS750 clutch is wet) and is both denser and more stable than the cork-rubber compound used previously on Barnett clutch plates. The new material resists distortion because it expands less when heated, but has a slightly lower coefficient of friction than the rubber/cork compounds. The increased stability is worth the trade-off in friction, for two reasons. First, the clutch didn’t slip during our testing, so friction isn’t a prob-
lem; and second, the new material has less of the creeping, dragging, and hard-to-find neutral characteristics made famous by older rubber/cork compound Barnett clutches.
The standard Barnett clutch kit comes with one copper-plated steel plate to be used in addition to the standard steel plates. We ordered extra copper-coated plates to replace every steel driven plate in the clutch. The copper coating improves heat dissipation and prevents hot spots. With the copper-plated plates, the clutch runs cooler. Generally, a cooler-running clutch is a longer-lasting clutch—heat fries clutches and leads to glazing of plates and slipping under extreme use.
The chrome-silicone steel clutch springs included with the Barnett kit are heat treated and shot peened for strength, and have roughly 20 to 25 lb. more spring pressure than the stock springs. The additional pressure holds the plates tighter together and again discourages slip under hard acceleration. With the springs installed, it takes more effort to pull in the clutch, but that isn’t noticeable when racing.
The combination of springs, driven and drive plates gave excellent, progressive clutch action with no slip or creep evident after the six-hour race, four sprint races, and 20 passes at the drag strip. There is no doubt that the Barnett clutch parts work and work well.
The clutch kit with springs retails for $45.00. Seven additional copper plates (at $2.50 each) cost $ 17.50 for a total of $62.50 (plus tax) for all the pieces.
From Barnett Tool and Engineering, 4915 Pacific Blvd., Vernon, Calif. 90058.
Racer 1 S-3 Turbo Fairing
The best thing we did for the six-hour was install a Racer 1 S-3 Turbo fairing from Dick’s Cycle West. In past six-hour races, the rider’s neck and shoulders cramped from fighting the wind during long stints in the saddle. But with the fairing installed, blasting down the straightaways while tucked in behind the bubble was more comfortable than we would have thought possible on a race bike. Fatigue during a full IV2 hours between rider changes was greatly reduced and lap times stayed more consistent.
The Racer 1 fairing is made of ABS thermoplastic, is vacuum formed, and weighs 4.5 lb. The fairing shell is 3/16 in. thick and is bonded to 1/16 in. inner pods which secure the center mounts. The outer surface of the fairing is coated with Koard, a protective finish which resists deterioration from ultraviolet sunlight. The fairing comes in black or white, and will accept any automotive-type paint, including lacquer and acrylic.
The fairing is flared on the sides to deflect wind out away from the rider, with clearance cutouts to allow use of flat handlebars (we used GSM R100S-bend bars) instead of less comfortable clubman or clip-on bars. The lower edge of the fairing incorporates a small spoiler.
According to Dick LaPlante, president of Dick’s Cycle West, the unique shape of the fairing evolved during the decade since the company sold its first sport fairing. Although LaPlante admits that the firm’s wind tunnel is makeshift, testing has been done in the tunnel during development of the fairing.
Even if the wind tunnel design testing wasn’t as complex as that at Cal Tech, the fairing does work. Some fork-mount fairings affect handling at top speed and contribute to a wobble with handlebar oscillation. The Racer 1 fairing did not affect handling at all.
But while the fairing was still attached after six hours, it didn’t come through unscathed.
The. right center mount broke out of the inner pod, and cracking showed around the left center mount. Fortunately. LaPlante assured us that any such failure is covered by the fairing’s limited lifetime warranty. Of course, the warranty does not apply in the case of faulty installation, crashing, or bubble windshield cracks.
For street use. the center mounts fasten to the headlight ear bolts with steel strap while the top mounts fasten to the upper triple clamp pinch bolts. Because we wanted the bubble as high as possible for maximum wind protection, and because the headlight would be removed anyway (and the hole in the fairing covered with a number plate), we bolted the fairing top mounts to the Suzuki’s rear view mirror mounts on the handlebars. The center mounts were bolted to the headlight ears with the steel strap bent to accommodate the change in upper mount position.
While we did not test the fairing in street use with the headlight installed, the headlight can be adjusted with the fairing in place, and the windscreen is DOT approved.
With the mounting hardware and bubble windscreen, the Racer 1 S-3 Turbo fairing costs $117. From Dick’s Cycle West, 401 Agostino Rd., San Gabriel. Calif. 91776.
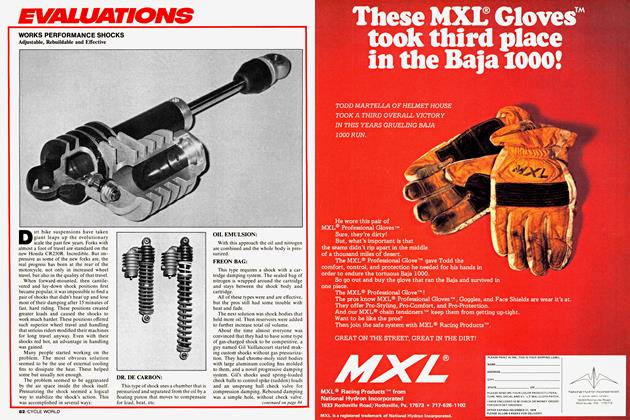
MX Fox shocks
MX Fox made its name with tough, long-travel shocks that often last a year or more under continuous motocross use. It makes sense then, that the gas pressurized prototype street bike shocks we tried for the six-hour worked as well at the finish as they did at the start.
The shocks are based on the MX Fox motocross shocks, but with less compression damping and more rebound damping. Construction is robust, with fade-free operation a major design objective. The shock bodies are mild steel, the shafts 0.5 in. o.d. chrome-moly. The shocks are emulsion type, that is, the pressurized nitrogen and the oil are mixed in the body.
While the shocks worked well during the six-hour and never called attention to themselves, MX Fox doesn’t have shocks in production for larger machines yet because they’re still testing. However, MX Fox shocks for lightweight road machines, such as Yamaha RD400s and RD350s, are currently available. Geoff Fox of MX Fox predicts that shocks for larger machines will be available in the fall of this year.
additional $22. Springs are available in 80, 90. 100, 110, 125 and 135 lb. ratings. (We used 110 lb. springs in the six-hour). From Moto-X Fox, Inc., 520 McGlincy Ln., Campbell, Calif. 95008. f§]
Shocks now being sold cost $109 per set of shocks, with each set of springs an