The Service Dept
THE SERVICE DEPT
MIDDLE WEST RESEARCH CORPORATION CDI
WALT FULTON
During the past few years the accessory sales market has seen several capacitive-discharge and transistor ignition systems come and go. Each of them claimed wondrous improvements in the performance and economy of any bike fitted with one of these trick ignitions. The prices of these units have also run the full course, from just a few dollars to higher than Wilt Chamberlain can reach; this, of course, isn’t unusual today.
Some of these claims have merit and some do not, but one thing is certain, a capacitor-discharge ignition does offer an advantage over the conventional battery/coil ignitions and even transistor systems.
We received a CDI system from Middle West Research Corporation and with it the same claims seen in ad copy in any of the many motorcycle magazines. This product evaluation deals specifically with this unit.
Before we get on with it, let’s look at some of the differences between the two basic ignitions. On the one hand there is the battery/coil ignition, which is an inductor-storage system. This also includes some “electronic” ignitions (transistor, etc.). On the other side is the capacitive-discharge ignition.
So what’s the difference? Inductorstorage systems generate and store ignition energy in an inductor—the primary windings of the ignition coil. This is accomplished by passing battery current through it as the points are closed. When the points open, this voltage is stepped up on the way to the spark plug and ground.
With CDI this energy is stored outside the coil, which is used only to step up the voltage pulses supplied by the CDI electronics. One advantage is obvious here. With the inductor-storage system, if the ignition switch were left on and the points were closed, the battery could be drained of all its charge. Worse yet, this direct path to ground is through the ignition coil(s), which could conceivably burn out. With the CDI this is impossible, because the juice is stored in this unit until a demand is put on it.
How many times have you left the ignition switch on? Not many? Neither have we, so this advantage isn’t all that important. At least at first glance. But what happens at low and high engine speeds is important.
Even stock engines with inductorstorage ignitions lose spark energy at higher engine speeds due to the decreased length of time the points are closed. At lower speeds the points are closed longer than necessary, causing the system to draw more current than needed. This extra current is then dissipated as heat in the ignition coil. A true CDI skirts around these problems this way: The ignition energy is stored outside the coil where it can be controlled rather than be dependent on the dwell time.
Dwell time is a term used from time to time but generally misunderstood. In basic terms, it is the time that battery current flows through the coil or the time the points are closed. It is possible to adapt a variable dwell angle scheme, but apparently not economically feasible.
There has been some concern regarding the short spark duration of the CDI. At the time being, this doesn’t present a problem in the bike application. Where the drawback shows up is in the new autos with the ultra-lean fuel mixtures. Spark duration could be extended with this or any CDI, but the price would also increase.
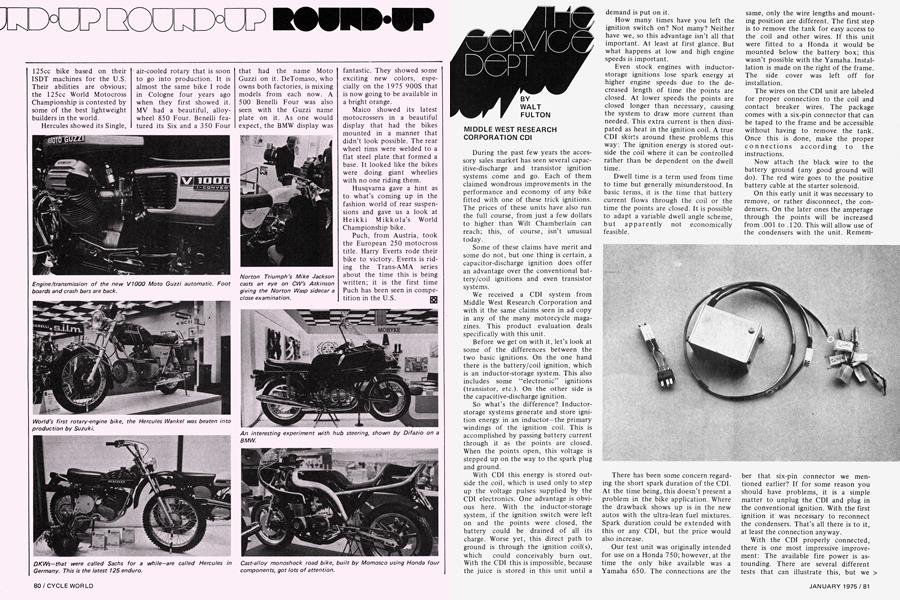
Our test unit was originally intended for use on a Honda 750; however, at the time the only bike available was a Yamaha 650. The connections are the same, only the wire lengths and mounting position are different. The first step is to remove the tank for easy access to the coil and other wires. If this unit were fitted to a Honda it would be mounted below the battery box; this wasn’t possible with the Yamaha. Installation is made on the right of the frame. The side cover was left off for installation.
The wires on the CDI unit are labeled for proper connection to the coil and contact breaker wires. The package comes with a six-pin connector that can be taped to the frame and be accessible without having to remove the tank. Once this is done, make the proper connections according to the instructions.
Now attach the black wire to the battery ground (any good ground will do). The red wire goes to the positive battery cable at the starter solenoid.
On this early unit it was necessary to remove, or rather disconnect, the condensers. On the later ones the amperage through the points will be increased from .001 to .120. This will allow use of the condensers with the unit. Remember that six-pin connector we mentioned earlier? If for some reason you should have problems, it is a simple matter to unplug the CDI and plug in the conventional ignition. With the first ignition it was necessary to reconnect the condensers. That’s all there is to it, at least the connection anyway.
With the CDI properly connected, there is one most impressive improvement: The available fire power is astounding. There are several different tests that can illustrate this, but we aren’t interested in the showmanship aspect of this system. We are interested in the performance from starting to full throttle.
Cold starts are a snap, just a touch of the button is required. Gas consumption and quarter mile times and speed have improved ever so slightly, but not to the point that a great increase can be claimed. What is of note is the claim of 20,000 miles on the same set of plugs; and that goes for points too. Of course we haven’t been able to put this many miles on the ignition system yet, but all indications point to the validity of this claim. The constant spark from cranking speed to 10,000 rpm smooths out the power output of the engine.
Low battery draw, constant spark energy and the possible high mileage between tune-ups and maintenance make the $34.95 price of Middle West Research Corp.’s CDI unit more attractive as dealers’ service prices continue to climb. Inquiries may be directed to Middle West Research at 3410 C Smith S.E., Albuquerque, NM 81706.
THE BREEZER
There are a lot of tire tools on the market, and we’ve just about tried them all. Some work well and some don’t. Prior to putting this issue away, several representatives from a company called Rojen-B stopped by our offices to try to sell us on a tire tool called the Breezer. “Oh really,” we thought.
But after a brief demonstration we were convinced that this was more than just a gag. The Breezer is a very simple tool that does make tire removal a breeze. We have had the opportunity (?) to use this tool on several different tire and rim combinations with the same results. . .easier tire changes.
Here’s how this gadget works. As with any tire change, the tube must be completely deflated. Also, where applicable, the security bolts must be loosened. Next, separate the tire bead from both sides of the rim by pressing your heel against the tire at the rim. Under ideal conditions it is best to lubricate the bead with a liquid soap or hand cleaner, etc. This reduces resistance of the tire, easing both removal and remounting.
Insert a tire iron and the breezer between the bead and rim, at the same time prying the bead over the rim. Place one foot on the tire iron to hold it stationary. At the same time use a large hammer—lead or brass, preferably—to tap the Breezer around the circumference of the wheel. Holding the tool too low will bring the neck into contact with the rim and cause scratching. This is most noticeable on an aluminum rim.
Once one side of the tire has been removed, the tube can be pulled out and repaired or replaced. To remove the tire completely, reinsert the tool and follow the same procedure as before.
The remounting procedure is similar to that for removal. A good part of the tire can be worked on the rim before the tool is necessary. Remember to lubricate the bead for best results and less effort.
Insert the Breezer—this time in a vertical position—and again tap it around the rim until the tire is mounted. When remounting, two other things are necessary. One is to place your foot on the side you are working toward. This prevents the bead from working over the rim at this point. Also, make sure that the bead stays down in the area from which you are working away.
If you meet with resistance, try prying the Breezer back and forth; this frees the tool and enables the job to be continued. We found this tool to be easy on aluminum rims. In fact, we did not put a scratch or nick in a single one. The heavy duty tires—six-ply and steel bead—presented a little more resistance than the usual tires found on the run-of-the-mill bikes. But even these were easily conquered with a bigger hammer. The little chrome cap at the top of the Breezer, used to finish it off, popped out on the ground, but so what, it doesn’t effect the working of the tool. The rest of it appears to be well-built, with little chance of coming apart.
This novel gadget sells for $7.95 and is available from Rojen-B, 7061 Hayvenhurst No. 203, Van Nuys, CA 91406.
NO HELP FROM HONDA
I have a 1973 Honda CB175 and would like to order reprints of any articles that you may have on this motorcycle.
Attached is a letter I sent to American Honda asking what I consider some basic, non-obligatory questions, and their less than satisfactory response. Could you give me any assistance in securing satisfactory answers?
Les Parsons Dunwoody, Ga. American Honda Motor Co.
P.O. Box 50 Gardena, CA 90247
Attention: Technical Information Department
Reference: 1973 U.S. Honda CB175K6 Frame No. 7028386 Engine No. CB1 75E7028365
Gentlemen:
I have some questions about my Honda CB175, referenced above, that my dealer cannot explain.
1. Dealer recommends premium (ethyl) gas and Castrol 20W-50 oil. Owner’s manual recommends regular gas and 10W-40 oil. I am using premium gas and 10W-40 oil. What is your recommendation?
2. I use my bike for cruising around residential streets primarily in second and third gear. What is your recommended rpm for maximum engine life under continuous light-load operation in the lower gears?
3. What is recommended minimum rpm before a lower gear is selected?
4. What is maximum continuous rpm that engine should be run at and still maintain maximum engine life?
5. What is recommended constant rpm for maximum engine life in fourth and fifth gear under load, i.e. highway driving?
6. What is recommended rpm at which to upshift between first and second, second and third, and fourth and fifth to maintain smooth operation and maximum engine life?
Thank you for your time and effort with this request.
Sincerely yours, Les Parsons
Dear Mr. Parsons:
After reviewing your recent letter, we feel we cannot reply to your first question with any absolute answer.
The gas requirement is low lead of 91 octane or higher or premium fuel (leaded) if you are unable to obtain 91 octane fuel in low lead.
It is not possible to quote any exact figures for rpm to provide maximum engine life. It is especially difficult since the state of tune drastically effects engine life.
A rule of thumb is to not run the engine in the red area of the tachometer and not apply large throttle openings in
the higher gears at engine speeds, which prevent good throttle response. This would correspond to the approximately 5000 rpm to 10,500 rpm. Bear in mind that the engine can be run below 5000 rpm, but for acceleration you should shift down in the gears until the engine responds well to increased throttle openings.
Sincerely,
American Honda Motor Co., Inc.
Tom Willenbring Customer Relations
You’re right, Les, Honda’s answers didn’t give you much assistance. We aren’t too sure that we can do much better, but we’ll try.
Concerning your first question, Honda is right, but we will try to add some details. With the present gas situation we should consider ourselves lucky as long as we don’t have to burn cactus juice.
The whole octane (low lead, no lead, leaded) thing is confusing to say the least. Without getting into a complicated discussion of these terms, let’s say the same thing that Honda did: Use a low lead fuel of at least 91 octane. Any less octane than that will probably produce detonation, pre-ignition and expensive engine repairs. The higher the octane, the more stable the gasoline; the lower the rating, the less stability it has. Up to now, lead has been used not only as a lubricant for moving parts in the top end of the engine, but to increase the octane rating.
At the present time, most motorcycles with small bores and low compression ratios will operate with low-lead gas, provided the octane is high enough.
As far as the oil is concerned, don’t sweat it. A good multi-grade—either 10W-40 or 20W-50 will accomplish the intended purpose.
These are the easy answers, the next one is harder and can’t be taught by the book. This is probably why Honda didn’t directly answer it. Your owner’s manual will tell you the recommended revs in each gear. These points will vary according to road conditions such as up-hill, down-hill, or level ground.
Just as with your car or anything mechanical, familiarity with your bike and experience will be the best two guides to go by. It is safe to say that any bike can cruise at 75 percent of its red-line without any difficulty. On the larger displacement road burners, disregard this or you will no doubt receive an overwhelming number of speeding citations.
PERFORMANCE ISN'T CHEAP
I own a Honda CL 100. I just put in a new set of rings (about 700 miles ago). It had been smoking and had a loss of power and compression. After I put the new rings in, it ran great. Now it’s doing
it again. Shortly after I put the new rings in I think the head gasket blew. When I kicked the bike over, it gave off several loud pops and puffs of blue smoke down around the gasket. I let it go and everything ran good, but now I think the rings are bad again.
The normal compression is 1 70 psi. It now has between 75-100 psi. Then I squirted some oil into the cylinder and tried it again. The compression jumped up to 145 psi. This would indicate bad rings, but they’ve only been in there for approximately 700 miles. And 145 psi still isn’t as good as it should be. So what’s wrong. Should I stick with Honda rings and gaskets or what?
The bike doesn’t have very much power even when it’s running good. How do I get better performance cheap?
Brian Nunes Sacramento, Calif.
Replacing the ring set will have somewhat of a positive effect by improving the compression and reducing smoke but, unless the cylinder has been bored and honed, or at least honed to rough the wall up enough to allow the new rings to seat, your cure is just temporary at best.
Once you have the top end off, measure both the ring-end gap and piston clearance. Factory specs call for .0004.0010 inches between the piston and cylinder, .0059.0138 compression ring gap and .0059.0158 oil control ring.
If the piston/cylinder clearance is greater than the specified limits, it will be necessary to bore the cylinder to the appropriate over-size.
Whatever the case, it sounds as though it will be necessary for you to replace the ring set. It is important that the cylinder be honed so the new ring set can seat properly. Carefully check and adjust end-gap if necessary.
There is one other thing to think about. Once the new rings are installed they must be bedded in properly. Too much heat build-up caused by running the engine too hard too soon may glaze the rings, thus preventing them from sealing. If this happens, there is only one cure—start over again.
Also, remember that any gaskets that have been removed should be replaced. Reassembly should be by the book and the prescribed torque figures should be used. The cylinder head should be tightened between 11.5 and 14.5 foot pounds.
An inexpensive increase in performance? No way, unless you are a machinist, welder and jack-of-all-trades. Actually, performance is dependent on the amount of money you are willing to spend. If you are a pleasure rider, I would suggest that you buy a bigger bike instead of spending money to improve the 100. This can become more expensive in the long run.