Me And My Baggy
me and my baggy
a do-it-yourself tent for tourers
G.L. ROSS
I WAS SICK and tired UI PUII1n~! up to a cu in p~i Ic he in med in all sides h doiens Of tCCl and glass campers and highway vachts~ tired of having to swallow my i~ride pulling out m tat Icr Ld old sleeping hag and flopping cheaply in the weeds. I was I red 01 laying there all night light ng oft the waves of fflOS(J nit Os and scratchy-legged bugs. and ot being wet and sogg'~ for days ii it happened to rain one night. Lying in the dark exhausted and red eyed in my grimy riding clothes, listening to the purr of' fat icy air conditioners in the campers around me, I'd decided I'd had it! I couldnt take it anymore.
I love touring--~ my number one hobby, next to wimmen -~ hut the had times connected with camping were beginning to kill my interest in traveling by hike. Certainly a serious situation! A tent was the answer, and I knew it was going to he a problem finding one that would fit my needs.
Most tents available on the mar ket today are both very large and very heavy. This makes them al most useless to cyclists. I needed one that was durable, light. and fairly roomy inside: one that could he tolded small enough to fit into a saddlebag. A big order. At first I hought one of the new mountain tents would work, but they turned out to he far too eXpenSiVe. Some models cost more than the entire budget I had saved for the trip!
It became clear that it' I was to get just what I needed at a price I could atlord. I would have to make my own. So I set about drawing up some plans and requirements.
The idea was to keep the tent itself fairly small, a little wider and longer than my sleeping bag, and no more than 3 ft. high. Just like a big bag. In this way I could keep the weight down and the folded dimen sions small while still retaining all the benefits of a screened. warm, waterproof, hand-tailored tent.
In order to keep the - size and weight down. I chose to use nylon cloth, the s~irne type of material light windbreakers are made of. It can be found in most fabric stores, is light, durable, and not too expen sive.
One reason for kceping the verti cal height of the tent down below 3 ft. is the problem of trying to carry long tent poles on a motorcycle. In addition, a low tent is easier for one person to set up and take down. Also, a low tent does not need many of the additional stakes and guy-lines that would he required ti a higher tent were used.
There are only 11 different pieces of material used: two sepa rate pieces of nylon cloth, two tria ngles of mosquito netting, four 3 in. by 3 in. reinforcement patches of a heavy material, two long zip pers, and about 30 ft. ot 3/I 6th cord. I am trying to avoid specific dimensions h~cause the sizes of tents will vary with personal choice and need. I suggest that you dia grain your own patterns to he sure of your own dimensions.
The largest piece ot material is of' course the sect ion used as the top or roof. It should he a large rectangle of nylon cloth about 7 ft. by 7 ft.. depending on the size of your sleeping bag and air mattress. and on the amount of room you think you'll need. It will probably be impossible for you to find a single piece of material this size, and you will end up (like I did) sewing two pieces together. Be sure to make a tight seam where the two pieces join, in order to prevent leakage.
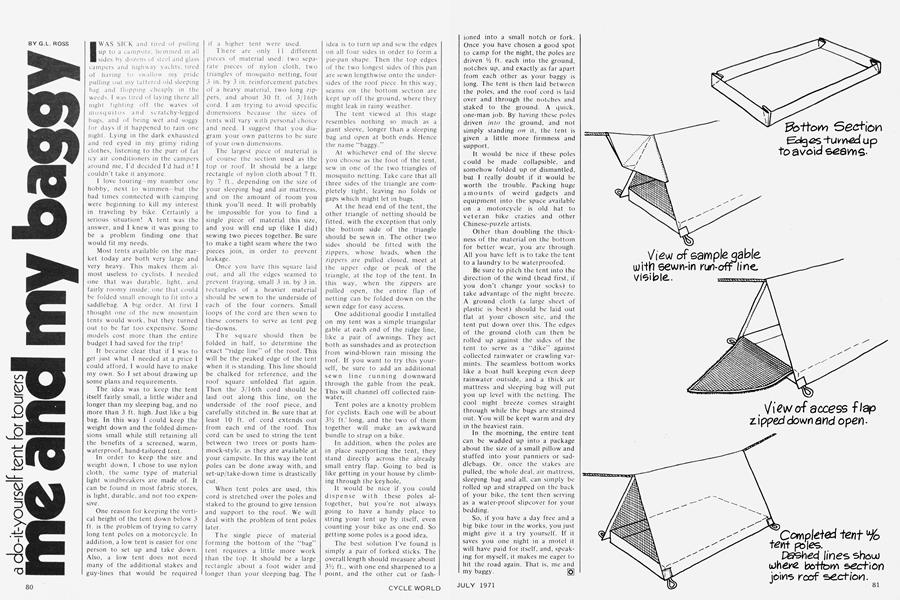
Once you have this square laid out, and all the edges seamed to prevent fraying, small 3 in. by 3 in. rectangles of a heavier material should he sewn to the underside of each of the four corners. Small loops of the cord arc then sewn to these corners to serve as tent peg tie-downs.
The square should then be folded in half, to determine the exact "ridge line" of the roof. This will he the peaked edge of the tent when it is standing. This line should be chalked for reference, and the roof square unfolded flat again. Then the 3/1 6th cord should be laid out along this line, on the underside of' the roof piece. and carefully stitched in. Be sure that at least 10 ft. of cord extends out from each end of the roof. This cord can be used to string the tent between two trees or posts ham mock-style. as they are available at your campsite. in this way the tent poles can be done away with, and set-up/take-down time is drastically cut.
When tent poles are used, this cord is stretched over the poles and staked to the ground to give tension and support to the roof. We will deal with the problem of tent poles later.
The single piece of material forming the bottom of the "hag" tent requires a little more work than the top. It should he a large rectangle about a foot wider and longer than your sleeping bag. 1'he idea is to turn up and sew the edges on all four sides in order to form a pie-pan shape. Then the top edges of the two longest sides of this pan are sewn lengthwise Onto the under sides of the roof piece. In this way, scams on the bottom section are kept up off the ground, where they might leak in rainy weather.
The tent viewed at this stage resembles nothing so much as a giant sleeve, longer than a sleeping bag and open at both ends. Flence the name "baggy." -
At whichever end of the sleeve you choose as the foot of the tent, sew in one of the two triangles of mosquito netting. `lake care that all three sides of the triangle are com pletely tight, leaving no folds or gaps which might let in bugs.
At the head end of the tent, the other triangle of netting should be fitted, with the exception that only the bottom side of the triangle should be sewn in. The other two sides should be fitted with the zippers, whose heads, when the zippers are pulled closed, meet at the upper edge or peak of the triangle, at the top of the tent. In this \Vi1~', when the zippers are pulled open, the entire flap of netting can be folded down on the sewn edge for easy access.
One additional goodie I installed on my tent was a simple triangular gable at each end of the ridge line, like a pair of awnings. They act both as sunshades and as protection from wind-blown rain missing the roof, If you want to try this your self, be sure to add an additional sewn line running downward through the gable from the peak. This will channel off collected rain water.
Tent poles are a knotty problem for cyclists. Each one will be about 3½ ft.~ long, arid the two of them together will make an awkward bundle to strap on a bike.
In addition. poles are in place supporting the tent, they stand directly across the already small entry flap. Going to bed is like getting in your house by climb ing through the keyhole.
It would be nice if you could dispense with these poles al together, hut you're not always going to have a handy place to string your tent up by itself, even counting your bike as one end. So getting sonic poles is a good idea.
The best solution I've found is simply a pair of forked sticks. The overall length should measure about 3½ ft.. with one end sharpened to a point, and the other cut or fash ioned into a small notch or fork. Once you have chosen a good spot to camp for the night, the poles are driven Vi ft. each into the ground, notches up, and exactly as far apart from each other as your baggy is long. The tent is then laid between the poles, and the roof cord is laid over and through the notches and staked to the ground. A quick, one-man job. By having these poles driven into the ground, and not simply standing on it, the tent is given a little more firmness and support.
It would be nice if these poles could be made collapsible, and somehow folded up or dismantled, but 1 really doubt if it would be worth the trouble. Packing huge amounts of weird gadgets and equipment into the space available on a motorcycle is old hat to veteran bike crazies and other Chinese-puzzle artists.
Other than doubling the thickness of the material on the bottom for better wear, you are through. All you have left is to take the tent to a laundry to be waterproofed.
Be sure to pitch the tent into the direction of the wind (head first, if you don’t change your socks) to take advantage of the night breeze. A ground cloth (a large sheet of plastic is best) should be laid out flat at your chosen site, and the tent put down over this. The edges of the ground cloth can then be rolled up against the sides of the tent to serve as a “dike” against collected rainwater or crawling varmints. T he seamless bottom works like a boat hull keeping even deep rainwater outside, and a thick air mattress and sleeping bag will put you up level with the netting. The cool night breeze comes straight through while the bugs are strained out. You will be kept warm and dry in the heaviest rain.
In the morning, the entire tent can be wadded up into a package about the size of a small pillow and stuffed into your panniers or saddlebags. Or. once the stakes are pulled, the whole deal, air mattress, sleeping bag and all, can simply be rolled up and strapped on the back of your bike, the tent then serving as a water-proof slipcover for your bedding.
So, if you have a day free and a big bike tour in the works, you just might give it a try yourself. If it saves you one night in a motel it will have paid for itself, and, speaking for myself, it makes me eager to hit the road again. That is, me and my baggy. (5)