Building A Handlebar Fairing
BUILDING A HANDLEBAR FAIRING
A Step-By-Step Procedure for the Industrious Do-It-Yourselfer
DAVID L. HOUGH
I PULLED the Suzuki over into a snowdrift next to the sidewalk, shifted into neutral, and left the engine running. As I huddled over the steaming engine, clutching the cylinders with frigid fingers, I asked myself a timid question: “What the hell are you doing riding home in a blizzard?” It was then I resolved to either build a handlebar fairing or give up winter riding.
There are several excellent factorymade fairings available on the accessory market, but the cost is usually prohibitive. So why not build your own, as I did? Those of you who are handy with tools can build one for about $15 in materials, less if surplus goodies are available.
Part One of this article explains how to design the fairing shape to fit your machine. Part Two tells how to build and attach it.
PART ONE: Designing the Fairing
The basic fairing shell can be made of heat-formed plastic sheet, thereby avoiding use of a mold. I obtained my plastic from the friendly local surplus store. This stuff generally is used for the interiors of jet aircraft and comes with a slight pebble grain surface. The printed label reads: BMS 8-86 Type 1 Gauge .093 (which is about 3/32 in. thick).
The most difficult part of fairing design is the shape. Although your individual taste may have certain aesthetic preferences, the shape must conform to two criteria: aerodynamics and the mounting points on the motorcycle. And since you are going to push this thing through the air at high speeds, it must be thought out correctly. We don’t want Mama’s little boy to crash on the freeway because his fairing came unglued.
As it turns out, a relatively conical shape can be formed around the headlight and the handlebars, provided the headlight is far enough out front. Some late model machines have the light tucked in under the gauges, so it will have to be moved forward on short brackets. The headlight on the Honda 750, for instance, was moved out two inches. If the light assembly is left attached to the machine, instead of fastening it to the fairing, the bike can be ridden with the fairing removed.
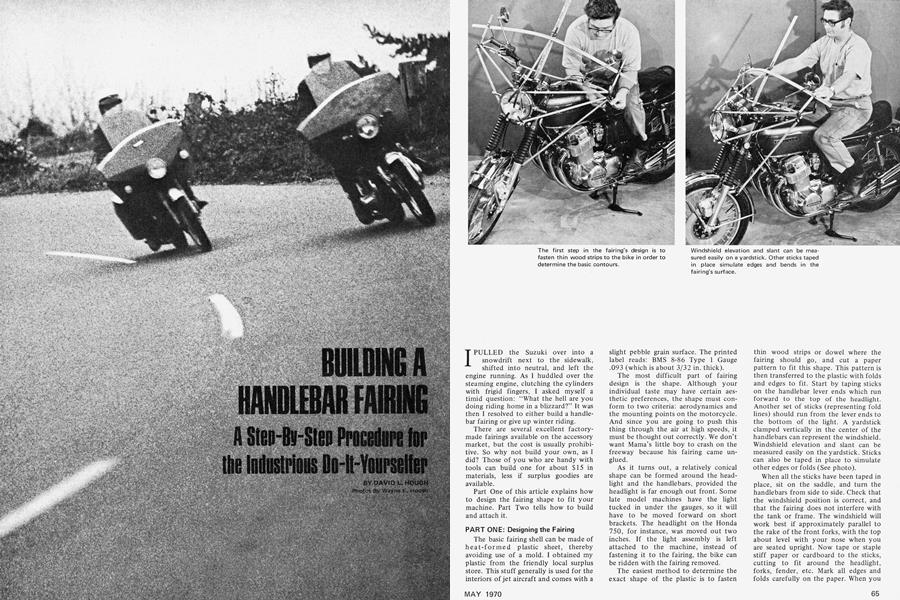
The easiest method to determine the exact shape of the plastic is to fasten thin wood strips or dowel where the fairing should go, and cut a paper pattern to fit this shape. This pattern is then transferred to the plastic with folds and edges to fit. Start by taping sticks on the handlebar lever ends which run forward to the top of the headlight. Another set of sticks (representing fold lines) should run from the lever ends to the bottom of the light. A yardstick clamped vertically in the center of the handlebars can represent the windshield. Windshield elevation and slant can be measured easily on the yardstick. Sticks can also be taped in place to simulate other edges or folds (See photo).
When all the sticks have been taped in place, sit on the saddle, and turn the handlebars from side to side. Check that the windshield position is correct, and that the fairing does not interfere with the tank or frame. The windshield will work best if approximately parallel to the rake of the front forks, with the top about level with your nose when you are seated upright. Now tape or staple stiff paper or cardboard to the sticks, cutting to fit around the headlight, forks, fender, etc. Mark all edges and folds carefully on the paper. When you are satisfied with the shape of at least one side, the pattern is ready for transfer to the plastic.
MATERIALS:
You will need a piece of sheet plastic about 3/32 in. thick, 30 in. wide, 48 in. long. The windshield can be made of plexiglass 3/16 in. to 1/4 in. thick, about 18 in. square. The plastic should be reinforced at top and bottom with metal strips. Do-it-yourself aluminum bar 1/8 in. thick, 2 in. wide, works well and doesn’t rust. Six feet of the metal will probably do the whole job, including headlight brackets if necessary.
The fairing plastic can be fastened together with 1 /8-in. pop rivets. It is necessary to use washers or backing plates under the rivets to prevent deforming the plastic. Sears, Roebuck & Co. sells riveters and supplies. You will also need some 1-in. 10-32 or 3/16-in. diameter machine screws for fastening the windshield and handlebar clamps with 3/8-in. rods for additional support. The plastic cuts neatly with a sabre saw using a wood-cutting (medium coarse) blade. An ordinary propane torch will be needed to heat-form the plastic, and you will also need a drill. When you have carted all the supplies home, you are ready to start construc tion.
PART TWO: How to Build and Attach the Fairing
Once the paper pattern has been determined, it is then transferred to the plastic. A felt-tip marking pen works well for drawing visible lines. Draw a longitudinal center line on the sheet, then measure out from the line to each side, ensuring both sides are the same width. Allow 1 in. extra material inside the headlight opening to make a flange around the rim later. Now cut out the basic shape with a sabre saw or keyhole saw. Woodworking tools do fine with soft plastics.
Making folds in the fairing can be tricky, but it isn’t impossible, and it is fun. I suggest you try practice bends on scraps before attempting the fairing itself. The trick is to keep the torch about four inches away from the surface and constantly moving. Use a straight board held or clamped on the fold line to keep the main portion cool, and apply the heat evenly and slowly to the line. If the portion to be folded is left hanging over the edge of the table, it will begin to sag when hot enough. Hold the folded part down with another flat board for a few seconds until it cools. Don't fold the bends too far; 15 or 20 degrees is plenty. You can always bend it a little more, but it is impossible to remove a bend once made.
When all the folds have been completed, pull the sheet into a conical shape approximating the position of the pattern, and clamp it together under the headlight hole. Now try it on for size, paying particular attention to the fit around the fork stanchions. If the shape and fit look correct, rivet a gusset under the headlight hole to permanently hold it in shape. The gusset should be on the outside, with a reinforcing bar riveted on the inside. Although the bar can be omitted, it adds structurally to the form. A little means a lot at 70 or 80 mph.
Now comes a tricky maneuver, utilizing your new-found plastic forming skills. The headlight hole has been left too small to fit over the headlight rim.
Carefully heat the entire area around the hole until soft, and quickly force the fairing over the rim. The first time this is tried, it will only partially deform but will stretch enough to show the exact shape of the rim. Heat one portion of the hole at a time, and use the tank cylinder or any round, smooth shape to stretch the material into a lip that will fit the headlight rim exactly. If you want the headlight to be removable with the fairing in place, allow for about 1/8 in. clearance. With the final heating, push the fairing over the headlight, and center it up and down for tilt, and vertically with reference to the handlebars and fork tubes. This is a difficult operation, but adds greatly to both strength and appearance as a custom fit.
Aluminum bar or angle stock now may be attached to the fairing. Two pieces are used to hold the windshield in place, one outside, one inside. The ends of these strips must extend out past the windshield to reinforce the handlebar cover areas. If this is not done, the fairing may fatigue from vibration at each end of the windshield.
The windshield is cut from 3/16-in. or 1/4-in. plexiglass with a sabre saw, preferably while still covered with its protective paper. If you can find a curved piece at a surplus store, just bolt it right in. But if you must purchase flat stock, it can be molded on a plywood or cookie sheet form after heating in the kitchen oven at about 400 degrees until soft. Handle with gloves . . . it stays hot for a while. And although it is possible to heat-form small areas of plexiglass with the propane torch, it tends to bubble on the surface. The formed clear plastic in now mounted, sandwiched between the aluminum strips inside the fairing. Rivets can be used, but machine screws or bolts are recommended so that it can be removed if necessary.
Mount the completed fairing to the handlebars with conventional windshield or mirror clamps. Brackets must be fabricated to hold the top ends of the mounting rods to the fairing. Flat bars could be used for the fairing supports, but 3/8-in. round aluminum or coated steel rod looks better and is more easily adjusted. The fairing is also fastened just under the headlight by either bolting it to an angle bracket fastened to the headlight shell or by running a rubber strap around the fork covers behind the fairing.
Your fairing should be ready for road testing now. But take it slowly at first, watching for undue vibrations or motion. A fairing shape similar to the one shown in the photos should be stable at any speed. It will also provide slightly better air entry, and, for some reason yet unknown, handle much better in cross winds. One side effect of the fairing is reduced wind noise around your ears. Since there is little air moving around your face, you will now be able to hear your engine much more clearly. All those little popcorn, clanking, crunching, and tinkling sounds formerly covered up by wind noise will now be audible.
The fairing can be painted to match the motorcycle if desired. Pick one of the touch-up paints available in spray cans for easy application. The aluminum bars and rods can be buffed to a bright shine for added attraction. If turn signals are desired, they can be attached directly to the fairing. Automobile back-up lights are fine. Wire the lights through a trailer connector for easy fairing removal. Now, go out and play in the snow. [Ô]