Tool Time
Tool Time
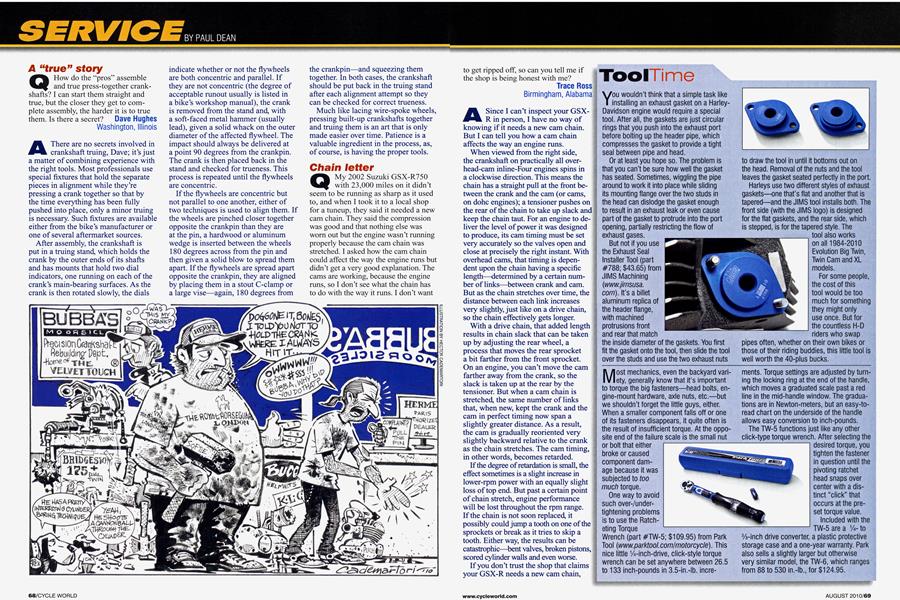
You wouldn't think that a simple task like installing an exhaust gasket on a HarleyDavidson engine would require a special tool. After all, the gaskets are just circular rings that you push into the exhaust port before bolting up the header pipe, which compresses the gasket to provide a tight seal between pipe and head.
Or at least you hope so. The problem is that you can't be sure how well the gasket has seated. Sometimes, wiggling the pipe around to work it into place while sliding its mounting flange over the two studs in the head can dislodge the gasket enough to result in an exhaust leak or even cause part of the gasket to protrude into the port opening, partially restricting the flow of exhaust gases.
But not if you use the Exhaust Seal Installer Tool (part #788; $43.65) from JIMS Machining (www.jimsusa. com). It's a billet aluminum replica of the header flange,
I with machined protrusions front and rear that match the inside diameter of the gaskets. You first fit the gasket onto the tool, then slide the tool over the studs and use the two exhaust nuts
to draw the tool in until it bottoms out on the head. Removal of the nuts and the tool leaves the gasket seated perfectly in the port.
Harleys use two different styles of exhaust gaskets—one that's flat and another that is tapered—and the JIMS tool installs both. The front side (with the JIMS logo) is designed for the flat gaskets, and the rear side, which is stepped, is for the tapered style. The tool also works on all 1984-2010 Evolution Big Twin, Twin Cam and XL models.
For some people, the cost of this tool would be too much for something they might only use once. But for the countless H-D riders who swap pipes often, whether on their own bikes or those of their riding buddies, this little tool is well worth the 40-plus bucks.
Most mechanics, even the backyard variety, generally know that it's important to torque the big fasteners—head bolts, engine-mount hardware, axle nuts, etc.—but we shouldn't forget the little guys, either. When a smaller component falls off or one of its fasteners disappears, it quite often is the result of insufficient torque. At the opposite end of the failure scale is the small nut or bolt that either broke or caused component damage because it was subjected to too much torque.
One way to avoid such over-/undertightening problems is to use the Ratcheting Torque Wrench (part #TW-5; $109.95) from Park Tool (www.parktool.com/motorcycle). This nice little 1/4-inch-drive, click-style torque wrench can be set anywhere between 26.5 to 133 inch-pounds in 3.5-in.-lb. incre-
ments. Torque settings are adjusted by turning the locking ring at the end of the handle, which moves a graduated scale past a red line in the mid-handle window. The graduations are in Newton-meters, but an easy-toread chart on the underside of the handle allows easy conversion to inch-pounds.
The TW-5 functions just like any other click-type torque wrench. After selecting the desired torque, you tighten the fastener in question until the pivoting ratchet head snaps over center with a distinct "click" that occurs at the preset torque value.
Included with the TW-5 are a 1/tto 3/s-inch drive converter, a plastic protective storage case and a one-year warranty. Park also sells a slightly larger but otherwise very similar model, the TW-6, which ranges from 88 to 530 in.-lb., for $124.95.

More From This Issue
-
 Up Front
A Gathering of Strength
AUGUST 2010 -
 Roundup
2011 Triumph Sprint Gt
AUGUST 2010 -
Roundup
Alpinestars Reveals Tech Air Race Wireless Electronic Airbag System
AUGUST 2010 -
Roundup
Brigestone Bt-023
AUGUST 2010 -
Roundup
25 Years Ago August 1985
AUGUST 2010 -
 Roundup
Update:team Cycle World
AUGUST 2010