Endurance Testing
ENDURANCE TESTING
Six Hours on the Racetrack is a Long, Hard Time for High-Performance Products.
John Ulrich
Testing high-performance products in endurance road races compresses a lot of abusive use into a short time span. Hours spent at maximum rpm are harder on a machine or product than thousands of normal street miles.
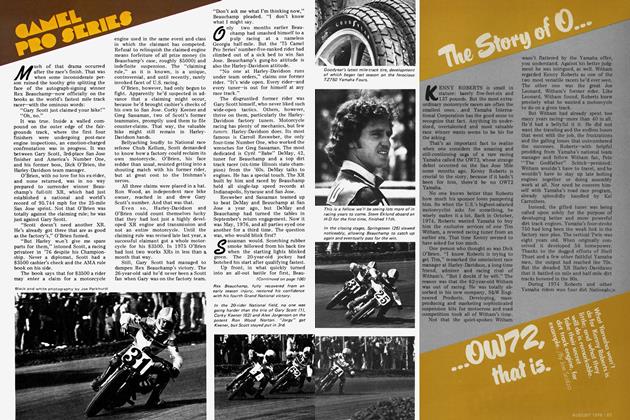
That's one reason why we like to test products in endurance races. At the 1980 Ontario Six-Hour we had the chance to test several products and accessories on a 1979 GS750 Suzuki.
The race effort itself was little short of a disaster. Story deadlines crashing about our ears delayed bike preparation until well beyond the last possible moment, the results being a week of stay-up-all-nightand-wrench sessions before the race. The engine first fired up at 10:30 the morning of qualifying (on Saturday, the day before the race), and the bike first set wheel on the racetrack soon afterwards, piloted by very tired riders.
Six laps of practice later, the bike qualified for the race, slowly, wobbling all the way. Saturday night was spent wrenching again, and bleary eyes were the rule on raceday. Despite that, the bike, which I rode with AFM 750 Box Stock Champion Mark Shelton, circulated for the duration of the race, finishing 13th overall and third in the 750 class.
Along the way to the finish line, several hard lessons were learned, and resolutions sworn: Start earlier next year; get enough sleep before the race so the riders don’t almost pass out during the fourth and fifth hours; and test everything before the race, like months before.
Last-minute efforts don’t have to be saddled with problems, as proven by 750cc class winners Mike Spencer and Lee Fleming. The difference was that Spencer and Fleming kept to combinations they had experience with. The fact that Spencer is a service manager and ace wrench by profession didn’t hurt, and neither did the fact that Spencer constantly races KZ650s similar to his six-hour bike. Organization and knowing what you’re doing are the keys.
But onward. What we found out, good stuff and regrets alike, follows.
ENGINE
In the 1979 six-hour, we ran a stock engine with Mikuni smoothbore carburetors and a Yoshimura hand-bent exhaust system. But while the bike lasted and ran well, it wasn’t the fastest 750 on the track. Looking for extra power, we used mild race cams from Vance and Hines Racing, 14010 Marquardt Ave., Santa Fe Springs, Calif. 90670. The cams opened the intake valves 17°BTDC and closed them at 57° ABDC, while the exhaust valves opened at 57 ° BBDC and closed at 17 ° ATDC for identical durations of 254°. Stock displacement racing pistons are not readily available for a GS750—the pistons that are available are all oversize, big-bore pistons. That limited our choice of cams, since stock pistons don’t have deep enough valve pockets for use with radical cams. The $199 VHR cams with 0.354 in. lift (8.99mm) would work.
We would later find out—after the bike was all together—that the cams produced a powerband starting at 7500 rpm, which, with the stock gearbox, was fine for the dragstrip and awful for riding around Ontario in an endurance race. The bike just didn’t come off certain corners hard enough.
Of course, installing different cams won’t do any good at all if the valves don’t seal well. The cylinder head of the engine we used—purchased second-hand just before the race—needed a valve job. We took it to Champion Motorcycles (1980 Harbor Blvd., Costa Mesa, Calif. 92627, 714-642-2311 ) because it was close by and five of the staff (including the owners) race and all hold current AFM class Championships. There Whitney Blakeslee gave the head one of his racing valve jobs.
Position of seats on a valve face is critical, and Blakeslee positioned the seats carefully. He also used a porting tool to radius the port throat material to make
sure it matched the valve seats. We were able to get the head back the same day, and the job cost $90. We had the cylinder head with us when we picked up the cams from VHR, where cylinder head specialist Bob Wilkenson looked at the valve job and said it was good, the best he’d seen from somewhere other than VHR. He also said that a good valve job can add 1-2 mph in top speed.
In the interests of reliability, we installed a set of VHR cam follower buckets with adjustment shims located underneath, instead of the stock buckets using a shim on top. With the shims underneath the buckets, the cam can’t kick a shim through the cylinder head. The buckets cost $159 for the set of eight, and were used with heavy-duty VHR valve springs, which cost $49.95 for a set, including retainers.
Since we planned to rev the engine past the 9000 rpm redline during the race, we sent the stock automatic cam chain tensioner to Homer Knapp, who modified it
to lock into position after being manually adjusted. The problem with the stock, automatic cam chain adjustor is that it tends to back out when the engine is revved past redline and the throttle then closed, as at the end of the straightaway.
Knapp works out of Hollywood Motorcycle Machine, 5419 Denny, North Hollywood, Calif. 91601 (213) 985-2213, keeping odd hours, taking his own sweet time to get things done, but doing excellent work. If you’re not in a hurry and don’t mind calling him to remind him to do whatever it is you’re having done, Knapp does good work.
Just to try something different, we ordered a set of Maxi-Bore carburetors which are actually stock Suzuki 26mm carburetors bored out to 30.5mm by Maxi-Products, PO. Box 9277, Kansas City, Mo. 64168.
The man behind Maxi-Products is Monty Campbell, 32, of Kansas City, Missouri. Campbell probably could be best described as a tinkerer and inventor who rides and races motorcycles, a man who worked his way through school as a welder and an electrician, rode his bike to save money, and kept trying to invent ways to solve problems he encountered with his bike.
Maxi-Bores were born when Campbell got his hands on a flow bench and started playing with carburetors, figuring that air flow concepts could be put into equations identical to electronic equations. Working with those equations, and discovering that certain electronic components will simulate the basics of air flow, Campbell developed his own theory of carburetor improvement.
What Campbell does is take a set of stock Mikuni carbs and intake manifolds and a customer’s $199. Campbell takes apart the carbs and goes through a fourstep boring process to put his own special angles and shapes into the carbs, which end up being 30.5mm in venturi size. When the carbs are bored, cleaned and reassembled, the air entrance side of the carb is much smaller than the exit, where many carburetors have an exit that is the same size as the entrance. The Maxi-Bore carburetor also has an oval venturi. The rubber intake manifolds are bored out to match the carbs.
Of course, all the theory in the world is no good unless it works. All we knew about Maxi-Bores before trying them was that Campbell claimed they worked better than 29mm Smoothbores and cost less (Smoothbores cost $333 from Yoshimura R&D, 5517 Cleon Ave., North Hollywood, Calif. 9160Í) For street applications, Campbell also claimed that the Maxi-Bores idled better, and delivered better gas mileage but this is, after all, a racing application test. We were interested in performance.
To start with, we put the carburetors on a flow bench. The stock 26mm Suzuki carburetors flowed 48 cubic feet per minute (cfm) at the index point of 25 in. of water (inches of water being a measure of relative barometric pressure, comparing ambient pressure outside the flow bench with pressure inside the flow bench.) Stock Suzuki carbs bored out to a straight, round 28mm venturi flowed 51.2 cfm; 29mm Mikuni Smoothbores flowed 61 cfm; 29mm Smoothbores with velocity stacks flowed 63 cfm; and Maxi-Bores flowed 63.5 cfm with velocity stacks.
That was with the stock intake manifold in place (one carb at a time is tested on the flow bench). With the intake manifold modified by Campbell (as included in the $199 Maxi-Bore job), the Maxi-Bores flowed 73.5 cfm. Smoothbores mounted on the same, modified manifold flowed 71 cfm.
Tested on the flow bench, then, the Maxi-Bores flow more air than Smoothbores and cost significantly less.
But the ability of a carburetor to mix the fuel is as important as air flow, so the best way to determine how well a carburetor actually works is to bolt it onto the motorcycle and go to the drag strip, which we did after the Ontario Six-Hour.
With the smoothbores and stock manifolds, the bike made a best pass of 12.08 sec. at 110.56 mph. We installed the MaxiBores with the modified Maxi manifolds, but when making jetting changes the bike still ran lean with 147.5 main jets, the biggest jets we had. (The smoothbores were jetted correctly with 120 main jets.) So we re-installed the stock manifolds and tried the bike with the 147.5 main jets in the Maxi-Bore carburetors. The jetting was perfect.
All four passes with the Maxi-Bores yielded quicker E. T, the best being 11.94 sec.at 109.75 mph, quicker than with the Smoothbores but marginally slower. We don’t regard the terminal speed differences as being significant, but do regard the consistently quicker elapsed times as being significant.
The bottom line, then, is that MaxiBores work as well as or better than Smoothbores and cost less money.
Along with the Maxi-Carbs, we tried a Maxi-Dwell ignition. Our original plan was to use a Martek 440 electronic ignition, (as used by 750cc class winners Spencer and Fleming), but we were worried about the amount of current the system might draw from the total-loss battery. As it turned out, we needn’t have worried—Spencer and Fleming’s victory showed that. But at the time, it was a concern.
The Maxi-Dwell bucks the trend toward pointless ignitions, and is, in essence, a trick set of points. Campbell developed it while commuting to college on his CB750 and getting tired of replacing burned points. He became interested in automotive points because they looked better on paper, being larger in surface area, designed to handle more amperage than bike points, ventilated and designed to open and close 40,000 times a minute in a V-Eight running at redline. That means that the points will work without float up to 20,000 rpm on a four-cylinder motorcycle with two sets of points. Campbell built a points plate to fit the automotive points to his Honda, and liked the results.
His next step was to use a condenser analyzer in the college electronics lab to work out the parameters of a new condenser design. The result, called MaxiCondenser and used on the Maxi-Dwell, doesn’t leak current, is temperature resistant and unaffected by moisture. Unlike stock condensers, the ones used by Campbell don’t leak, and don’t cause the points to burn as they degenerate.
Going further, Campbell found a grease that permeates the fibers of the point heel, extruding grease onto the points cam lobe, eliminating the need for an oil wick to lubricate the points heel, yet insuring that lubricant will always be available to prevent premature points heel wear.
To top it off, the Maxi-Dwell has a builtin strobe light and a tiny three-way switch. To set the timing, the bike is started and brought up to 2500 rpm. The switch on the points plate is flipped one way and the strobe light fires with cylinders 1 and 4. The mechanic lines up the 1 and 4 firing mark with the pointer by loosening a lock set screw and then turning an adjusting set screw one way or the other. Then the mechanic flips the switch the other way and does the same for cylinders 2 and 3. By flipping the switch back and forth, the mechanic can easily check that both sets of cylinders are firing at the same point in terms of crank rotation. The strobe light built into the Maxi-Dwell operates accurately up to 10,000 rpm, far beyond the capabilities of most ignition timing strobe lights, so it’s easy to check timing at full ignition advance as well.
The clincher is the price, $34.95 for the complete Maxi-Dwell and $11.50 for replacement Maxi-Dwell replacement points.
Campbell has a whole list of reasons why people should use Maxi-Dwell points instead of electronic ignitions, including the fact that most electronic ignitions do not allow adjustment of the timing of the two banks of cylinders separately and that some electronic ignitions allow the timing to change as their electronic components heat up. As far as we’re concerned, the real attraction of the Maxi-Dwell is the fact that it is inexpensive compared to electronic ignitions and functions well. After the six-hour race, the timing had not changed and the Maxi-Dwell did not need adjustment. (However, the built-in strobe light did malfunction and needed replacement.) Another point of appeal for anyone who distrusts little black boxes used in electronic ignitions is the fact that the Maxi-Dwell has no little black box. The reason someone would change from stock points is the fact that stock points are prone to floating, delivering a short service life and requiring frequent adjustment during that service life.
Used in conjunction with Maxi-Coils, the Maxi-Dwell puts out as hot a spark as electronic ignitions with accessory coils and still costs less. However, hotter spark means more current draw, and since our bike ran stock pistons (higher compression would have required hotter spark to fire the mixture) and total loss, we elected to use stock coils.
Because we were worried about possible rain on race day, we also installed a MaxiWire sparkplug kit, which uses silicone rubber plug caps. The Maxi-Wire kit splices onto stock plug wires at the point where the wires leave the coils, using a three-piece, heat-sealed, waterproof splice. The kit cost $18.15 and went on without problems, following the supplied instructions.
ND W24ESGU racing spark plugs were used because we’d had good luck with the plugs in the 1979 six-hour.
The exhaust system was a Bassani Superbike Pipe. The Bassani pipe is unusual in that it has an inner, smaller diameter collector built inside the main collector. The inner collector starts at the junction of the head pipes and then dumps into the larger, main collector. In his tests, Daryll Bassani says that he found that the inner collector improves exhaust scavenging— pulling burned gasses out of the cylinder and helping to pull in fresh fuel when the valves are at overlap—by producing another timed wave in the exhaust system.
Theory aside, the pipe worked and fit perfectly and never touched the ground.
According to Bassani, the pipe is supposed to be quick and easy to remove by simply unbolting the rear tail section mount, positioning a hammer handle between the frame downtubes and the headpipes, and levering the head pipes out of their special locking-slip-fit joint with the bolt-on exhaust port fittings.
That removal technique is supposed to simplify oil changes, since the pipe blocks access to the oil filter cover. But we never were able to master that method of removing the pipe and always ended up unbolting the exhaust port fittings.
And in practice before the race, we noticed that the head pipes were slipping partially out of the exhaust port fittings, allowing the front fender to hit the head pipes under braking. To end that problem, we welded a piece of tubing between the inside cylinder head pipes and hoseclamped the tube to the reinforcing tube already welded in between the front frame downtubes, thus holding the head pipes tight inside the exhaust port fittings.
The problem probably lies in the fact that our pipe was built in a hurry and we didn’t have time to wait for the usual Bassani plasma-sprayed aluminum coating. That coating meets military specifications for a 14-year service life in a 5 percent salt solution, so to say that it is corrosion resistant is an understatement. The coating is also .003-.005 in. thick, and with the extra thickness the head pipes wouldn’t have been able to work out of the exhaust port fittings, according to Bassani. Production-line Bassani Superbike Pipes are painted black and coated with a silicone resin finish after the plasma-sprayed aluminum is applied.
Bassani Superbike Pipes are made for racing use only and cost $225 from dealers or from Bassani Manufacturing, 3726 E. Miraloma, Anaheim, Calif. 92806 (714) 630-1821.
We used Bel-Ray 40w racing oil and added a 6-oz. bottle of Engine Gard, a solution of Molybdenum Disulphide (MOS2) in an oil base. Pops Yoshimura has long used Engine Gard, and the latest version doesn’t have the tendency of earlier Engine Gard formulations to allow the MOS2 to separate out of solution during storage. At the Suzuka Eight Hours endurance race in Japan this year, the winning Yoshimura Suzuki ridden by Wes Cooley and Graeme Crosby used Engine Gard, as did the second-fast-qualifying Moriwaki Kawasaki of David Aldana and David Emde. American Honda superbike mechanics used Engine Gard earlier this year, stopping the practice only when the oil company that sponsors the team objected to use of the additive as unnecessary. Engine Gard is available from dealers for $7.95, or from Kal-Gard, 16616 Schoenborn St., Sepulveda, Calif. 91343.
We used the Engine Gard because engines using the stuff show little wear on high-wear components after six-hours of racing. That held true after this year’s race, just as it had in 1979. With zero break-in, we expected our 1980 race engine to be hurting after the race. It was, but not because of wear. In fact, in terms of wear, it looked very good.
Unfortunately, the No.2 cylinder was seriously damaged when a circlip broke in half late in the race and traveled around the wrist pin cutaways on both sides of the piston (using the still-in-place wrist pin as a tunnel), beating the piston so that the bottom ring land disappeared in the area
of the wrist pin, and digging four trenches into the cylinder wall (at each side of the two wrist pin cutaways.)
To make matters worse, the rear cam chain tensioner shoe locating bracket broke so cam chain tension was not constant. The tensioner shoe surface itself was badly worn, normal for a Suzuki 750 raced in an endurance event.
The bike actually ran pretty well even at the end of the race, although it smoked a little, and had reasonable compression, too. We took it to the drags as it was and ran 12.17 sec. and 106 mph. Of course, it ran better after we replaced the cylinders and pistons, and returned to the dragstrip.>
To keep the engine oil cool, we used a Derale standard oil cooler. The coppertube Derale coolers we’ve used on various racing projects don’t have the tendency to spring leaks that competing all-aluminum coolers have shown on the racetrack, and cost less as well. The particular cooler we used has been superceded by a new Derale design, the QA-1, which sells for $79.95 in complete installation kit form. In other races, we’ve also used Derale racing oil coolers with success. The larger racing coolers sell for $50 for the cooler alone and $90 with a complete installation kit, including cooler mounts, hoses, engine fittings and hardware. Derale coolers are also available with braided stainless-steelcovered lines, but the coolers we’ve used had rubber hoses. Derale coolers are available from dealers, who can get them from Derale Oil Coolers, 138 W. Gardena Blvd., Gardena, Calif. 90248.
WHEELS AND TIRES
As in 1979, in 1980 we used spoked racing wheels laced up by Meryl’s Pro Wheels. This year we ran a 19-in. WM-4 front rim and an 18-in. WM-5 rear rim.
A Dunlop KR83 3.50/4.50-19 T-l 3-726 treaded endurance tire was used on the front because our 1979 experience showed that the Dunlop stuck about as well as a slick with much less chatter in the corners. For the rear, we used a D2344 3.85-18 Goodyear slick, a hard tire developed for Daytona.
Both tires went the distance, although the Goodyear had worn considerably on the right side at the angle in contact with the pavement on the banking. Entering right handers in the infield, the tire would stick until it reached that worn area, then slide during the transition from one side of the worn area to the other, then stick again as the bike was leaned over past the angle used on the banking.
The choice at Ontario is either run a slightly softer tire (say a D1829) and change it halfway or else go with the super-hard tire (like the 2344) and put up with reduced traction and wear problems encountered late in the race.
For bikes bigger than 750cc, the best approach is a rear wheel change halfway. Front tire wear isn’t as much of a problem unless you’re Eddie Lawson and your riding style includes turning the front wheel into a turn, dirt-track style, as you enter, thus increasing side scrub wear.
The problem with the KR83 is availability, since the company we bought the tires from, K.T. Engineering (formerly Hunt Racing), is difficult to contact at best. Phone calls reach only an answering service, and we actually got two KR83s by sending the company a telegram placing the order.
The KR83 cost us $85 each from K. T. Engineering, 1203 Grandview Dr., South San Francisco, Calif. 94080 (415) 873-8412.
The D2344s cost $83.05 from Carrol Shelby, 19021 So. Figueroa, Gardena, Calif. 90248 (213) 538-2914.
CORNERING CLEARANCE
To go around a corner fast, you need weight transfer to the inside of the turn. To get that weight transfer, you’ve got to have lean, the more lean the better. Once stuff starts dragging on the ground, the rider has to hang off the bike for more cornering speed, and once stuff starts to drag again and the rider is already hanging off as far as possible, the maximum cornering speed is reached.
What it all boils down to, hanging off or not, is cornering clearance—the amount of possible lean before hard things drag and lever the bike’s wheels up off the ground, thus sending the rider down the road on this head.
Some things, like folding footpegs, can drag without doing much harm. But when things like alternator covers and exhaust systems drag too early it’s an invitation to crash city.
For the six-hour we removed the GS750’s alternator and ran total-loss ignition. We found a local welder, George Spearing, who cut down and heliarced a stock Suzuki alternator cover for only $ 15, easily the bargain of the year. Spearing cut out a section from the cover and welded it back together. Spearing’s Welding is located at 776 Newton Way, Costa Mesa, Calif. 92627 (714) 645-8583.
Darryl Bassani built an exhaust system that simply couldn’t be dragged, the system being tailored to the bike and securely mounted in two places on the tail section. In installing the pipe on an almost-bare frame, Bassani’s workers removed too much of the right passenger peg hanger, making it impossible to use the stock brake pedal return spring, which normally> anchors on part of the passenger peg hanger.
So a leftover KZ650 centerstand return spring was hooked over a clutch cover bolt and the brake pedal—a stock GS750 part cut-down 3.0 in. and welded—to return the lever. Because the spring was so strong, the riders never had any problem with the rear brake locking up and starting rear wheel chatter.
Footpegs were both lefthand CB77 Honda pegs, one of them cut, rotated 180°, welded and installed on the right side on one of the original Suzuki footpeg mounts.
In the race, the alternator cover dragged a little, but it wasn’t a serious problem and all of the tire tread area was contacting the pavement. On the right side, the bottom screw head on the points cover also touched down a few times, but the Bassani pipe never hit asphalt.
FRAME BRACING
Handling wasn’t a problem during the 1979 six-hour, but the rear tire used then didn’t stick very well either. Because we planned to use a Goodyear slick on the back in 1980, we worried about frame flex and decided to get the frame braced.
Looking back, the effort, time and money spent on having bracing installed probably was wasted, since the engine just didn’t make enough power to twist up the frame the way a lOOOcc superbike will. And the frame bracing episode created a whole new pile of problems to be overcome at the last moment.
Finding someone to brace the frame was easy, since Kinya Ishibashi at Brea Kawasaki, (515 W. Lambert Rd., Brea, Calif. 92621) specializes in such custom fitting and welding work. Brea Kawasaki is owned by Mack Kambayashi, who built the Kawasaki Superbike on which David Emde finished second at Daytona in 1977 and first (with Harry Klinzmann) in the 1977 Ontario Six-Hour.
Ishibashi bridged the swing arm and installed chrome-moly tubing between the front downtubes, between the rear downtubes, and between the rear downtubes and rear frame section side tubes. He also installed chrome-moly plate at the junction of the rear downtubes and the rear frame section top tubes.
The bill for the frame bracing was $213.71, $ 195 of that being labor and the rest being tubing, welding gas and tax.
Several problems showed up right away. The frame as delivered to Brea Kawasaki contained only engine cases (to avoid frame warping when the braces were welded in). So Ishibashi had to guess as far as exhaust pipe location and battery box location.
Later, the battery box would not clear the rear downtubes brace tube, and had to be cut to fit, meaning that the standard battery couldn’t be used. That meant we
had to use a small, dry-cell battery called Maxi-Battery, but more on that elsewhere.
And when the bike was assembled and sent over to Bassani Manufacturing for the custom racing pipe to be installed, the swing arm bridging prevented routing the pipe tail section where required for good ground clearance. After hurried consultation, Bassani cut out a section of bridging to allow pipe clearance, and the swing arm bracing was replaced with sections of straight (not curved like the original) bracing to clear the pipe. Having the swing arm bracing changed cost $45 for labor and chrome-moly tubing from Spearing’s Welding.
More problems. Bracing the swing arm fried the swing arm needle roller bearings, which had to be replaced. Removing the bearings required heating with a torch and use of a small slide hammer. The replacement bearings went in easily enough, but the bearings we bought for the swing arm from a local Suzuki shop had a different i.d. than the o.d. of the bearing sleeves we had, and no compatible sleeves could be found by the local dealer or U.S. Suzuki.
Frantically we ordered a rectangular cross-section Dresda swing arm for $195 from William Myshkoff, 415 Conklintown Rd., Ringwood, N.J. 07456 (210) 8351185. The Dresda swing arm features Timken tapered roller bearings with o-ring end caps, cross bracing, internal axle carriers and aluminum end plates. It fit well enough, but the brackets on the right arm designed to hold the stock metal brake line were not properly aligned, making fitting the stock line impossible. This was not a major problem, however, because we planned to install teflon-lined braided stainless steel hose anyway.
Use of the large Timkin tapered roller bearings in the Dresda swing arm greatly increases bearing surface and practically eliminates the need for maintenance. Tapered roller bearings are designed to handle side thrust loads as well as up and down movement of the arm, and so are more suitable for swing arm use than straight roller bearings or bushings.
The Dresda axle carriers are sections aluminum tubing welded to the adjustment bolts, and because the o.d. of the axle carriers is smaller than the inside dimensions of the swing arm, the axle carriers fall out of position when the axle being installed, slowing wheel changes and increasing aggravation. It was obvious that if we had to change the rear wheel with the Dresda arm we’d be in big trouble.
However, since the six-hour, the axle carriers have been changed from aluminum tubing to aluminum blocks which cannot fall out of position in the arm. That should eliminate or at least alleviate the problem.
SUSPENSION
Waiting until the last minute again unearthed incredible problems, this time with suspension. It started with a simple enough idea. The GS750 we wanted to race in the Ontario Six-Hour had a tweaked front end. Sitting in the corner of our garage, however, was a near-new GS 1000 owned by a staff member. Instead of buying new front end parts for the GS750, why not graft on the entire GS1000 front end and get larger o.d. fork tubes in the bargain?
William Myshkoff sold us a Dresda Timken tapered roller bearing conversion kit that would allow installing the GS 1000 steering stem, triple clamps and forks on the GS750 frame. Besides making the installation possible, the tapered bearings have much more bearing area than the stock ball bearings, don’t suffer bearing race dimpling (a common GS750 problem) and don’t require frequent maintenance. Tapered roller bearings are also by design better equipped to handle the thrust loads encountered in steering heads than are ball bearings.
The problem came when looking at the forks and noticing that the GS1000 forks—already installed on the GS750— were shorter than GS750 forks, which would probably mean less ground clearance. Panic hit and resulted in one hand grabbing a handy wallet and the other dialing Yoshimura R&D of America to order Kayaba Superforks, which are 20mm longer than stock, fit in the stock triple clamps and have expensive internal differences to justify their $535 retail price.
Basically the racing Kayaba forks are built to closer tolerances with different damping (due to different oil valving), Teflon coated seals, and preload spacers. The forks come with stock springs but other rates are available.
For the rear we used S&W Street Strokers shocks which sell for $139.95 with springs.
After qualifying on Saturday it was obvious that we had a serious handling problem—the bike wobbled all around the track. Fujio Yoshimura was recruited from his nearby pit for consultation. After listening to our descriptions of the problem, Fujio decided that the suspension was too stiff and too tall, and he produced a list of changes to make to the forks.
The first step was to reduce oil volume in the forks. The oil was drained and the preload spacers and springs removed. A jack was placed under the engine and with the forks completely extended Bel Ray 20w SE-2 fork oil was added to the forks to a level of 145mm from the top edge of the tube.
The oil level changes the air volume of the forks. According to Fujio, if the forks compress too much under braking, oil should be added 10 or 20mm at a time to reduce the air volume. But if the fork oil level is too high, then the forks will be in effect too stiff.
Air pressure recommended for the forks ranges from 10-16 psi. Our forks started at 12 and Fujio reduced the pressure to 10 psi, lowering the ride height.
With the rider in place and the forks reassembled, Fujio measured fork sack (the amount the forks sink from full extension with the rider aboard), found that the forks did not sack the recommended 40-50mm, and changed to softer springs and shorter preload spacers to bring the fork sack into line.
Last, Fujio raised the fork tubes in the triple clamps, in effect lowering the front end of the bike 15mm.
At the rear Fujio recommended shorter shocks (14-in. shocks were installed) and softer shock springs, and the bike ended up with a combination of 1.3.5-in. shocks and 35/90 lb. springs.
The bike, thus changed, was transformed from a rolling disaster to a rideable racebike. In this case having the right stuff wasn’t enough—knowing how to use it made the difference.
BRAKES
In the 1979 Ontario Six-Hour we tried Ferodo pads, which easily went the distance and performed without fade. So for the 1980 six-hour we again used Ferodo pads, but this time ran into an unexpected problem. The inside pads are held in position by a screw and plate assembly threading into the back of the pad itself. On the Ferodo front brake pads we bought this year, the threads in the hole were so clogged with the anti-corrosion varnish put on by the factory that the screw wouldn’t start.We had to chase the pad threads with a tap before installation.
We ran into the same problem at the Aspen Six-Hour, where four sets of pads tried for a Kawasaki KZ650 had defective hole threads.
While the Ferodo pads work and last well, anybody planning on using them in the same type of caliper found on GS series Suzukis and KZ series Kawasakis should be ready to run a tap into the pad and then secure the screw with Loctite thread sealant.
Suggested retail for a set of two Ferodo front pads is $23, while suggested retail for a set of two rear pads (which have less friction than front pads, for reduced rear wheel chatter and lock-up) is $23.50. The pads are available from dealers, who can order from Great State Performance Products, Inc., 171 Hillside Ave., Williston Park, Long Island, NY. 1 1596 or M.E.I. Services, PO. Box 2833, Yakima, Wash. 98907 (509) 453-4692.
In addition to the Ferodo pads, this year we tried Aeroquip teflon-lined, braided stainless steel brake hoses and fittings.
In theory, because stainless steel braided brake hoses don’t expand the way stock rubber hoses do when pressure is applied to the brake lever or pedal, brake power and feel is improved. The stainless steel braided lines can also withstand more abuse without failure, which isn’t the same thing as saying that they are indestructable.
The kit for our GS cost $79.55 from a specialty house that no longer is in business, including lines and fittings. However, because we were using Kayaba racing forks, which are 20mm longer than stock GS forks, the upper brake hose was too short and had to be replaced with one purchased from a nearby aircraft supply house, one which also sold Aeroquip brand hoses and fittings. That cost an extra $21.
In actual use the Aeroquip lines did just what we expected, producing a harder feel at the brake lever. We didn’t do any comparison stops with braided steel lines versus stock, but we do like the feel produced with steel lines for racing use.
Anybody buying stainless steel lines should measure the stock rubber lines for a guide to hose length, then allow a little extra for routing changes or mistakes made in cutting and fitting the hose.
REFUELING
If there is one single important lesson we’ve learned since our first endurance race in 1974, it is that time on the track is the key to success. Pit stops must be few and far between, as well as short in duration. To be competitive, you’ve got to have a quick fill. The trouble with quick fill systems has always been cost and availability.
The nicest quick-fillers we’ve seen designed for use with stock gas caps were built by Alloy Graphics, but earlier this year they were no longer being built for sale.
We bought a 4.2-gal. quick-fill from Moriwaki Engineering immediately after Daytona for $300, but it was the only one they had and they sold it to avoid having to cart it back to Japan with them. Unfortunately we put off trying the quick fill until the morning of the race and then learned that the Suzuki’s tank opening is smaller than the Kawasaki opening for which the Moriwaki quick fill was built.
Fortunately we had seen an advertisement for simple quick fills made by Pacific Racing Products, and had ordered one for $105.95 to supplement our Moriwaki quick fill, which didn’t hold enough to fill the bike’s tank in one stop. The Pacific Racing quick fill was available to fit Suzuki tanks and held 5.4 gallons.
The Pacific Racing quick fill lacked an overflow system, which is partly why it is relatively inexpensive. In use, the quick fill is inserted into the tank opening and a top-mounted handle pulled. As soon as the tank is full, the handle is released, shutting off the gas flow. It’s easier to spill gas on the tank with the Pacific Racing quick fill than with a quick fill with a built-in over-
flow system, but on the other hand, even the expensive systems spill some gas.
In the race the Pacific Racing unit worked well enough, and the eight-gallon gas tank (built of two stock tanks welded together) was topped off with a funnel and gas can.
Since the six-hour, Pacific Racing has developed an optional overflow system selling for $24.95, which routes overflowed gas out an 18-in. long, 5/8-in. i.d. plastic pipe. Because the Pacific Racing cans were first made for off-road use, the overflow system simply dumps the gas onto the ground, which isn’t a problem in dirt racing. For road racing, it’s best to run the overflow pipe into a vented catch can—a plastic oil bottle works well—or to install a fitting on top of the can and use a longer plastic hose running overflow gas back up into the top of the tank.
The key to quick refueling with the Pacific racing filler is to completely remove the screw-on lid before use—otherwise gas flow is slower because the can doesn’t vent quickly enough.
Since Ontario, Pacific Racing has developed cans in other sizes with several optional neck o.d. and overflow systems, including a 10-gal. tank with side handles and an overflow system for less than $250. Because there are so many variations and options available, the best thing is to call Wayne Cornelius at Pacific Racing Products and discuss what you need. The phone number is (714) 278-9808, and the address is P.O. Box 178551, San Diego, Calif. 92117.
We loaned our Pacific Racing quick fill to Bruce Sass and Rusty Sharp to use in the Mountain Roadracing Assn. (MRA) Six-Hour at Aspen, Colorado later in the year. Sass and Sharp won the race and had no refueling problems.
BATTERY
With the alternator removed for cornering clearance, the bike had to be run with total loss ignition, which means that the power for the ignition system comes from the battery. When the battery is discharged, the power stops. In a six-hour race, it’s normally no problem to run three hours on a single stock-sized lead-acid battery, and changing batteries (set up with quick-change terminals) at the half way point usually works out well.
But because one of the braces installed in our bike’s frame occupied space needed by the battery box, the battery box had to be cut down. That meant that the standard lead-acid battery would not fit.
continued from page 119
Re-enter Monty Campbell and MaxiProducts. Besides carburetors and ignitions, Campbell markets the Maxi-Battery, basically a dry-cell battery about half as big and a third as heavy as the equivalent lead-acid battery.
Campbell developed the battery because in one season of drag racing he had to replace the lead-acid battery used to power his drag bike’s total loss ignition no fewer than six times. The problem with lead-acid batteries, Campbell says, is that a lead-acid battery stored 24 hours (as it might be on the way back from a racetrack) with a 90 percent charge never regains its original charge capacity. From that point on, the battery can only be charged to 90 percent of its original capacity. If, after the next race, the battery is run down to 80 percent of the original charge capacity it can only be charged to 80 percent of its original capacity, and so on until the battery is useless.
Another problem in racing applications is vibration damage, which forced the 750cc class winners at the Ontario SixHour to make an unscheduled pit stop after 5 hours, 40 minutes, a stop which could have cost them the class win if the race hadn’t been redflagged at that point.
The Maxi-Battery looks like 10 D-cells hooked together. According to Campbell, the battery is developed from nicad rechargeable aircraft batteries, with design characteristics which he says allow it to have a longer life, but which he won’t reveal. Campbell says that his battery also has higher amperage than a normal nicad, with a terrific amount of power output because it has low cell resistance.
Campbell claims that the Maxi-Battery does not have to be charged during storage, and that it can be stored in any state of charge without damage, needs no maintenance, is vibration proof, will not corrode terminals or leak acid (because it contains no acid), lasts five times longer than a lead-acid battery does under ideal conditions, does not generate explosive gasses when charged, and comes with a one year warranty and a lifetime repair policy (meaning that Maxi-Products will repair the battery in the event of damage).
There is a catch, or more correctly, three catches. First, a Maxi-Battery is expensive, retailing for $159.95 for the largest Maxi-Battery, which is designed for use with electric starters or total-loss road racing ignitions or total-loss CDI drag racing ignitions. Second, a Maxi-Battery has a more rapid discharge rate than a lead acid battery, so while a lead-acid battery used for total-loss will warn the rider that it is reaching the end of its power by causing the engine to misfire for several laps, the Maxi-Battery will just stop, probably in less than a lap. Third, a Maxi-Battery is very sensitive to overcharging or rapid charging, and can be so damaged. What usually happens in such a case is that one cell burns out, protecting the others much like a fuse. Because the Maxi-Battery is charge sensitive, it must be charged with a tiny, 0.1 amp charger available from Maxi-Products. When the Maxi-Battery is installed in a street bike with a charging system, a special voltage regulator included in the price of the battery must be installed according to the directions supplied with the battery.
The large Maxi-Battery we used weighed 3.25 lb. compared to the stock Suzuki battery’s 10 lb. A smaller version of the battery is available for kick-start street bikes and drag bikes with non-CDI ignitions. The smaller Maxi-Battery weighs 1.0 lb. and sells for $69.95 including voltage regulator.
Because the Maxi-Battery has a rapid discharge rate and we weren’t sure how long our bike would run on one Maxi-Battery, we installed two of the big Maxi-Batteries and one small Maxi-Battery. One battery was fitted in the cut-down battery box and another on a small tray fabricated out of aluminum plate, and hung between the fairing mounts on the front forks. A third, smaller Maxi-Battery fit into the tail section of the Suzuki. Wires from the batteries led to the ignition system and a pair of control switches mounted on a tin can lid glued into the speedometer housing with silicone rubber glue. By flipping the switches, the rider could instantly switch ignition power from one battery to another, the original plan being to switch from one large battery to the other with the small battery as an emergency power supply.
Because the front battery could not be easily reached, we changed the plan at the track to run on the battery located in the easily-reached battery box and swap it at each of the three fuel stops, those stops being planned for 90-minute intervals during the race.
The Maxi-Batteries did what they promised to do during the race—the main battery lasting the full 90 min. each time. In four months following the Ontario sixhour, the Maxi-Batteries were repeatedly run down and stored for weeks on end, never failing to regain full charge the next time we wanted to use them. Because they don’t contain acid, we didn’t have to be careful how we loaded them into the truck when it was time to go racing, and didn’t have to worry about leaving them in the garage within the reach of small children.
One time we duct-taped a Maxi-Battery to the frame rails of a bike with a battery box too small to accommodate the length of the battery (a KZ650) and it didn’t bother the battery.
The only cautions that must be observed when installing the Maxi-Battery are that contact with metal doesn’t rub through the plastic battery housing and that the terminals don’t short out on metal. Duct tape works fine both to insulate the terminals and also to run interference between the battery housing and metal contact points.
While our experience with the MaxiBattery has been racetrack-oriented, it seems that a Maxi-Battery would make life a lot easier for the owner of a street bike with an inconveniently-located, hardto-reach-and-service battery. Properly installed, the Maxi-Battery should never need service and can be ignored during winter storage in cold areas, since it doesn’t lose its charge in storage and so can’t freeze the way uncharged lead-acid batteries can.