Service
SERVICE
We welcome your technical questions and comments, and will publish those we think are of interest to our readers. Because of the volume of mail received, we cannot return any personal replies. Please limit your "Service" letters to technical subjects only, and keep theni as brief as possible. Send them to: "Service," CYCLE WORLD, 1499 Monrovia Ave., Newport Beach, (`a/if 92663.
HEAD LEAK
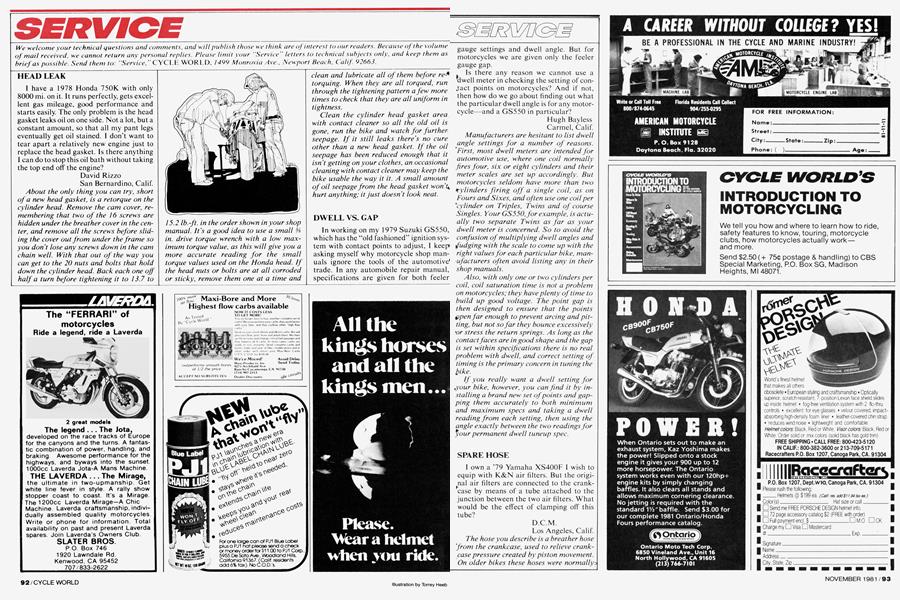
I have a 1978 Honda 750K with only 8000 mi. on it. It runs perfectly, gets excellent gas mileage, good performance and starts easily. The only problem is the head gasket leaks oil on one side. Not a lot, but a constant amount, so that all my pant legs eventually get oil stained. I don’t want to tear apart a relatively new engine just to replace the head gasket. Is there anything I can do to stop this oil bath without taking the top end off the engine?
David Rizzo San Bernardino, Calif.
About the only thing you can try, short of a new head gasket, is a retorque on the cylinder head. Remove the cam cover, remembering that two of the 16 screws are hidden under the breather cover in the center, and remove all the screws before sliding the cover out from under the frame so you don’t lose any screws down in the cam chain well. With that out of the way you can get to the 20 nuts and bolts that hold down the cylinder head. Back each one off half a turn before tightening it to 13.7 to 15.2 lb.-ft. in the order shown in your shop manual. It’s a good idea to use a small 3/s in. drive torque wrench with a low maximum torque value, as this will give you a more accurate reading for the small torque values used on the Honda head. If the head nuts or bolts are at all corroded or sticky, remove them one at a time and clean and lubricate all of them before re-4 torquing. When they are all torqued, run through the tightening pattern a few more times to check that they are all uniform in tightness.
Clean the cylinder head gasket area with contact cleaner so all the old oil is gone, run the bike and watch for further seepage. If it still leaks there’s no cure other than a new head gasket. If the oil seepage has been reduced enough that it isn’t getting on your clothes, an occasional cleaning with contact cleaner may keep the bike usable the way it it. A small amount of oil seepage from the head gasket won \ hurt anything; it just doesn’t look neat.
DWELL VS. GAP
In working on my 1979 Suzuki GS550, which has the “old fashioned’’ ignition system with contact points to adjust, I keepasking myself why motorcycle shop manuals ignore the tools of the automotive^ trade. In any automobile repair manual, specifications are given for both feeler gauge settings and dwell angle. But for motorcycles we are given only the feeler gauge gap.
Is there any reason we cannot use a awell meter in checking the setting of contact points on motorcycles? And if not, then how do we go about finding out what the particular dwell angle is for any motorcycle—and a GS550 in particular?
Hugh Bayless Carmel, Calif.
Manufacturers are hesitant to list dwell angle settings for a number of reasons. First, most dwell meters are intended for automotive use, where one coil normally fires four, six or eight cylinders and their meter scales are set up accordingly. But motorcycles seldom have more than two ¡cylinders firing off a single coil, as on Fours and Sixes, and often use one coil per *cylinder on Triples, Twins and of course Singles. Your GS550, for example, is actually two separate Twins as far as your dwell meter is concerned. So to avoid the confusion of multiplying dwell angles and fudging with the scale to come up with the right values for each particular bike, manufacturers often avoid listing any in their shop manuals.
Also, with only one or two cylinders per coil, coil saturation time is not a problem on motorcycles; they have plenty of time to build up good voltage. The point gap is then designed to ensure that the points çpen far enough to prevent arcing and pitting, but not so far they bounce excessively *or stress the return springs. As long as the contact faces are in good shape and the gap is set within specifications there is no real problem with dwell, and correct setting of timing is the primary concern in tuning the ¡pike.
If you really want a dwell setting for >your bike, however, you can find it by installing a brand new set of points and gapping them accurately to both minimum and maximum specs and taking a dwell reading from each setting, then using the angle exactly between the two readings for your permanent dwell tuneup spec.
SPARE HOSE
I own a ’79 Yamaha XS400F I wish to equip with K&N air filters. But the original air filters are connected to the crankcase by means of a tube attached to the junction between the two air filters. What would be the effect of clamping off this tube?
D.C.M. Los Angeles, Calif.
The hose you describe is a breather hose from the crankcase, used to relieve crankcase pressure created by piston movement. On older bikes these hoses were normally2 routed along the rear fender, exhausting a fine mist of crankcase oil directly into the air as the piston(s) pumped air back and forth in the tube. Emission laws then required that these hoses be ducted back into the intake system of the engine so the oil particles would be burned with the fuel mixture. As there is no good way to duct a breather hose into most aftermarket air filters, a common practice is clamp a small metal or plastic bottle to the bike’s frame and channel the hose into that. These breather or catch bottles are required on racing bikes to prevent their dumping oil onto the race track. K&N also makes a crankcase breather filter that clamps to the breather hose.
Clamping off the tube is not recommended; this will cause the crankcase to try to relieve internal pressure by forcing hot air and oil out through the crank seals and crankcase gasket surfaces. It will also rob horsepower by increasing the engine’s pumping load. The hose needs to be open to an area of normal atmospheric pressure. If you decide to route the hose into a catch bottle, make sure the hose fits loosely into the top of the container or the container has a number of small holes punched or drilled into the top to allow air in the breather hose to fluctuate freely.
GS450 FORKS
I own a 1981 GS450S. In order to squeeze a better sporting ride out of it I have installed Goki air caps and equalizer tube. The local dealer says to put no more than 7 psi in the forks. The result is a little better fork action but not the range I wanted. Can 1 put more psi than that in without damaging the forks? Should I go to a greater viscosity fork oil? Why can’t I put more air in the forks than that?
Scott A. Gilmore San Diego, Calif.
Your dealer is probably following the manufacturer’s specs in his recommendation of 7 psi maximum pressure, but we’ve found you can go as high as 20 psi—or high enough to make the forks too stifffor comfort—with no problem. Also, putting the air in correctly can make a big difference in how much spring assist you’re getting out of the air caps. Make sure when you add air that the bike is on its centerstand with the front wheel off the ground and the fork legs fully extended. This will ensure you have the greatest possible volume of air and subsequent pressure increase as the fork compresses. A pressure of 7 psi in the fork at full extension can become 25 or 30 psi with the suspension at full bump, which is why manufacturers list fairly conservative starting pressures. Fortunately, the seals and seal retainer clips on most newer bikes are good enough to handle higher pressures.
The GS450S comes with a 50/50 mixture of 10W/30 and 5W/20 fork oil. Changing over to straight 30 wt. will give you better damping and less cushy ride. Installing a spring spacer under each fork cap will provide a higher spring preload. Short lengths of pipe of an appropriate diameter work well for this purpose, and you can play with the preload by trying a couple of different lengths. In addition, some of our readers have brazed up the oil orifices in their damper rods and then redrilled them to smaller diameters for restricted oil flow and higher damping rates, but this requires considerable precision and a willingness to experiment with the correct hole sizes; i.e. the work involved is a little more than most people may care to invest for a slight improvement in damping.
IT LOOKS LIKE...
I have a 1967 Norton PI 1 that is disassembled and missing some frame parts.
I have various tech manuals but none of them shows pictures of the bike or frame. I am trying to restore it to original. Can you help me out?
R. Jochem Kansas City, Kan.
We’re sending along a Xerox of the July, 1967, CW road test of the PI 1, hoping you can pick out some details from the photos. If you need parts or more information some other good sources are: U.S. Norton Owners Club, 525 Blackstone, La Grange, III. 60525; Sunset Motors, 1403 52nd St., Kenosha, Wis. 53140; British Marketing, 32122 Paseo Adelanto, San Juan Capistrano, Calif. 92675; and British Parts Old and New, 13428 E. Telegraph, Whittier, Calif. 90605.
GOLD WING TIRES
I have a question about my 1980 Gold Wing, which I bought used. Your April, 1980, issue, my owner’s manual and the numbers on the tires are all in metric sizes. None of the catalogs I have, or your advertisements, lists tires in metric measurements. Could you please tell me, in standard measurements, what the following tires would be: 110/90-19 front and 130/90-17 rear?
David Whalen Wellsville, Kan.
The counterparts to your tires, in standard sizes, are a 3.50-19 front and a 5.00-17 rear. The lower profile alternative to the standard sizes would be a 4.10-19 front and a 5.10-17 rear. IS