Braking Basics
Braking Basics
How Your Brakes Work and What to do About it.
Peter Egan
The great automobile designer Ettore Bugatti was once criticized for the tiny snuff-can brakes on his fast racing cars and reportedly said, “My cars are made to go, not to stop.” That’s all very fine and cavalier and makes good copy in the papers, but anyone who has raced a car or a motorcycle, or more to the point, tried to stop a motorcycle in front of a left-turning car, knows it’s healthier to ride a machine that has also been made to stop. Stopping, it turns out, is an important part of going. A race bike going flat out down a long straightaway can cover a lot of valuable distance in those last few seconds before the brakes are needed, and the better the brakes the later they’re needed. On the street, of course, brakes take on an importance that rises above mere lap times. They have to stop you on the first half on an imaginary line bisected by a car or truck. Bugatti’s opinions aside, good brakes are worth having and they are also worth maintaining.
When a motorcycle stops, the brakes are not doing the job alone. If you back off on the throttle of a bike going 60 mph the bike slows down for a number of reasons. Wind resistance and drag over the bike and rider play a part, which is why racers sit up into the wind at the end of a long straight. Engine compression slows the bike, particularly if the engine is shifted into a lower gear. Rolling resistance, the friction of tires on the road, along with the combined friction of wheel bearings, transmission gears, chain or driveshaft, etc. will all bring a bike to an eventual halt on level ground if the brakes are not used. In normal riding those forces may account for half or more of the bike’s deceleration as it approaches a stop where the rider has plenty of warning that a full stop is required. While braking force may exceed 1 g on most bikes, riders seldom exceed 0.5 g of deceleration in normal stops. In short, substandard, run-of-the-mill brakes would work for most of the stops we actually make.
It’s that other part of the time we worry about; panic stops, sudden tight corners, stray dogs, leaving home without your cigarettes and remembering halfway down the street, etc. In those cases you’ve got between 400 and 800 lb. of rolling mass (more, if you’ve got a touring bike with a passenger) to slow down and a lot of kinetic energy to use up somehow. That energy has to go somewhere, so the brakes are used to turn it into heat. Shoes push against drums or brake pads press against rotors, or both, and the resulting friction generates the necessary heat. The heat builds up in the brake drum or brake rotor (disc) and is released as radiant energy and also cooled by the air.
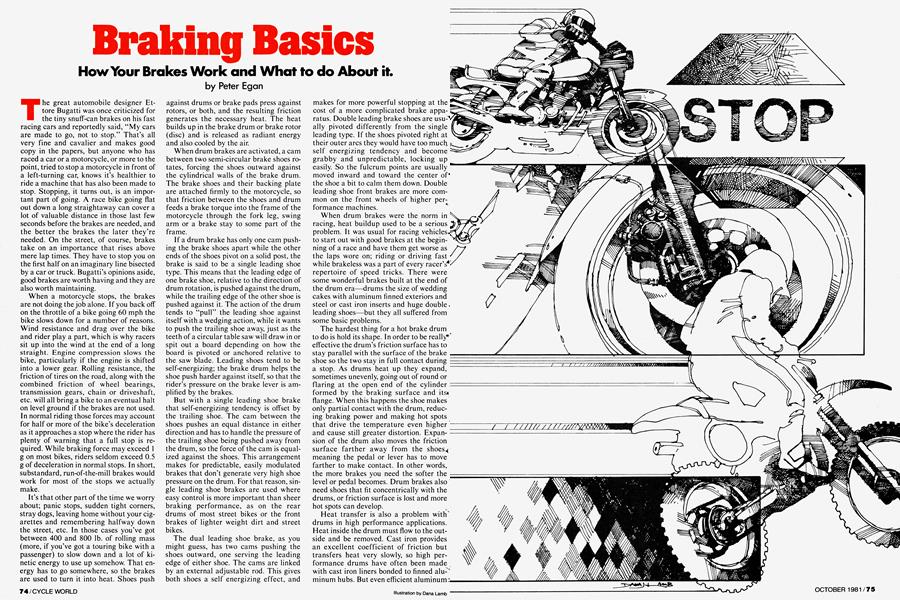
When drum brakes are activated, a cam between two semi-circular brake shoes rotates, forcing the shoes outward against the cylindrical walls of the brake drum. The brake shoes and their backing plate are attached firmly to the motorcycle, so that friction between the shoes and drum feeds a brake torque into the frame of the motorcycle through the fork leg, swing arm or a brake stay to some part of the frame.
If a drum brake has only one cam pushing the brake shoes apart while the other ends of the shoes pivot on a solid post, the brake is said to be a single leading shoe type. This means that the leading edge of one brake shoe, relative to the direction of drum rotation, is pushed against the drum, while the trailing edge of the other shoe is pushed against it. The action of the drum tends to “pull” the leading shoe against itself with a wedging action, while it wants to push the trailing shoe away, just as the teeth of a circular table saw will draw in or spit out a board depending on how the board is pivoted or anchored relative to the saw blade. Leading shoes tend to be self-energizing; the brake drum helps the shoe push harder against itself, so that the rider’s pressure on the brake lever is amplified by the brakes.
But with a single leading shoe brake that self-energizing tendency is offset by the trailing shoe. The cam between the shoes pushes an equal distance in either direction and has to handle the pressure of the trailing shoe being pushed away from the drum, so the force of the cam is equalized against the shoes. This arrangement makes for predictable, easily modulated brakes that don’t generate very high shoe pressure on the drum. For that reason, single leading shoe brakes are used where easy control is more important than sheer braking performance, as on the rear drums of most street bikes or the front brakes of lighter weight dirt and street bikes.
The dual leading shoe brake, as you might guess, has two cams pushing the shoes outward, one serving the leading edge of either shoe. The cams are linked by an external adjustable rod. This gives both shoes a self energizing effect, and makes for more powerful stopping at the cost of a more complicated brake apparatus. Double leading brake shoes are usu-'’ ally pivoted differently from the single leading type. If the shoes pivoted right at their outer arcs they would have too much self energizing tendency and become grabby and unpredictable, locking up easily. So the fulcrum points are usually moved inward and toward the center oD the shoe a bit to calm them down. Double leading shoe front brakes are more common on the front wheels of higher performance machines.
When drum brakes were the norm in racing, heat buildup used to be a serious problem. It was usual for racing vehicles* to start out with good brakes at the beginning of a race and have them get worse as the laps wore on; riding or driving fast while brakeless was a part of every racer’s4 repertoire of speed tricks. There were some wonderful brakes built at the end of the drum era—drums the size of wedding cakes with aluminum finned exteriors and steel or cast iron inserts and huge double-, leading shoes—but they all suffered from some basic problems.
The hardest thing for a hot brake drum to do is hold its shape. In order to be really* effective the drum’s friction surface has to stay parallel with the surface of the brake shoe so the two stay in full contact during a stop. As drums heat up they expand, sometimes unevenly, going out of round or flaring at the open end of the cylinder formed by the braking surface and its* flange. When this happens the shoe makes only partial contact with the drum, reducing braking power and making hot spots that drive the temperature even higher and cause still greater distortion. Expansion of the drum also moves the friction surface farther away from the shoes* meaning the pedal or lever has to move farther to make contact. In other words, the more brakes you need the softer the level or pedal becomes. Drum brakes also ' need shoes that fit concentrically with the drums, or friction surface is lost and more hot spots can develop.
Heat transfer is also a problem with' drums in high performance applications. Heat inside the drum must flow to the outside and be removed. Cast iron provides an excellent coefficient of friction but transfers heat very slowly, so high performance drums have often been made with cast iron liners bonded to finned alu-' minum hubs. But even efficient aluminums hubs have a hard time getting rid of all the heat generated in a single hard stop and may get hot enough to cause serious brake fade. Drum brakes on bikes are also generally positioned roughly along the centerline of the wheel, so they cannot be cooled by an undisturbed air flow.
This is not to say that drum brakes are always overheating or are a constant source of trouble. They are well protected from rain and other weather, are normally lighter than disc brakes and fit compactly into the hub of a motorcycle wheel. And if they are actuated mechanically, as on most motorcycles, adjustment is a simple procedure. Which is why drums are still commonly used on the rear wheels of street bikes having disc brakes at the front. The front brakes account for about 70 per cent of a motorcycle’s stopping power, so a rear drum is able to handle a 30 per cent load without overheating, distorting, fading, or suffering severe wear. Dirt bikes still get by very well with front drums because they need light brakes that are protected from dust, mud and water. Because a dirt tire on a loose surface cannot generate as high a coefficient of friction it doesn’t need brakes as powerful as those on a street machine. The bikes themselves are also much lighter, lessening the load, and top speeds are generally lower.
But the majority of street bikes now use one or two disc brakes at the front wheel. Motorcycles, compared with cars, were late in getting into the disc brake game. Motorcyclists are inherently conservative about changes in the appearance of their machines, and there was still that lingering superstition that overly powerful front brakes were somehow dangerous and might cause a bike to jack-knife or otherwise run amok. People also wondered how disc brakes would work in the rain. The first issue of CW (Jan., 1962) ran a short article entitled Disc Brakes for Motorcycles, describing the installation of Airheart kart discs on a 90cc Pointer Lassie and a 125cc Pointer Senior, no less, reporting with guarded enthusiasm that they seemed to work very well. Not until the late Sixties, when Honda introduced the CB750, did disc brakes arrive as a stock feature on a popular production bike. These brakes were found to provide excellent stopping power and good modulation right up to the point of lockup. Locking up a wheel is not the fastest way to stop. Once the tire rubber has broken loose from the pavement it heats up and slides along at a greatly reduced coefficient of friction and the bike will travel much farther than it would if the tire could be held just short of lockup. And discs are easier to hold at that point than drums. They also stop well in the rain, after a slight delay in which the disc surface is wiped of heavy surface water by the brake pads. Design of the pads also has a lot to do with wet weather stopping. Most street pads have metal particles embedded in a resin base, and the metal particles form small raised bumps on the pad surface, cutting through the water film to reach the brake rotor and stop the bike.
Disc brakes work much like the handbrakes on a 10-speed bike. A caliper simply forces a set of friction pads against a revolving disc, creates heat, and feeds the brake torque loads through the caliper into the frame of the vehicle. Disc brakes need higher pad pressure than drums so on most bikes the calipers use hydraulic pressure to activate the pads. When the brake lever is squeezed it pushes a piston in the master cylinder. The piston tries to compress the brake fluid in the cylinder, can’t, and therefore pushes it through the brake line, to a piston or pistons in the brake caliper where the pads are forced against the disc. Dual piston calipers have a piston on each side of the disc, both linked by a hose or drilling in the caliper to equalize the pressure between them. Single piston calipers push on only one pad and rely on a sliding action of the caliper in its bracket to equalize the pressure on the other pad. When hydraulic pressure is released the rubber seals in the caliper pistons, stretched during operation, return to their normal positions and help retract the pads from the disc. Small irregularities in the disc also tend to push the pads out of the way and keep them from dragging.
The disc brake has several advantages over the drum. For a given diameter, disc brakes provide a greater swept area, or area of braking path, which is important to the transformation of kinetic energy into heat. An average size drum for instance, with a 10 in. diameter and brake shoes 1.5 in wide is good for about 47 sq. in. of swept area, where a 10 in. disc with a 1.5 in. brake pad swath on either side of the disc has a swept area of more than 80 sq. in. Dual discs, of course, would double that figure to 160 sq. in. You could make a larger or wider drum to duplicate those figures, but the disc provides better braking in a simpler, more compact form. The disc or discs also rotate in the air flow, where they cool better. And because disc brakes have a coefficient of friction about 1.4 times greater than that of drum brakes, due to their higher and more controllable pad pressure, they have more heat to lose.
A brake disc being just that—a simple metal disc—it is stronger and less susceptible to heat and pressure distortion than a drum. As it heats up a disc also expands toward the brake pads, rather than away from the brake shoes as a drum does, so lever or pedal travel is not lost. As brake pads wear on a disc brake the hydraulic pistons move outward to take up that wear, so disc brakes never need adjustment. When the brake pads do wear out and need replacement they are easily accessible and can be changed without wheel removal. As a final advantage, a greater variety of friction material can be used in disc brakes because the pads can be cut or molded into simple blocks rather than being shaped into the more flexible ar<à configuration of brake shoes used in drums.
Disc brakes are not perfect. They can be made to fade just as drum brakes can.During a race or, in that ultimate test of non-competition stopping power, a fast run down a curving mountain road, disc brakç calipers can become hot enough to boil brake fluid. Brake fluid absorbs moisture from the air and if there is enough water in the fluid the boiling can be serious, throw-" ing bubbles into the brake lines and causing a soft lever or pedal and low pad pressures on the disc. It’s this condition that makes periodic changing of brake fluid a worthwhile part of motorcycle maintenance.
Whether you have disc or drum brakes on your bike, or a combination of both, keeping an eye on the pads, shoes, adjustment and the condition of the brake fluid is a good idea. Brake maintenance is relatively simple and not very time consuming, so there’s no good reason for riding around with worn out or maladjusted brakes.
Maintaining Drum Brakes
The most common reasons for removing a wheel to work on drum brakes are: Replacement, when you suspect the linings are gone or, worse yet, know they’re gone because you can hear the scraping of metal on metal; deglazing, when relatively new linings are demanding a lot of lever pressure to stop the bike, or barely stop it at all; squealing, when the high-pitched note from your brakes at every traffic light makes you an object of scorn and the target of thrown bottles from fellow motorists; and grabbing or sticking of the shoes.
It takes a lot of miles of stop and start riding to wear drum brake shoes right down to the metal, particularly on a rear wheel, but people who tend to overuse rear' drums or have put considerable mileage on their bikes should check the shoes occasionally for wear. And high mileage used bikes, for some reason, always seem to have worn out brakes. Once a shoe is worn down to the rivets or metal backing surface it will begin to gouge and score the drum, making repair suddenly more expensive because the drum will have to be Replaced or turned in a machine shop.
' To get at the shoes remove the wheel and disconnect the brake backing plate from its cable or brake rod and from the ►brake stay, if it has one. This is a good time to dump the brake dust out of the drum and brush it off the shoes and backing plate. This is best done over a newspaper on the garage floor. Try to make as little dust as possible and avoid blowing brake parts off with compressed air. The asbestos ^particles in brake dust have been linked to a particularly nasty form of lung cancer and are better off wrapped in newspaper and thrown away than floating around in a brown cloud in your garage. It’s important to get brake dust out of the drums because it interferes with contact between the brake linings and drum and is a principal cause of squealing in drum brakes.
>. Removing the shoes from the backing plate looks easy enough, but a simple trick can save you from stretching and possibly ruining the brake springs. Instead of holding one shoe down and pulling or prying the other one out until it clears the cam and pivot posts, fold both brake shoes toward you and toward one another at the same time and lift them out. Brake return springs are strong, but they have a very small latitude for expansion and are easily stretched and ruined. A stretched brake spring will allow the shoe to drag and give the lever a vague, mushy feel.
Most manufacturers list minimum brake lining thickness and recommend replacement if it’s worn thinner, but as a rule of thumb you should buy new shoes if the lining is much less than 0.10 in. thick. With bonded linings that distance is measured to the backing plates; if they are riveted it’s measured to the rivets. Assuming the linings have plenty of material remaining, look at the friction surfaces and see how they’re wearing. If they have a shiny, glazed look your brakes probably aren’t working up to capacity. Take a piece of emery paper—about 180 grit works best—and sand the linings until they have a uniform rough feel and a flat appearance, like new brake linings. Also check the linings for constant arc. Their wear pattern should show contact over the entire surface of the friction material. If the shoes are not making full contact they can sometimes be carefully hand filed for a better fit, but if the shape is too far off new shoes will be needed. When new shoes are fitted it’s a good idea to file a small bevel into the leading and trailing edges of the linings if the edges are squared off. This makes the shoes less grabby and also less prone to squealing and vibration. But don’t bevel off more than 0.25 in. or you’ll start losing braking power.
While the shoes are off, remove the cams and the pivot pins and lubricate them with a molybdenum disulfide grease, graphite-base anti-seize grease or some other high-temp lubricant that won’t run onto the shoes or drums when the brakes get hot. Use the grease sparingly, but lube the moving pieces of the brake mechanism enough to prevent the brakes from sticking. If the brake linings or drum get oil or grease on them the brakes will have an initial grabby feel, followed by ineffective braking. Grease or oil spots should be cleaned off with laquer thinner, contact cleaner, or a regular brake cleaning spray.
Brake shoes should be installed on the backing plate the same way they came off; folded up and toward you and then pushed out flat until they snap into place, to avoid stretching the springs.
The other half of the braking system is the drum itself. This too has to be checked for wear, scoring and out-of-roundness. An internal vernier caliper is the best means of examining wear and roundness. Wear limits are normally listed in the bike’s shop manual, and roundness should not vary by more than a few thousandths. If a drum is scored, badly grooved or distorted it will probably have to be replaced, unless you can find a machine shop set up to turn drums for your particular type of bike. If the drum is in good shape it should be cleaned of brake dust, degreased with lacquer thinner, contact cleaner or brake cleaner and lightly sanded with emery paper on its friction surface.
Reinstall the wheel, backing plate and brake stay. If the brake is a double leading shoe type it will have an adjustable rod between the two cam levers and this has to be set so both shoes contact the drum at the same time. Remove one clevis pin from the rod, hold both cam levers in so the shoes are both in firm contact with the drum and then adjust the rod end so the clevis pin is a loose slip fit. When you release pressure on the cam levers the shoes should back off just enough so they aren’t dragging. Adjust the main pull cable or brake rod so that a comfortable amount of lever movement engages the brake, but leave enough free play so there is no drag of the shoes against the drums. The wheel should spin freely.
Maintaining Disc Brakes
The two most common tasks in taking care of disc brakes are pad replacement and changing the brake fluid. Brake fluid has a way of absorbing moisture from the air, which creates a couple of problems. One of these, as mentioned before, is that heavy braking can heat the caliper to such a high temperature that moisture in the lines boils and creates air bubbles. Unlike fluid, bubbles compress when pressure is applied at the lever, making the lever feel soft and spongy and diminishing the energy transferred to the brake pads. The other problem is that moisture in the fluid causes rust and corrosion in the metal parts of the hydraulic system. It’s not uncommon in damp, cold climates to pull a brake caliper apart and find a heavy silt of rust and water sitting on the bottom of the brake cylinder behind the piston. When this happens the cylinder wall is usually so pitted with rust that new seals won’t hold pressure, and a new caliper is needed.
Brake fluid with moisture in it generally takes on a hazy or brownish tinge, and should be cleaned out of the system by bleeding. Bleeding the brakes is merely the process of using the master cylinder to pump old fluid through a bleed screw in the caliper as new fluid is added. To do this you need a can of new brake fluid (use a freshly opened can, not something that’s been sitting around on the shelf half empty for two years), a small wrench to open and close the bleed screw, a small jar or bottle and about 24 in. of clear tubing that fits tightly over the end of the bleed screw.
Remove the cap and diaphragm from the master cylinder, attach one end of the clear tubing to the end of the bleed screw and put the other end in the bottle. Make a loop in the tube higher than the level of the bleed screw to prevent air from being drawn back into the caliper during bleeding. Making sure there’s plenty of fluid in the master reservoir, pull in on the brake lever until you feel pressure, then loosen the bleed screw and pull the lever all the way to the grip, forcing fluid out into the tube and bottle. Close the bleed screw, add more fluid to the reservoir, pump the brake lever slowly and evenly until you get pressure again, then open the bleed screw once more. Squeeze the lever, push out the fluid, close the bleed screw, add fluid and pump, etc. Repeat this operation as many times as it takes to push out all the old fluid and get a consistent flow of nice clean brake fluid, free of any air bubbles, coming out of the caliper.
If the fluid is really dirty before you start, it’s a good idea to suck the old brake fluid out of the reservoir with a squeeze bulb and fill it with new fluid right away, so you don’t waste a lot of new fluid by diluting it with the old dirty stuff. Incidentally, it’s an excellent idea to cover or remove your tank while working around an open master cylinder reservoir, as brake fluid makes the best paint remover this side of a blowtorch.
Brake bleeding should be done any time you suspect moisture contamination in the fluid, and on a regular maintenance basis (once a year is about right) to keep the system clean. It is also necessary any time a brake line or fitting has been loosened, allowing air to get into the lines.
Replacing brake pads is a pretty straightforward, easy procedure. Most brake pads are held in with retaining pins which, when removed, allow the pads to be extracted from the top of the caliper by hand or with a small pair of pliers. New pads should be examined carefully before installation. Any rough edges or burrs on the backing plates should be filed smooth and the leading and trailing edges of the friction material can be very slightly beveled with a hand file to prevent the new pads from squealing as they’re being broken in. The backs of the pads should be smeared with a thin coat of the same hightemp lubricant you would use on drum brake parts, or sprayed with a small amount of commercial anti-squeal lubricant. Brake calipers often have steel antivibration shims between the backing plates and caliper pistons, and these should be coated with the same lubricant. Take care in handling the pads not to get any of the grease on the friction material.
When new, fatter pads are installed the reservoir cap should be removed before the pistons are pushed back to make room for the new pads. As each piston is pushed back, brake fluid will be forced back up into the reservoir. If the reservoir is already full it may overflow and drip brake fluid onto the bike, so it’s a good idea to suction a little out before you start. Also, on dual piston calipers it’s best to replace only one pad at a time, leaving the other in place. That way you can push in on the 3iston to make room for the new pad without forcing the other piston out of its cylinder.
Push the pistons in with your fingers of; if necessary, with the tip of a large, flatbladed screwdriver, and install the new pads. The pistons shouldn’t be forced iij abruptly or they may cause a small geyser of brake fluid to shoot out of the open reservoir and land on your nice formerlyshiny tank. When the pads are in placa, slide in the retaining pins and pump the brake lever to move the pads into working position. This last step is important. It’s amazing how often people install new pads! and take off for a ride without first pumping up the brakes. The error of your ways doesn’t strike home until you go gliding through a red light with your hair standing on end, the brake lever clamped all the way to the bars.
Single piston brake calipers push on only one brake pad and rely on the sliding action of the caliper in its bracket to equalize the pressure on the other pad. If the brakes are sticky or one pad is wearing faster than the other it usually means the sliding surface on the caliper needs to be cleaned and lubricated. This is a simple matter of pulling the caliper out of the bracket, cleaning the surfaces off with light emery paper and spreading on a thin coat of high-temp grease.
Brake rotors should be checked for scoring, grooves and runout. A badly warped or distorted disc will run through the pads in a wave motion, pushing them away from the swept surface so when thebrakes are applied there’s too much lever travel, or the brakes have to be pumped up. Scored or slightly warped rotors can sometimes be machined smooth again, but a new one is usually in order if the distortion or damage is severe.
Leaking or sticky pistons in the master cylinder or calipers usually require disassembly, cleaning and new seals. If corrosion or grit has damaged the cylinder walls they can be refinished with a small brake hone before new seals are installed. If pitting or grooving of the cylinder walls is heavy, honing and new seals won’t help and all new master and caliper bodies are needed. Rebuilding brake hydraulics could almost be the subject of another entire article and is not a normal part oÇ brake maintenance. Fortunately, the hydraulic systems on modern street bikes have excellent reliability and will last for years without leaking or wearing out if the fluid is changed occasionally, the brakes are used now and then, and the bike is protected from sitting for long periods in really inclement weather or corrosive salt air.
Brakes like to be used. Sitting and waiting makes them stiff and unreliable. And despite their relatively trouble-free nature, they also like a little maintenance. With a little care and attention your bike can be made to stop faster than a speeding Bugatti.