It's What's Up Front...
IT'S WHAT'S UP FRONT...
RX for the Run-Down Fork
Peter Egan
Fork oil, like fine wine, tends to develop a lot of character with age. It begins as an undistinguished red or amber fluid and with the passing of years matures into an interesting mixture of rainwater, powdered chrome, metallic oxides and road grime, with trace elements of mineral oil. This wonderful balance and complexity is lost, of course, on the inner works of motorcycle forks, which prefer
clarity and freshness over all other virtues.
Most maintenance manuals call for changing the stuff every 5-6000 mi., though a few manufacturers who are no doubt wary of litigation (Local Man Killed Changing Fork Oil) say nothing about it. So unless forks leak, make odd noises, or suddenly cast the rider onto the ground, most people forget about them entirely. If it works
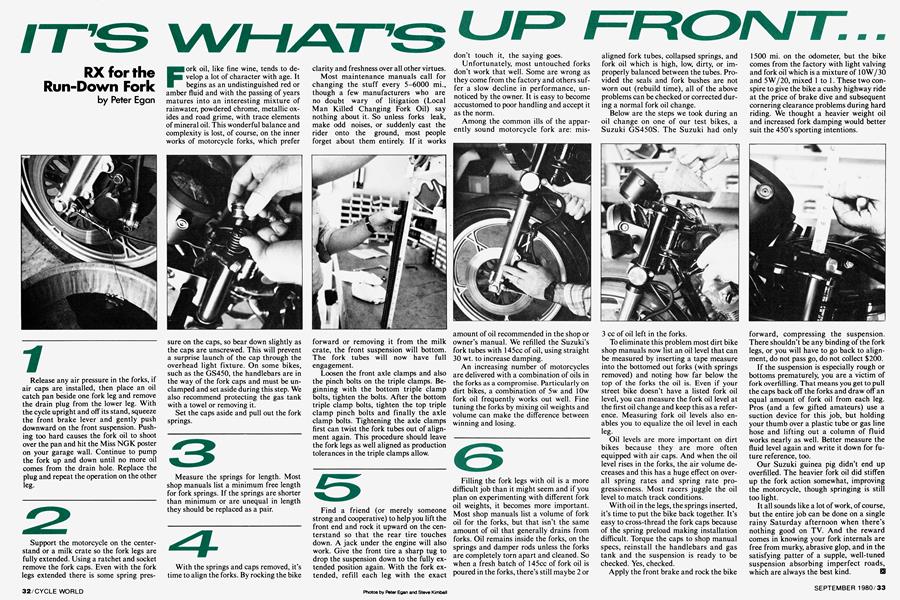
1
Release any air pressure in the forks, if air caps are installed, then place an oil catch pan beside one fork leg and remove the drain plug from the lower leg. With the cycle upright and off its stand, squeeze the front brake lever and gently push downward on the front suspension. Push ing too hard causes the fork oil to shoot over the pan and hit the Miss NGK poster on your garage wall. Continue to pump the fork up and down until no more oil comes from the drain hole. Replace the plug and repeat the operation on the other leg.
2
Support the motorcycle on the center stand or a milk crate so the fork legs are fully extended. Using a ratchet and socket remove the fork caps. Even with the fork legs extended there is some spring pres
sure on the caps, so bear down slightly as the caps are unscrewed. This will prevent a surprise launch of the cap through the overhead light fixture. On some bikes, such as the GS450, the handlebars are in the way of the fork caps and must be undamped and set aside during this step. We also recommend protecting the gas tank with a towel or removing it.
Set the caps aside and pull out the fork springs.
3
Measure the springs for length. Most shop manuals list a minimum free length for fork springs. If the springs are shorter than minimum or are unequal in length they should be replaced as a pair.
4
With the springs and caps removed, it's time to align the forks. By rocking the bike
forward or removing it from the milk crate, the front suspension will bottom. The fork tubes will now have full engagement.
Loosen the front axle clamps and also the pinch bolts on the triple clamps. Beginning with the bottom triple clamp bolts, tighten the bolts. After the bottom triple clamp bolts, tighten the top triple clamp pinch bolts and finally the axle clamp bolts. Tightening the axle clamps first can twist the fork tubes out of alignment again. This procedure should leave the fork legs as well aligned as production tolerances in the triple clamps allow.
5
Find a friend (or merely someone strong and cooperative) to help you lift the front end and rock it upward on the centerstand so that the rear tire touches down. A jack under the engine will also work. Give the front tire a sharp tug to drop the suspension down to the fully extended position again. With the fork extended, refill each leg with the exact don't touch it, the saying goes.
Unfortunately, most untouched forks don't work that well. Some are wrong as they come from the factory and others suf fer a slow decline in performance, un noticed by the owner. It is easy to become accustomed to poor handling and accept it as the norm.
Among the common ills of the appar ently sound motorcycle fork are: mis-
amount of oil recommended in the shop or owner's manual. We refilled the Suzuki's fork tubes with 145cc of oil, using straight 30 wt. to increase damping.
An increasing number of motorcycles are delivered with a combination of oils in the forks as a compromise. Particularly on dirt bikes, a combination of 5w and lOw fork oil frequently works out well. Fine tuning the forks by mixing oil weights and volume can make the difference between winning and losing.
6
Filling the fork legs with oil is a more difficult job than it might seem and if you plan on experimenting with different fork oil weights, it becomes more important. Most shop manuals list a volume of fork oil for the forks, but that isn't the same amount of oil that generally drains from forks. Oil remains inside the forks, on the springs and damper rods unless the forks are completely torn apart and cleaned. So when a fresh batch of 145cc of fork oil is poured in the forks, there's still maybe 2 or
aligned fork tubes, collapsed springs, and fork oil which is high, low, dirty, or im properly balanced between the tubes. Pro vided the seals and fork bushes are not worn out (rebuild time), all of the above problems can be checked or corrected dur ing a normal fork oil change.
Below are the steps we took during an oil change on one of our test bikes, a Suzuki GS45OS. The Suzuki had only
3 cc of oil left in the forks.
To eliminate this problem most dirt bike shop manuals now list an oil level that can be measured by inserting a tape measure into the bottomed out forks (with springs removed) and noting how far below the top of the forks the oil is. Even if your street bike doesn't have a listed fork oil level, you can measure the fork oil level at the first oil change and keep this as a refer ence. Measuring fork oil levels also en ables you to equalize the oil level in each leg.
Oil levels are more important on dirt bikes because they are more often equipped with air caps. And when the oil level rises in the forks, the air volume de creases and this has a huge effect on over all spring rates and spring rate pro gressiveness. Most racers juggle the oil level to match track conditions.
With oil in the legs, the springs inserted, it's time to put the bike back together. It's easy to cross-thread the fork caps because of the spring preload making installation difficult. Torque the caps to shop manual specs, reinstall the handlebars and gas tank and the suspension is ready to be checked. Yes, checked.
Apply the front brake and rock the bike
1500 mi. on the odometer, but the bike comes from the factory with light valving and fork oil which is a mixture of 1OW/30 and 5W/20, mixed 1 to 1. These two con spire to give the bike a cushy highway ride at the price of brake dive and subsequent cornering clearance problems during hard riding. We thought a heavier weight oil and increased fork damping would better suit the 450's sporting intentions.
forward, compressing the suspension. There shouldn't be any binding of the fork legs, or you will have to go back to align ment, do not pass go, do not collect $200.
If the suspension is especially rough or bottoms prematurely, you are a victim of fork overfihling. That means you get to pull the caps back off the forks and draw off an equal amount of fork oil from each leg. Pros (and a few gifted amateurs) use a suction device for this job, but holding your thumb over a plastic tube or gas line hose and lifting out a column of fluid works nearly as well. Better measure the fluid level again and write it down for fu ture reference, too.
Our Suzuki guinea pig didn't end up overfihled. The heavier fork oil did stiffen up the fork action somewhat, improving the motorcycle, though springing is still too light.
It all sounds like a lot of work, 01 course, but the entire job can be done on a single rainy Saturday afternoon when there's nothing good on TV. And the reward comes in knowing your fork internals are free from murky, abrasive glop, and in the satisfying patter of a supple, well-tuned suspension absorbing imperfect roads, which are always the best kind.