Trials Notebook
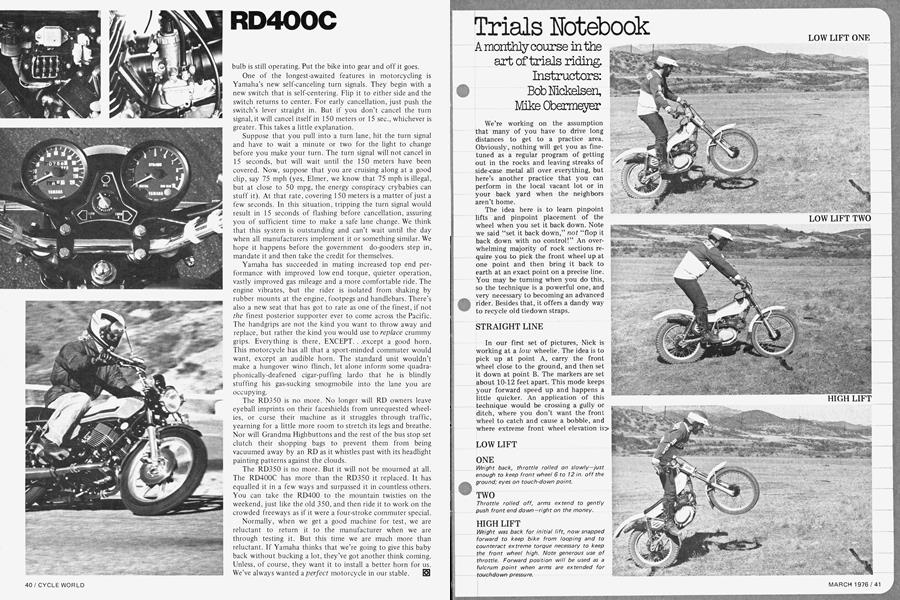
Trials Notebook
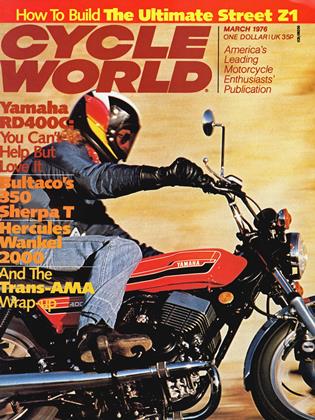
FEATURES
A monthly course in the art of trials riding.
Bob Nickelsen,
Mike Obermeyer
We're working on the assumption that many of you have to drive long distances to get to a practice area. Obviously, nothing will get you as fine-tuned as a regular program of getting out in the rocks and leaving streaks of side-case metal all over everything, but here's another practice that you can perform in the local vacant lot or in your back yard when the neighbors aren't home.
The idea here is to learn pinpoint lifts and pinpoint placement of the wheel when you set it back down. Note we said "set it back down," not "flop it back down with no control!" An over whelming majority of rock sections re quire you to pick the front wheel up at one point and then bring it back to earth at an exact point on a precise line. You may be turning when you do this, so the technique is a powerful one, and very necessary to becoming an advanced rider. Besides that, it offers a dandy way to recycle old tiedown straps.
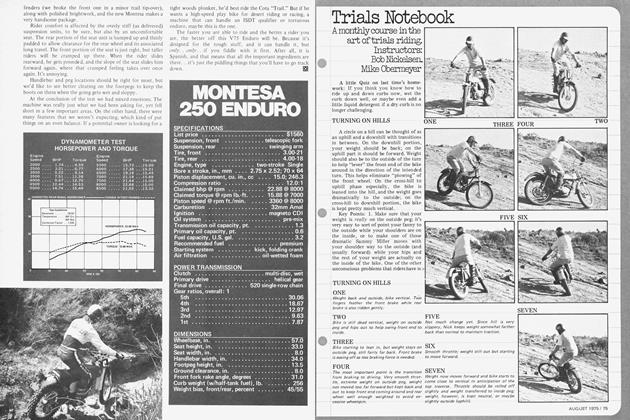
STRAIGHT LINE
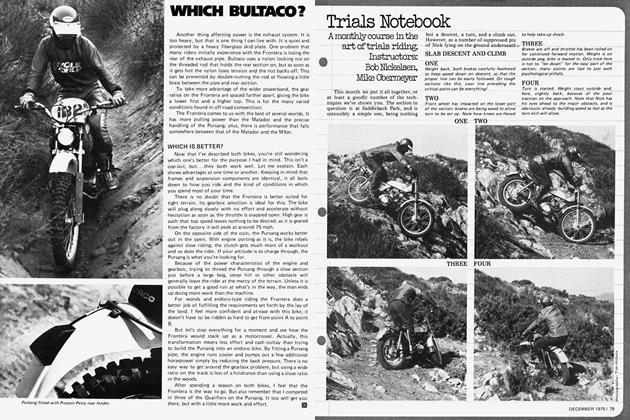
In our first set of pictures, Nick is working at a low wheelie. The idea is to pick up at point A, carry the front wheel close to the ground, and then set it down at point B. The markers are set about 10-12 feet apart. This mode keeps your forward speed up and happens a little quicker. An application of this technique would be crossing a gully or ditch, where you don't want the front wheel to catch and cause a bobble, and where extreme front wheel elevation is> unnecessary and unwanted.
(Continued on page 72)
Continued from page 42
The last shot in this sequence shows a high wheelie between the same markers. This is good practice for the sort of section where you have to go over a large log or rock and then hit a precise spot on the other side to avoid obstacles which would kick you off-line. Obviously this kind of practice does not give you any help on unweighting and throttle shut-off to help get the rear wheel
over such a hazard, but will help you learn pin-point front wheel placement. Key Points: 1. Again, practice with markers at different distances. 2. Front wheel is turned to initiate the turn (remember our slant log crossing lesson?). Weight back and outside to lighten the front wheel and lever the bike around. 4. Bike leaned in at start of turn and until you need to go straight; then the bike must be brought back to the vertical. 5. Know where you're going after touchdown; remember that
you’re learning this technique for application in sections, and may have to change direction or make another lift very quickly. 6. Practice both low and high lifts.
After you’ve learned these, then you can learn to ride in a circular wheelie like Nick is doing in the last shot; this will be a feature of future Honda exhibitions and schools. You too can be king of the parking lot!
TECH TIPS
Take a look at Nick’s new folding brake lever on the RTL300. The pivot, spring and stub pieces were borrowed from an accessory shift lever recently marketed for enduro applications. The major benefit is that the brake pedal
may now be made large enough so that it’s easy to find, but will fold if it connects with a rock. This keeps the pedal functional through an event, and also prevents impact from being transmitted to the transmission shifter shaft. Trick!
The second shot depicts another innovation: off-the-shelf higher footpegs. Nick discovered that pegs from the new Honda MR250 will bolt right onto the TL250 and the factory RTL300. Some minor grinding is necessary on the righthand peg to avoid interference with the brake pedal. Other bikes undoubtedly can be found to make the same sort of interchange, and a cooperative parts man at your local dealer should be able to help. Don’t hound him on Saturday afternoon, though, if you want to keep a friend! Advantages of this setup are more leverage, and an easier ride at your local event—most sections are set on bikes with standard pegs, so if the trialsmaster just barely cleared the rocks, you’ll have an extra inch.
If you’ve been following this series and are still riding the same bike, it’s probably time to replace your needle and needle jet; I’ll bet they’re worn! E