Trials Notebook
Trials Notebook
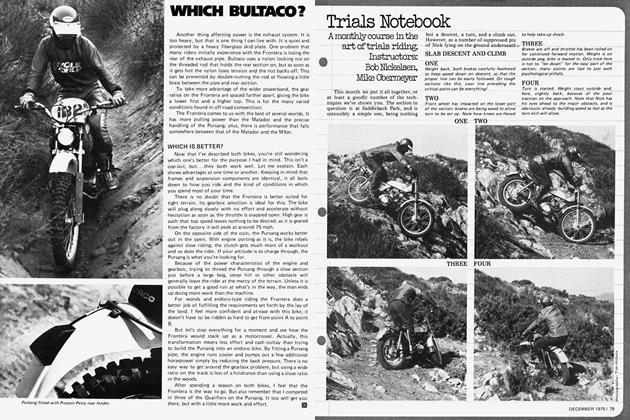
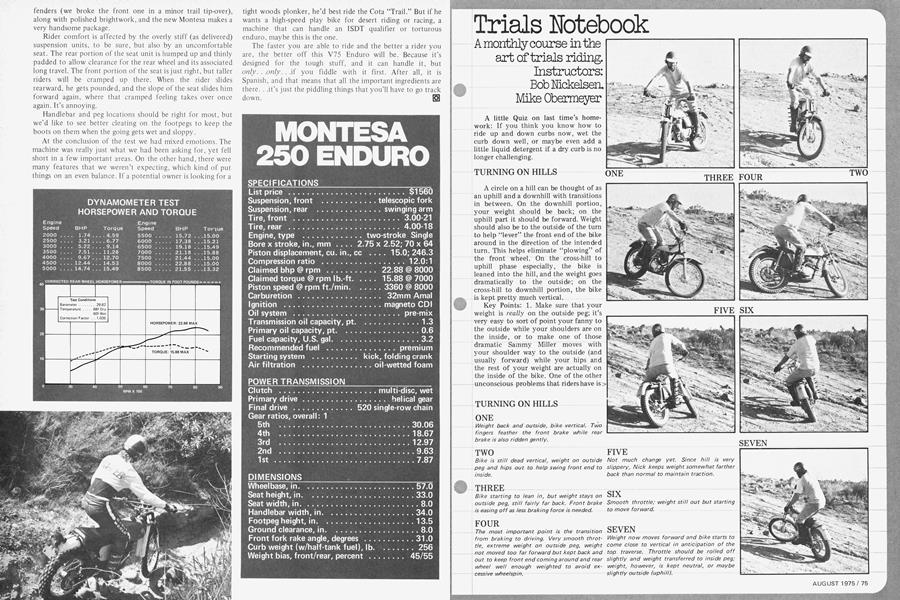
A monthly course in the art of trials riding. Instructors: Bob Nickelsen. Mike Obermeyer
A little Quiz on last time’s homework: If you think you know how to ride up and down curbs now, wet the curb down well, or maybe even add a little liquid detergent if a dry curb is no longer challenging.
TURNING ON HILLS
A circle on a hill can be thought of as an uphill and a downhill with transitions in between. On the downhill portion, your weight should be back; on the uphill part it should be forward. Weight should also be to the outside of the turn to help “lever” the front end of the bike around in the direction of the intended turn. This helps eliminate “plowing” of the front wheel. On the cross-hill to uphill phase especially, the bike is leaned into the hill, and the weight goes dramatically to the outside; on the cross-hill to downhill portion, the bike
is kept pretty much vertical.
Key Points: 1. Make sure that your weight is really on the outside peg; it’s very easy to sort of point your fanny to the outside while your shoulders are on the inside, or to make one of those dramatic Sammy Miller moves with your shoulder way to the outside (and usually forward) while your hips and the rest of your weight are actually on the inside of the bike. One of the other unconscious problems that riders have is: to do all the right things about weight shift, but to keep their weight on the inboard leg. This is a hard one to spot, but is more commonly done by riders who ride with their legs clamping the tank, than by those who have copied the Mick Andrews “knees apart” style. If you have any doubts or problems in this area, you can help correct this by consciously lifting your inside leg until your inside foot is an inch or so off the peg, or just resting there very lightly. It’s astounding what loose, slippery uphill turns you can clean by using exaggerated versions of this technique.
TURNING ON HILLS
ONE
THREE
FOUR
FIVE
SIX
SEVEN
2. On the uphill portion, experiment with moving your weight forward by varying amounts, and at various rates. Note how, especially on loose or sandy climbs, a rapid and/or pronounced forward shift of weight makes the bike “come ‘round” the turn, whereas if you keep your weight too far back, it’s almost impossible to make it turn.
3. Smooth throttle is very important, especially on the cross-hill to uphill transition; too much throttle or too “blippy” a throttle can cause the rear wheel to spin out, forcing you to put a foot down, and frequently disturbing your weight distribution between front and back wheels in the process.
4. You must, both in line-picking and in riding the section, know where your wheels are going to go, and avoid irregularities that are going to pitch you off-line.
5. Tire pressures should not be too high for this kind of riding; high tire pressure keeps the tire from conforming to the ground surface and makes it easy to spin out.
Figure eights are the best practicemany riders get to be great at turning clockwise, but never get very good at counterclockwise turns. Figure eight practice helps to avoid this syndrome. Lay them out across the camber, or in a vertical format. Perhaps the best is a diagonal layout, so that one leg is directly across the hill while the other is straight up and down. Vary the type of ground you practice on, and especially avoid tacky moist loam with lots of traction and a “groove” that breaks in after a few rides—this makes it too easy!
UNWEIGHTING
Take a look at the picture labeled ROCK JUMPING THE WRONG WAY: this is the incorrect way to hit a step. Note that the rear tire is compressed, the suspension is partially compressed, and the frame is going to hit the upper lip of the rock. Now, for contrast, look at the fourth picture in the next sequence. Nick has levitated the bike by catapulting his weight up and forward, hooking his boot heels under the frame rails, pulling upward with his legs, and performing a huge arm and shoulder lift. This looks improbable, if not impossible, but it isn’t. The better riders can do this almost unconsciously. Why do it at all? Try the following reasons:
1. It can help get you over things you might otherwise not get over at all.
2. It can make up for a lack of speed; speed is frequently used to help hurl the bike up over a ledge; radical unweighting lets the rear wheel crawl up and over and makes such speed unnecessary.
UNWEIGHTING, FLAT GROUND
ONE
TWO
3. Lower speed usually means better control in the section: slower, more controlled approaches, and less of a tendency to overshoot if there’s a circus turn just following the step or log.
PRACTICE
This technique can be practiced by starting with a small log or rock. A squeaker toy or an aluminum beer can work well too; this way you can tell if you’re getting the rear wheel up. There are several variations of the technique: perhaps the most basic and straightforward is “jumping off the pegs.” In this method you simply load the shocks and then use them as a take-off point to jump forward and up just as the rear wheel hits the rock or log. This takes the weight off the pegs and the bike for an instant, and lets it go over things more easily. A really athletic rider using this technique can actually throw himself six inches off the pegs.
The next variation builds stomach muscles like iron. After the body goes up and forward, the boot heels grip the underside of the frame and attempt to pull the bike smartly up toward the rider’s fundament. Note the fourth sequence shot again—Nick’s left foot is a good two inches off the peg, and you can see the way his heel grips the under side of the frame down tube, hauling it up underneath him. This accounts for the peculiar squatted-appearing position. The last step is the arm lift. Even though the arms have been previously used to press the bars down and initiate the return of the front wheel to the ground, at a slightly later stage they may be used to oppose this forward rotation and keep the whole bike in the air as Nick is doing.
Key points in this technique are timing and physical condition. You can wear yourself to a frazzle in a short time doing this, and it may be quite frustrating. In the early stages of practice it may help to have a friend watch and tell you where your timing is off. Once you get to the point where you can pick the rear wheel up an inch or two, then it’s only a matter of practicing to improve your technique and your strength. Do this on every rock or log until it becomes second nature; it should be your regular technique, not something that you bring out only for emergencies, because the timing and strength required are both too critical. If you don’t pick this one up right away, keep after it—it’s probably the most important thing we’ve shown you yet! (§J
ROCK JUMPING, WRONG WAY
ROCK JUMPING, RIGHT WAY
ONE
TWO
THREE
FOUR
FIVE