Directional Signals
DIRECTIONAL SIGNALS
WILLIAM MARON
DIRECTIONAL signal lights usually are found on motorcycles ridden by police and highway patrol officers. The majority of riders rely on hand signals to alert following and oncoming traffic of the intention to turn. However, when the rider puts his hand back on the grip, just prior to making the turn, the car driver thinks the bike rider has changed his mind. This may cause confusion and lead to a dangerous situation.
The obvious solution is turn signal lights. The lights must be large enough and bright enough to be seen in broad daylight. Also, the lights should be spaced far enough apart so other drivers know which way the bike is going to turn.
ICC-approved 4-in. truck type lamps are made by Grote, Signal-Stat, Yankee and others. These are available in singleor double-face. The double-face housing is used in front, with the amber lens facing forward and the red lens toward the rear. The singleface housing, with a dual-filament bulb, is put in the rear. Using a dual-filament bulb in the rear housing makes it possible to have three taillights-the one already on the bike, plus the two in the directional lights.
The lights can be mounted on front and rear brackets made of 0.25by 1-in. aluminum stock. Many hardware stores carry this stock in 8-ft. lengths and 8 ft. is somewhat more than enough to fabricate a pair of brackets.
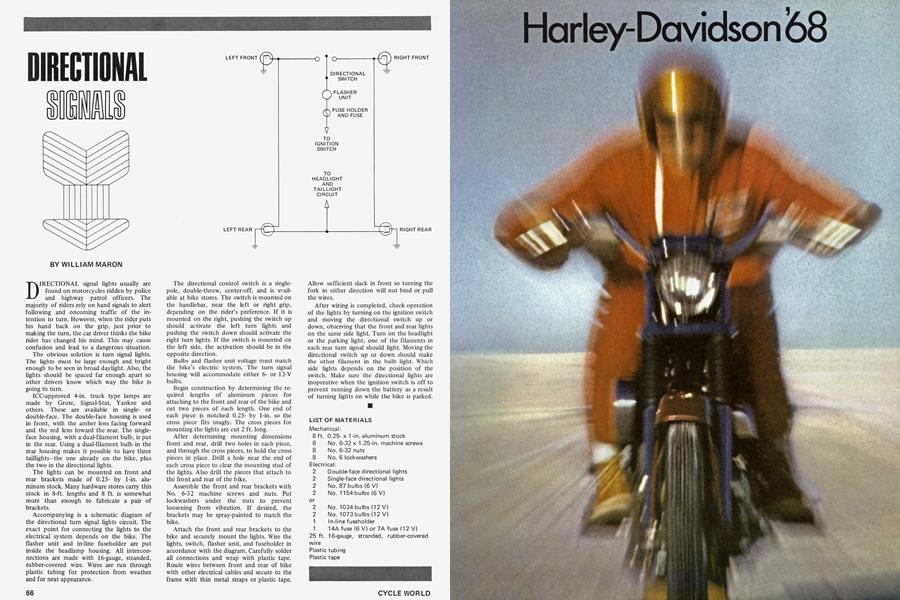
Accompanying is a schematic diagram of the directional turn signal lights circuit. The exact point for connecting the lights to the electrical system depends on the bike. The flasher unit and in-line fuseholder are put inside the headlamp housing. All interconnections are made with 16-gauge, stranded, rubber-covered wire. Wires are run through plastic tubing for protection from weather and for neat appearance.
The directional control switch is a singlepole, double-throw, center-off, and is available at bike stores. The switch is mounted on the handlebar, near the left or right grip, depending on the rider’s preference. If it is mounted on the right, pushing the switch up should activate the left turn lights and pushing the switch down should activate the right turn lights. If the switch is mounted on the left side, the activation should be in the opposite direction.
Bulbs and flasher unit voltage must match the bike’s electric system. The turn signal housing will accommodate either 6or 12-V bulbs.
Begin construction by determining the required lengths of aluminum pieces for attaching to the front and rear of the bike and cut two pieces of each length. One end of each piece is notched 0.25by 1-in. so the cross piece fits snugly. The cross pieces for mounting the lights are cut 2 ft. long.
After determining mounting dimensions front and rear, drill two holes in each piece, and through the cross pieces, to hold the cross pieces in place. Drill a hole near the end of each cross piece to clear the mounting stud of the lights. Also drill the pieces that attach to the front and rear of the bike.
Assemble the front and rear brackets with No. 6-32 machine screws and nuts. Put lockwashers under the nuts to prevent loosening from vibration. If desired, the brackets may be spray-painted to match the bike.
Attach the front and rear brackets to the bike and securely mount the lights. Wire the lights, switch, flasher unit, and fuseholder in accordance with the diagram. Carefully solder all connections and wrap with plastic tape. Route wires between front and rear of bike with other electrical cables and secure to the frame with thin metal straps or plastic tape. Allow sufficient slack in front so turning the fork in either direction will not bind or pull the wires.
After wiring is completed, check operation of the lights by turning on the ignition switch and moving the directional switch up or down, observing that the front and rear lights on the same side light. Turn on the headlight or the parking light; one of the filaments in each rear turn signal should light. Moving the directional switch up or down should make the other filament in the bulb light. Which side lights depends on the position of the switch. Make sure the directional lights are inoperative when the ignition switch is off to prevent running down the battery as a result of turning lights on while the bike is parked.